Choose a Deposit Method
Confirm acceptance before depositingBaroPay - KRW PaymentsApply on NOVA → Purchase and transfer → Check automatic crediting
Up to KRW 3,000,000 per transactionMetaMask - Existing USDT HoldersPrepare TRON assets and fees → Apply on NOVA → TransferBuy through Upbit or BithumbKorean exchange → Binance → NOVABinance - Existing USDT HoldersApply on NOVA → Withdraw via TRC20 → Mark Transfer Complete
① A mobile phone registered in your name ② identification document(resident registration card or driving licence) ③ a bank account in your own name(for receiving withdrawals)
④ For Upbit or Bithumb, you also need an account with K Bank for Upbit, or KB Kookmin Bank for Bithumb, and a Binance account.
Screen text has been localized into English for this guide. Translated images are instructional illustrations, not transaction records. Live app layouts and menu names may differ. Always verify the network, full receiving address, amount and status in your own account; use your live account details for every transfer.
Register with NOVA FINANCE
Complete your account details, ID and withdrawal bank account in one form. It takes about 5 minutes; you can log in without email verification, and ID approval is processed on the same business day. If you already have an account, go directly to ② Deposit Application.
1-1
Open the Registration Pagewww.crmnova-fin.co - English-localized example
▾
Open www.crmnova-fin.co in your mobile browser to see the login page. At the bottom, select [Sign Up]. If you use a registration link provided by your representative, the application form opens directly.
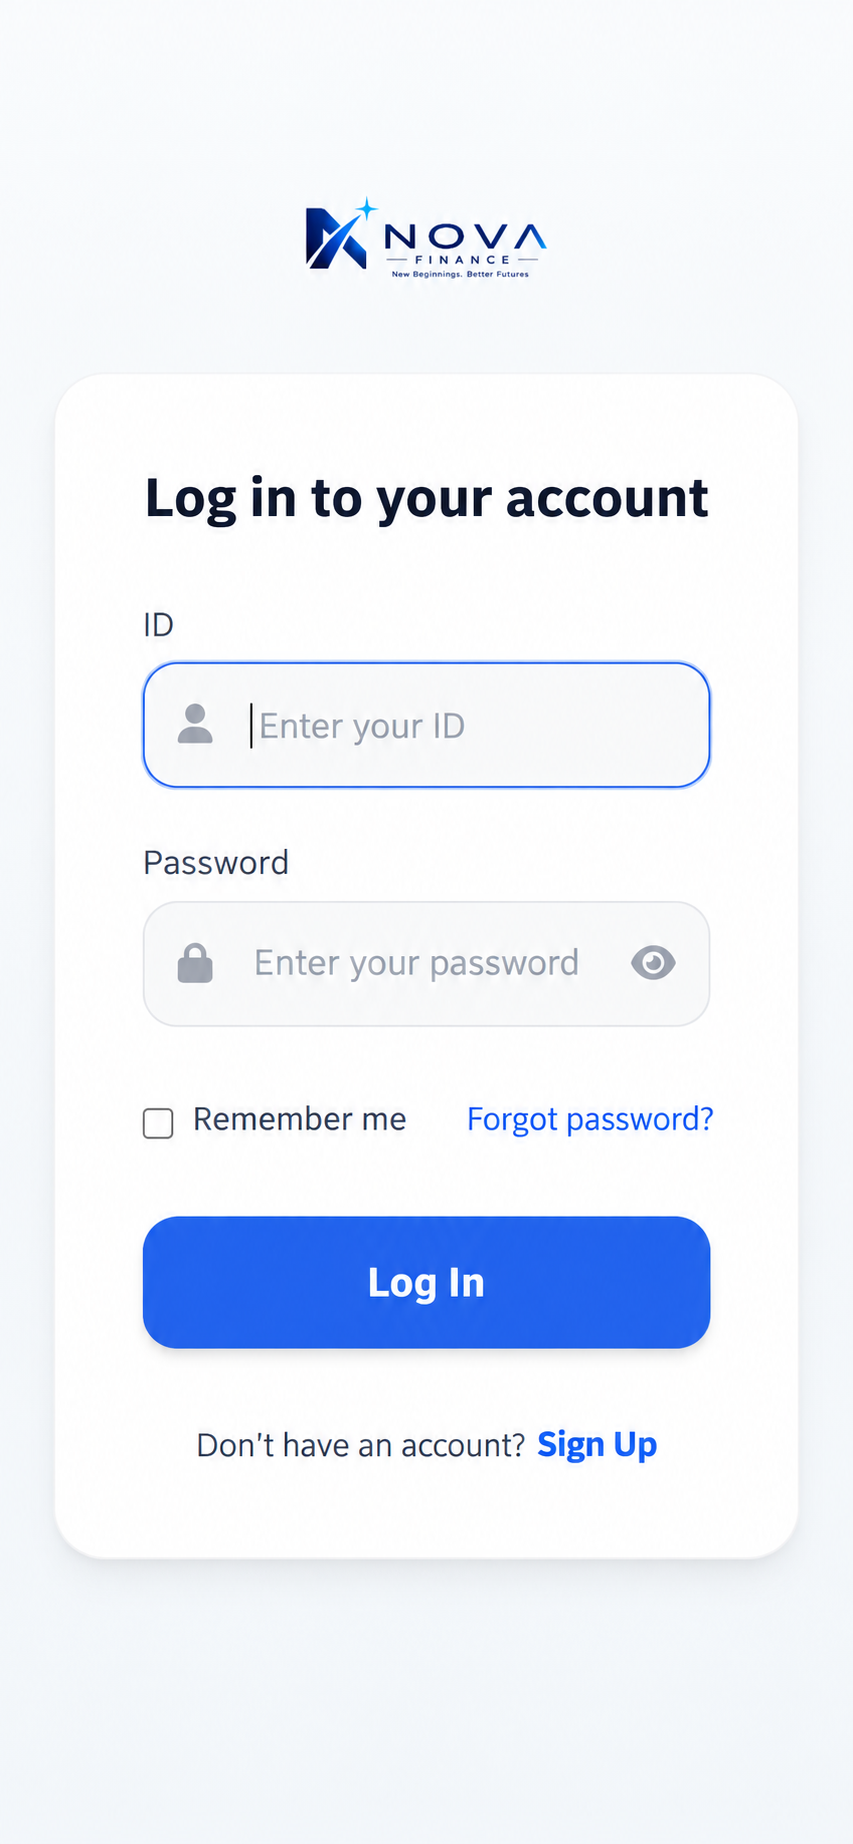
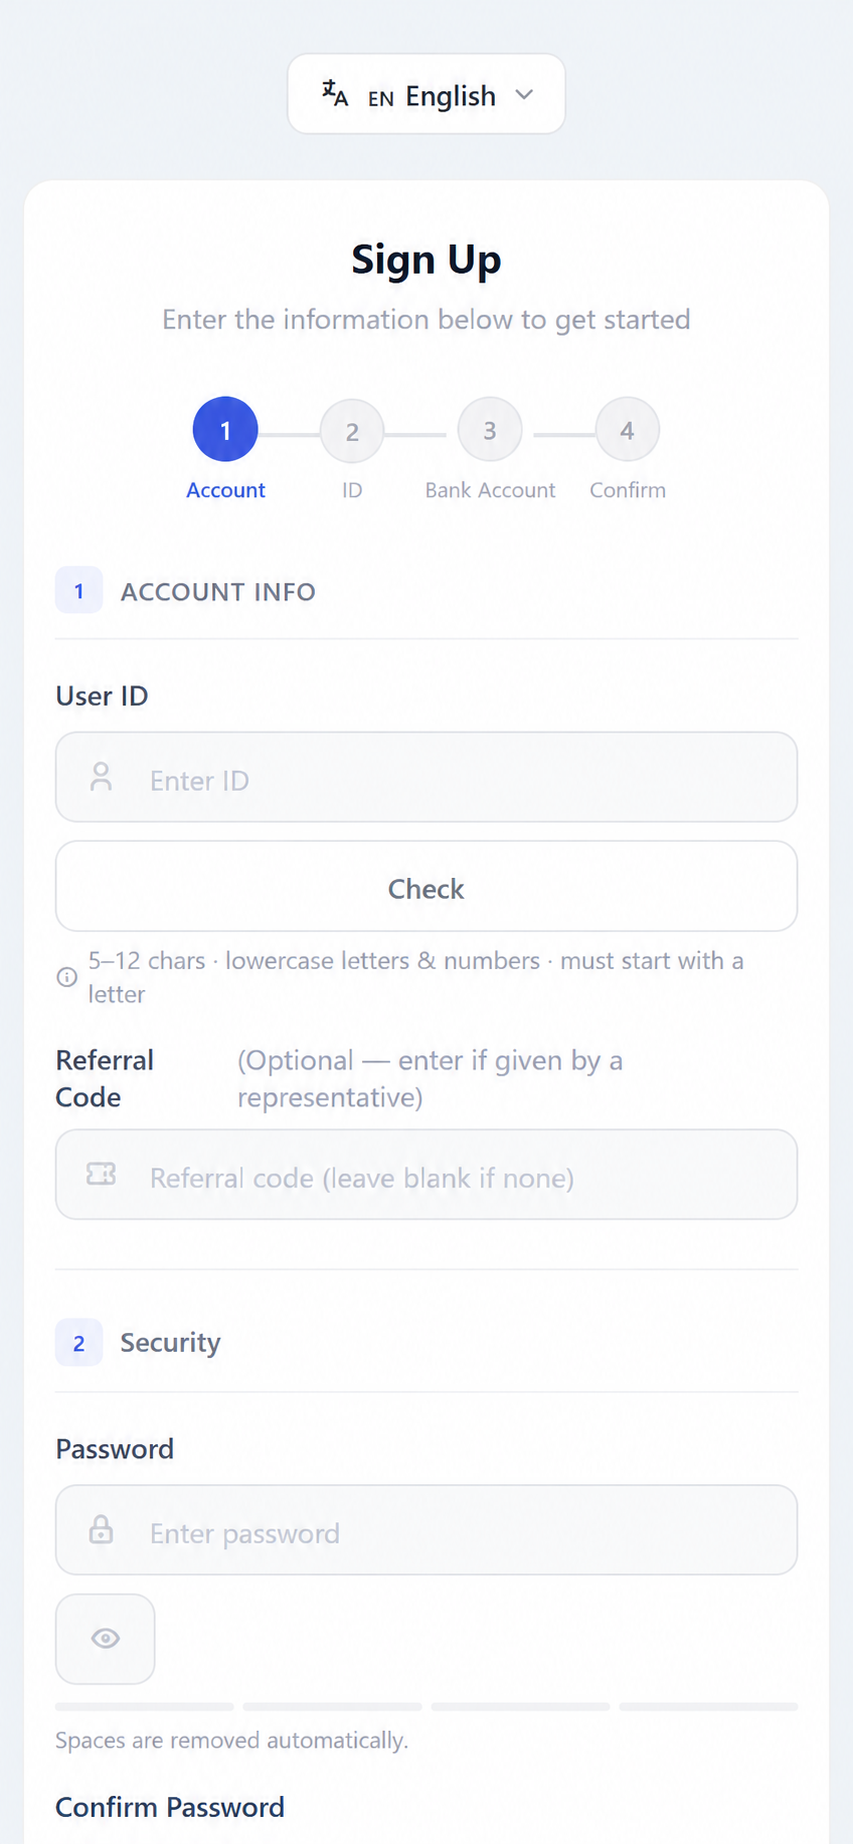
Follow Account → ID → Bank Account → Verify, completing the page from top to bottom. The language button at the top switches the instructions to Korean when Korean is selected; some field names remain in English.
1-2
Complete the ApplicationUsername - Password - Contact Details - ID - Withdrawal Bank Account
▾
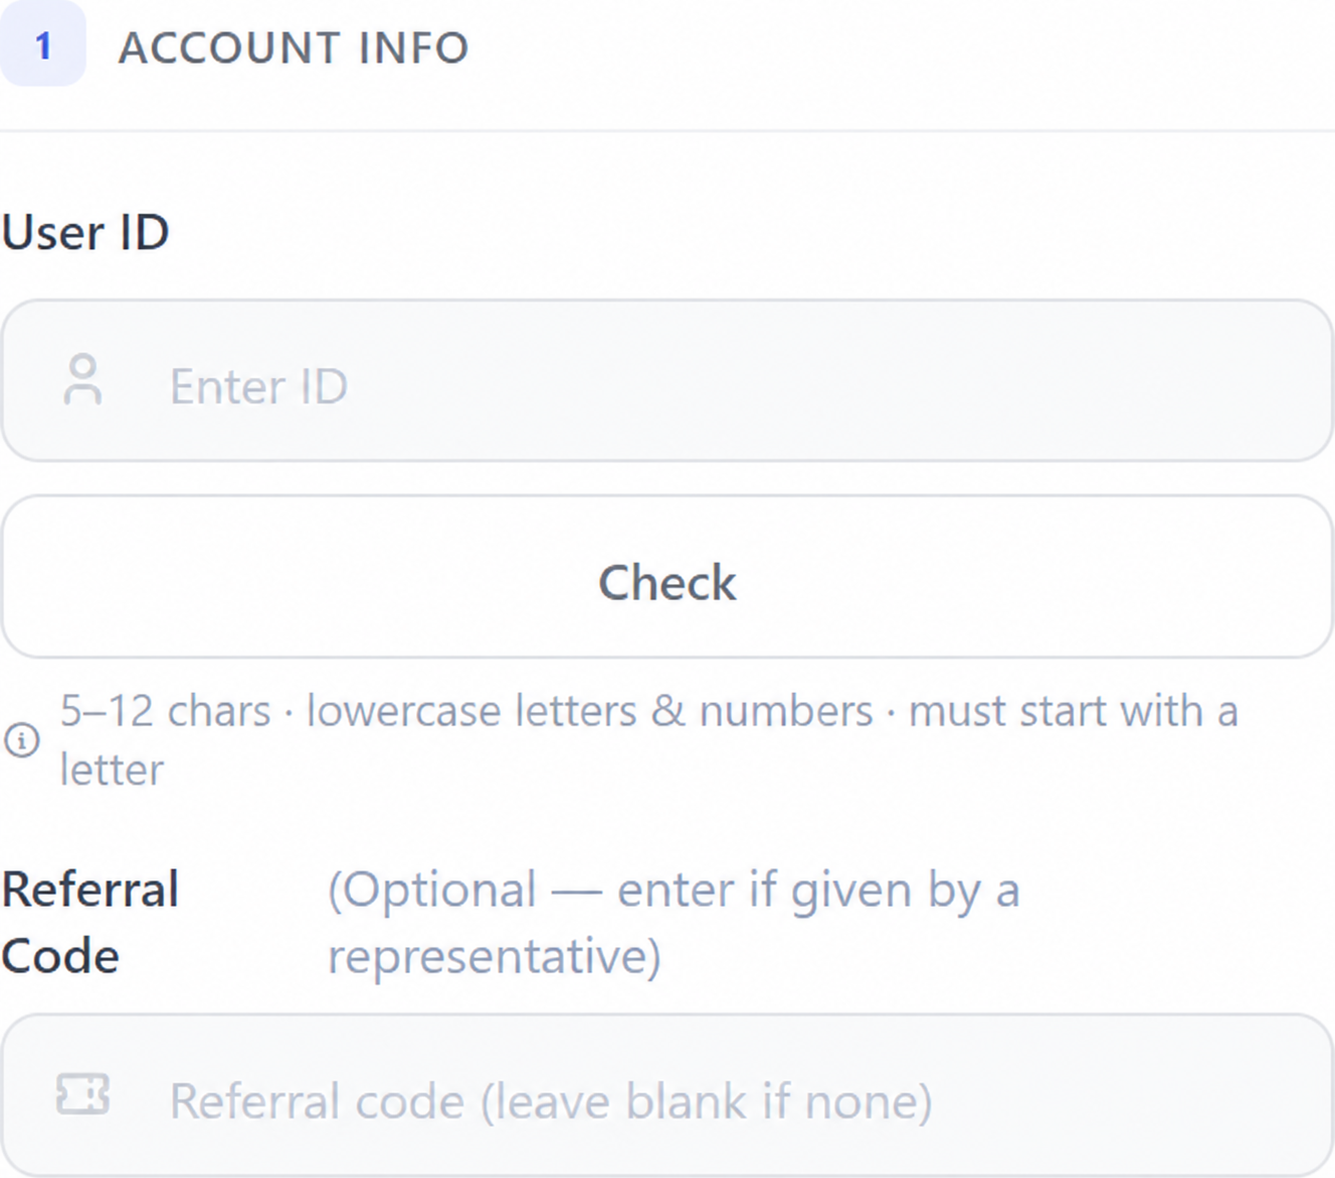
Username: 5-12 characters, using lowercase English letters and numbers only; the first character must be a letter. After entering it, select [Check] to check availability.
Referral Code is optional. Enter it only if your representative provided one; otherwise leave it blank.
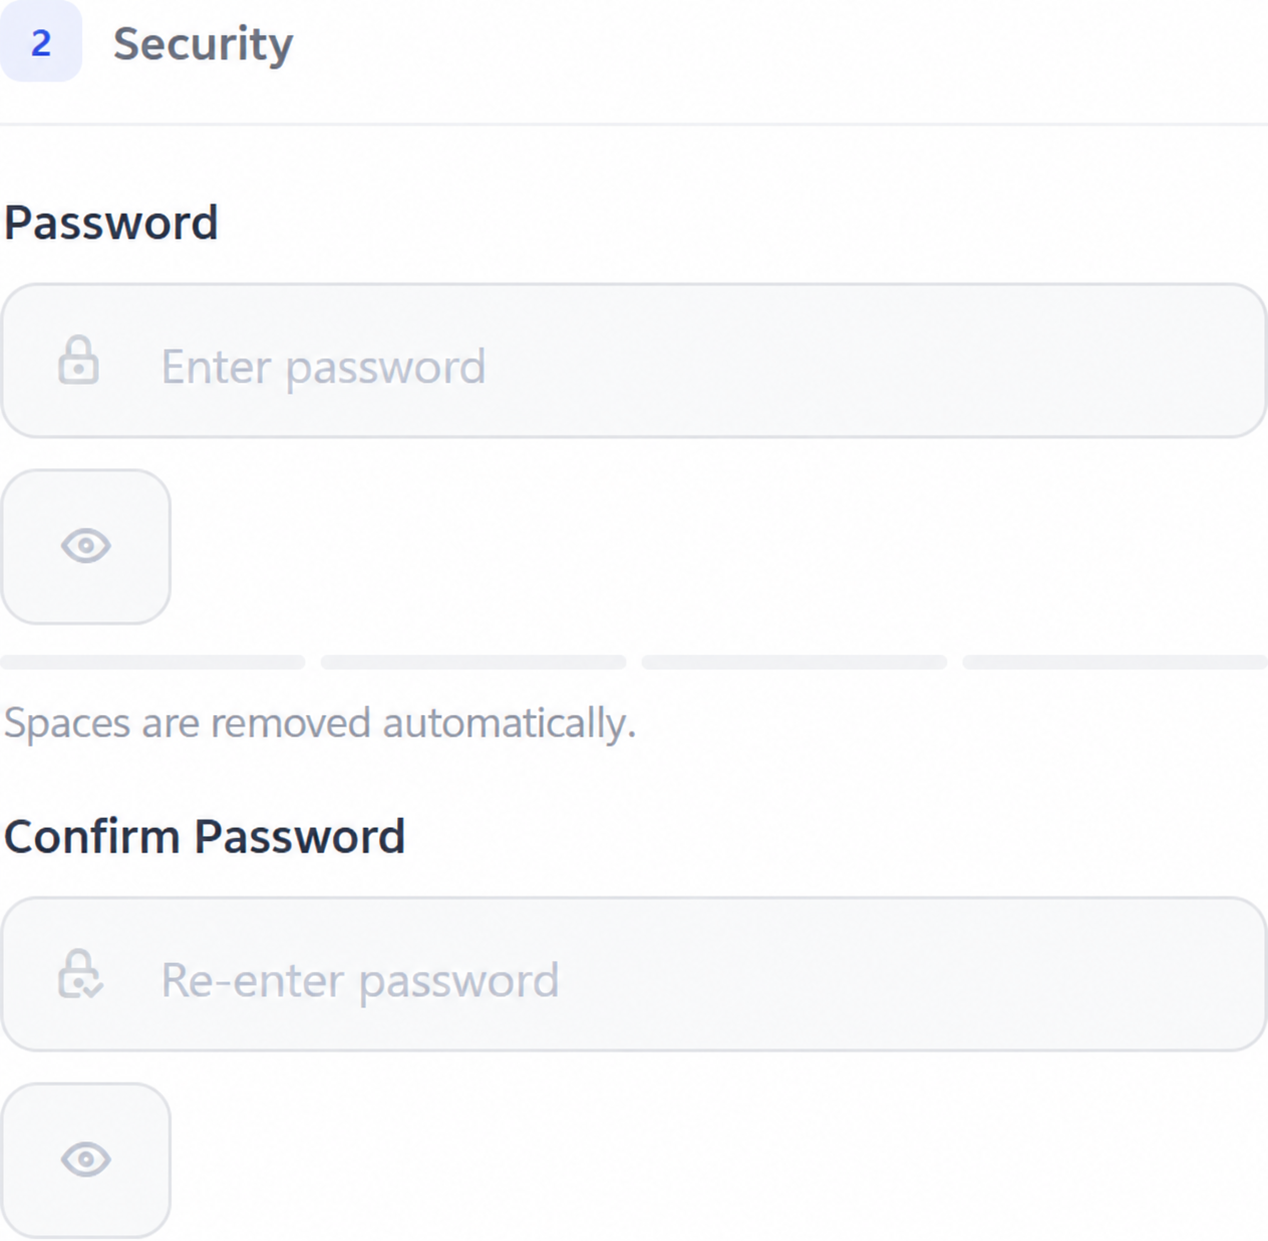
Password and Confirm Password must contain the same value. Leading and trailing spaces are removed automatically. Select the eye icon to display the entered text.
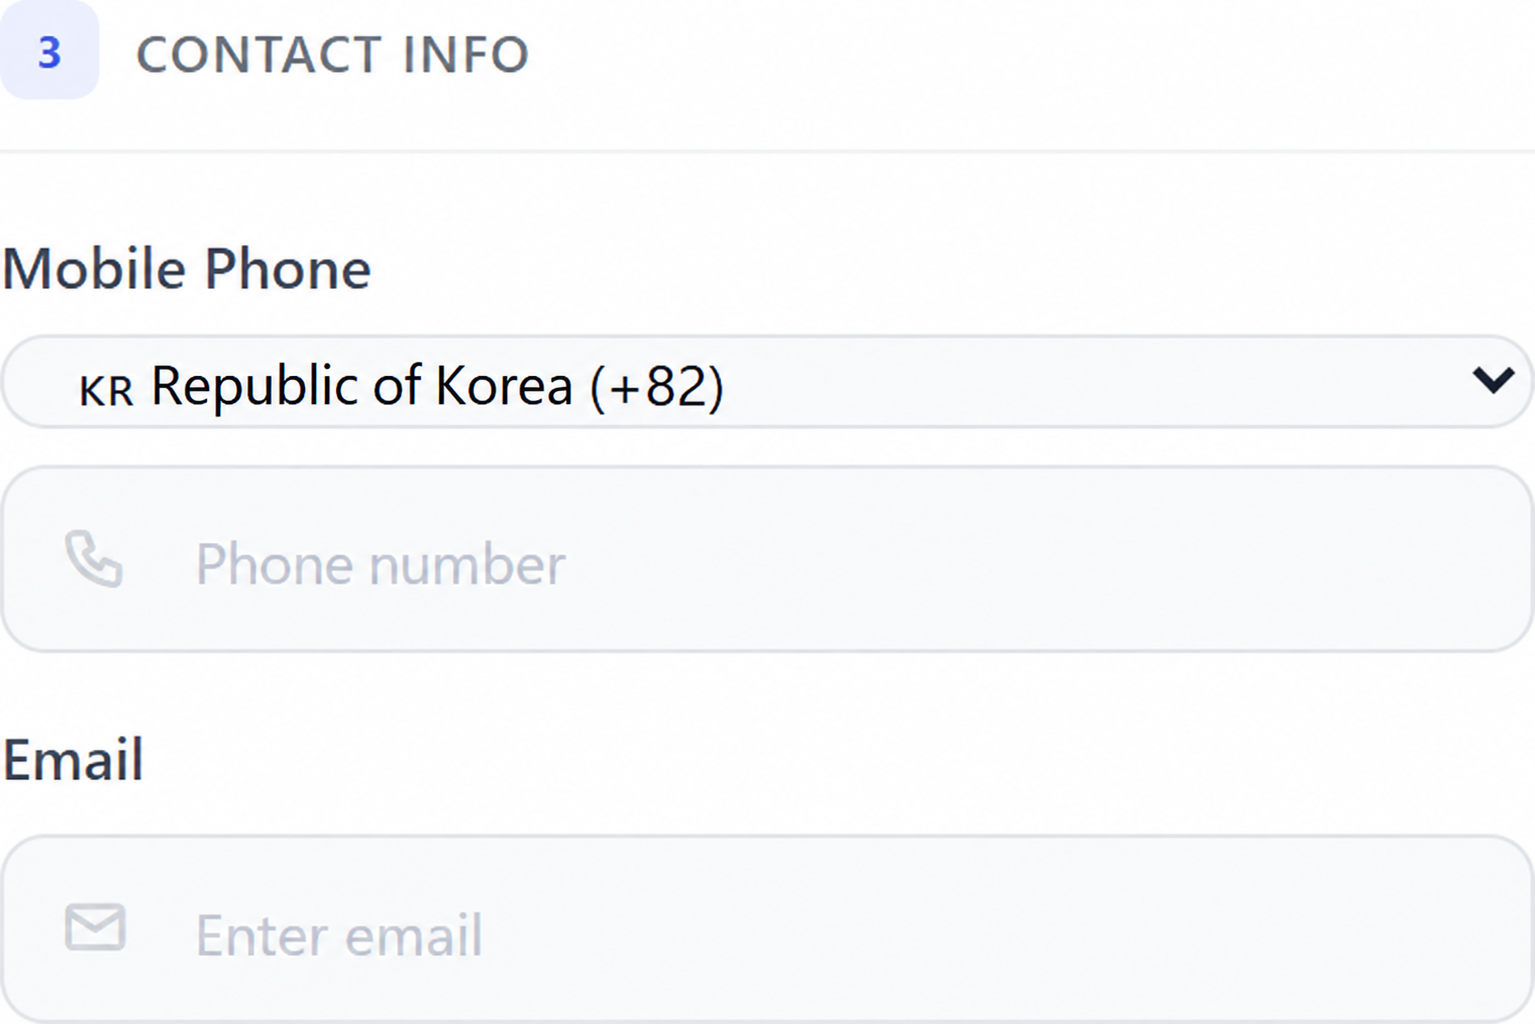
Set the country to Republic of Korea (+82) and enter your mobile number. Although there is no email verification, deposit and withdrawal notifications are sent to this email address. Enter an email address you actively use.
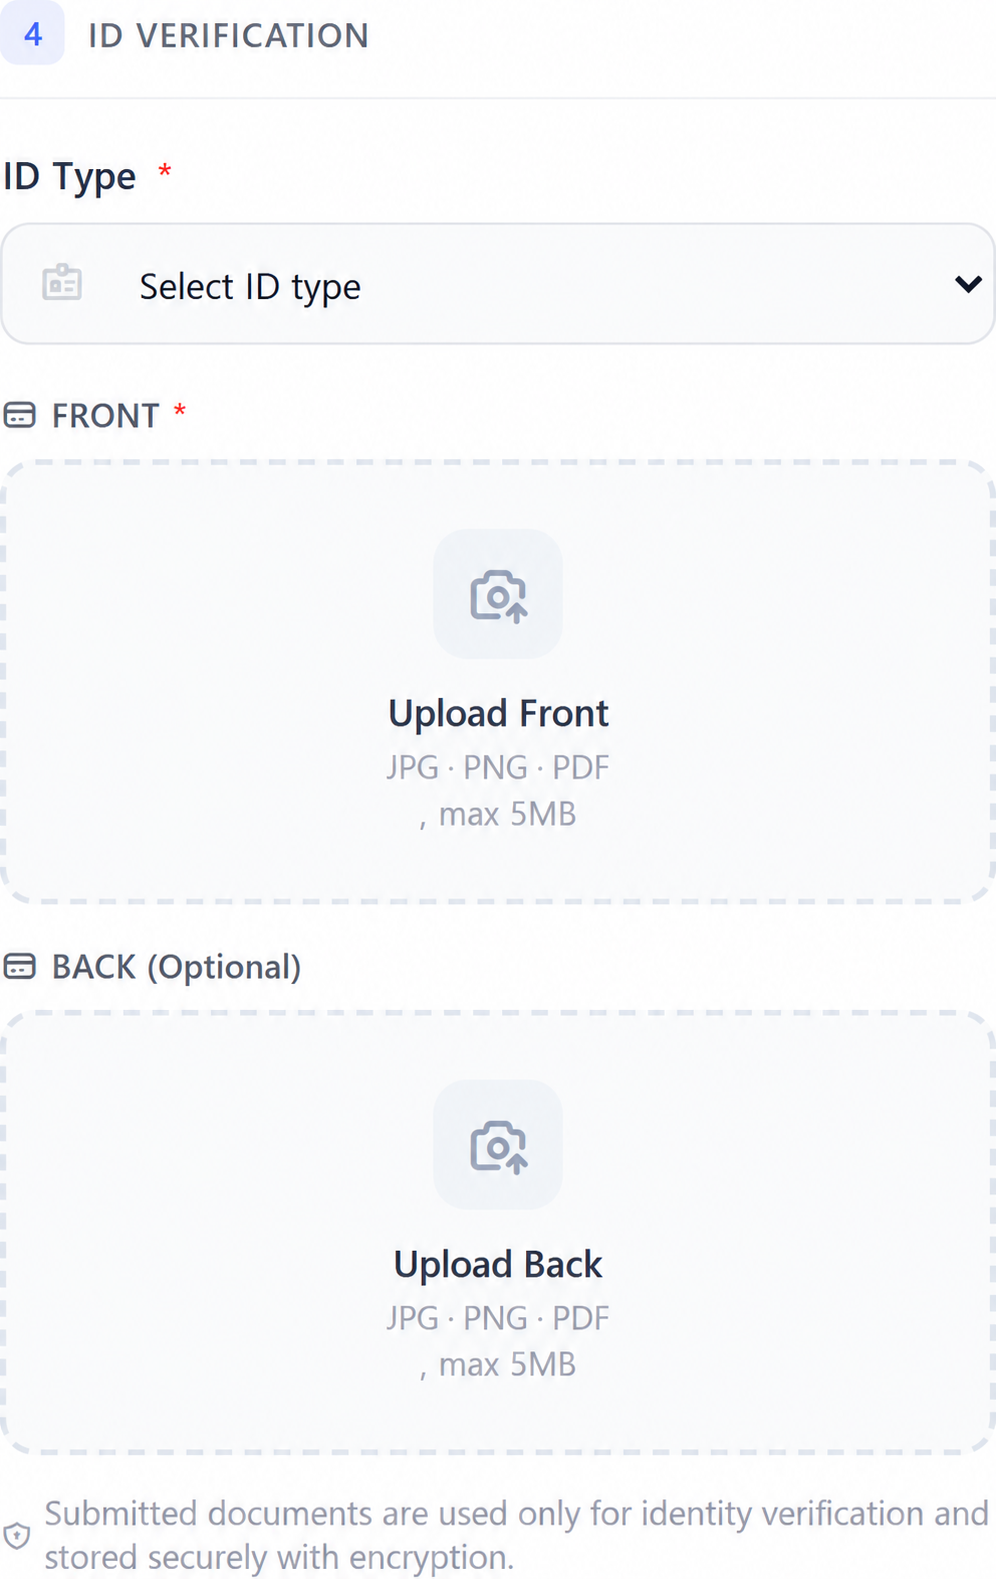
Select an ID type. The FRONT image is required; the BACK image is optional. Accepted formats: JPG, PNG or PDF, up to 5 MB. You can take a photo with your phone and upload it directly.
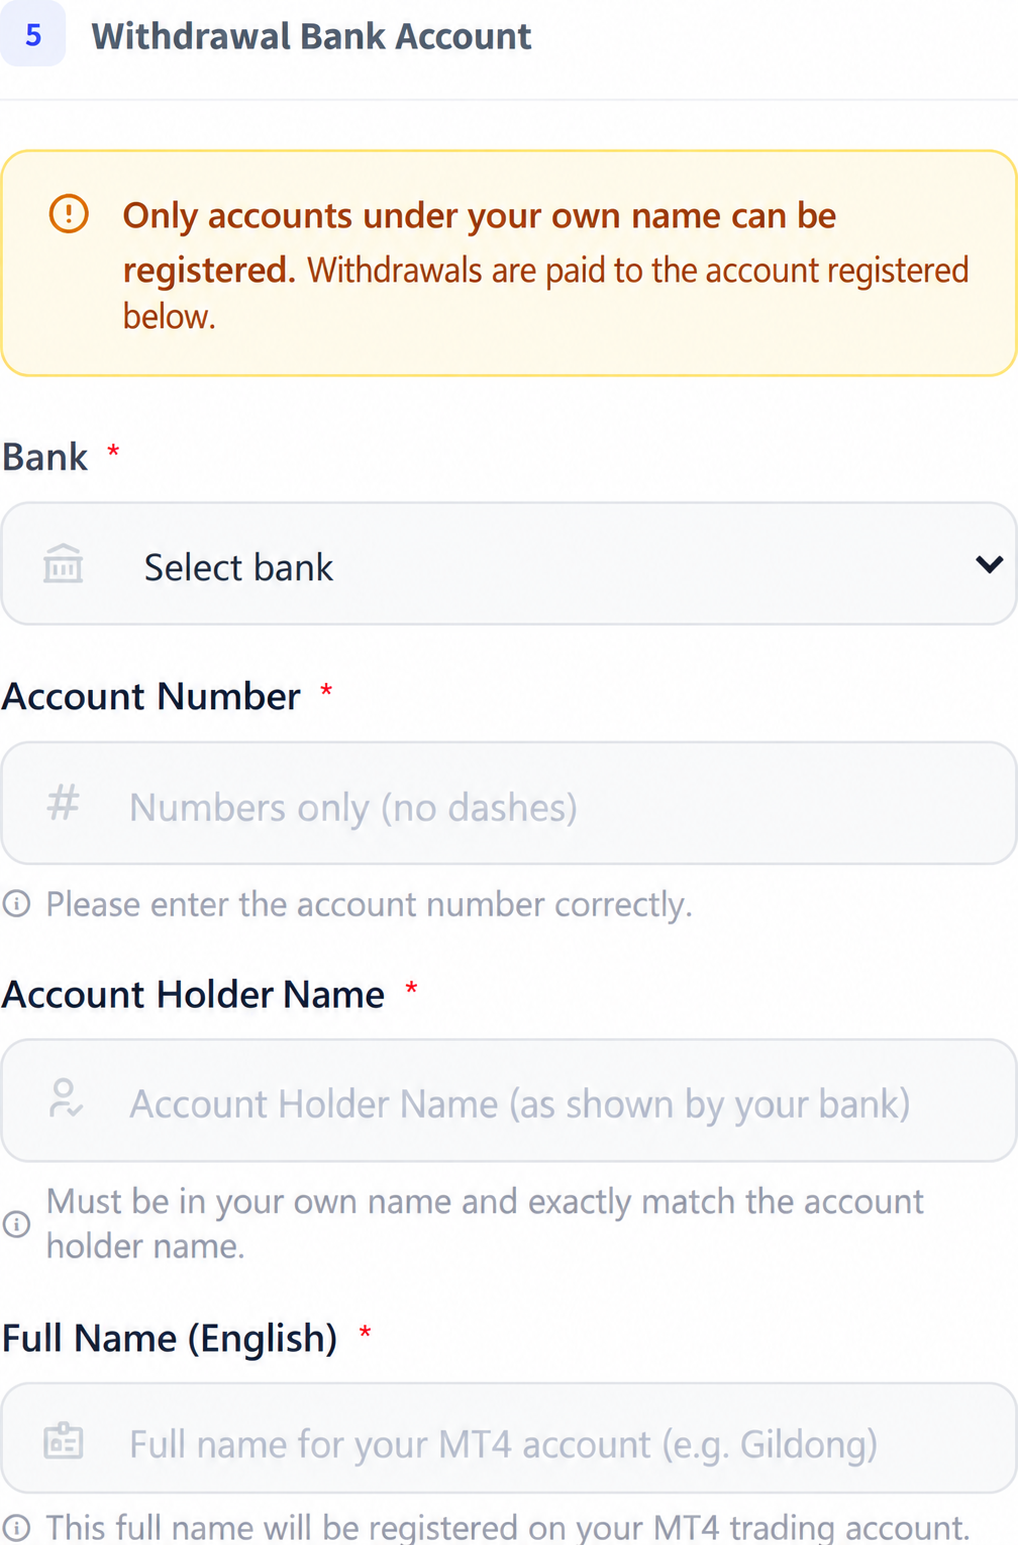
Select a bank, then enter your account number (digits only, without hyphens) and account holder's name exactly as recorded by your bank. The account must be in your own name; withdrawals are sent only to the registered account.
This English name is registered on your MT4 trading account exactly as entered. Use no Korean characters or special symbols; enter the Roman-letter spelling shown in your passport (for example:
Gildong Hong). Incorrect names are the most common cause of account-opening failures.
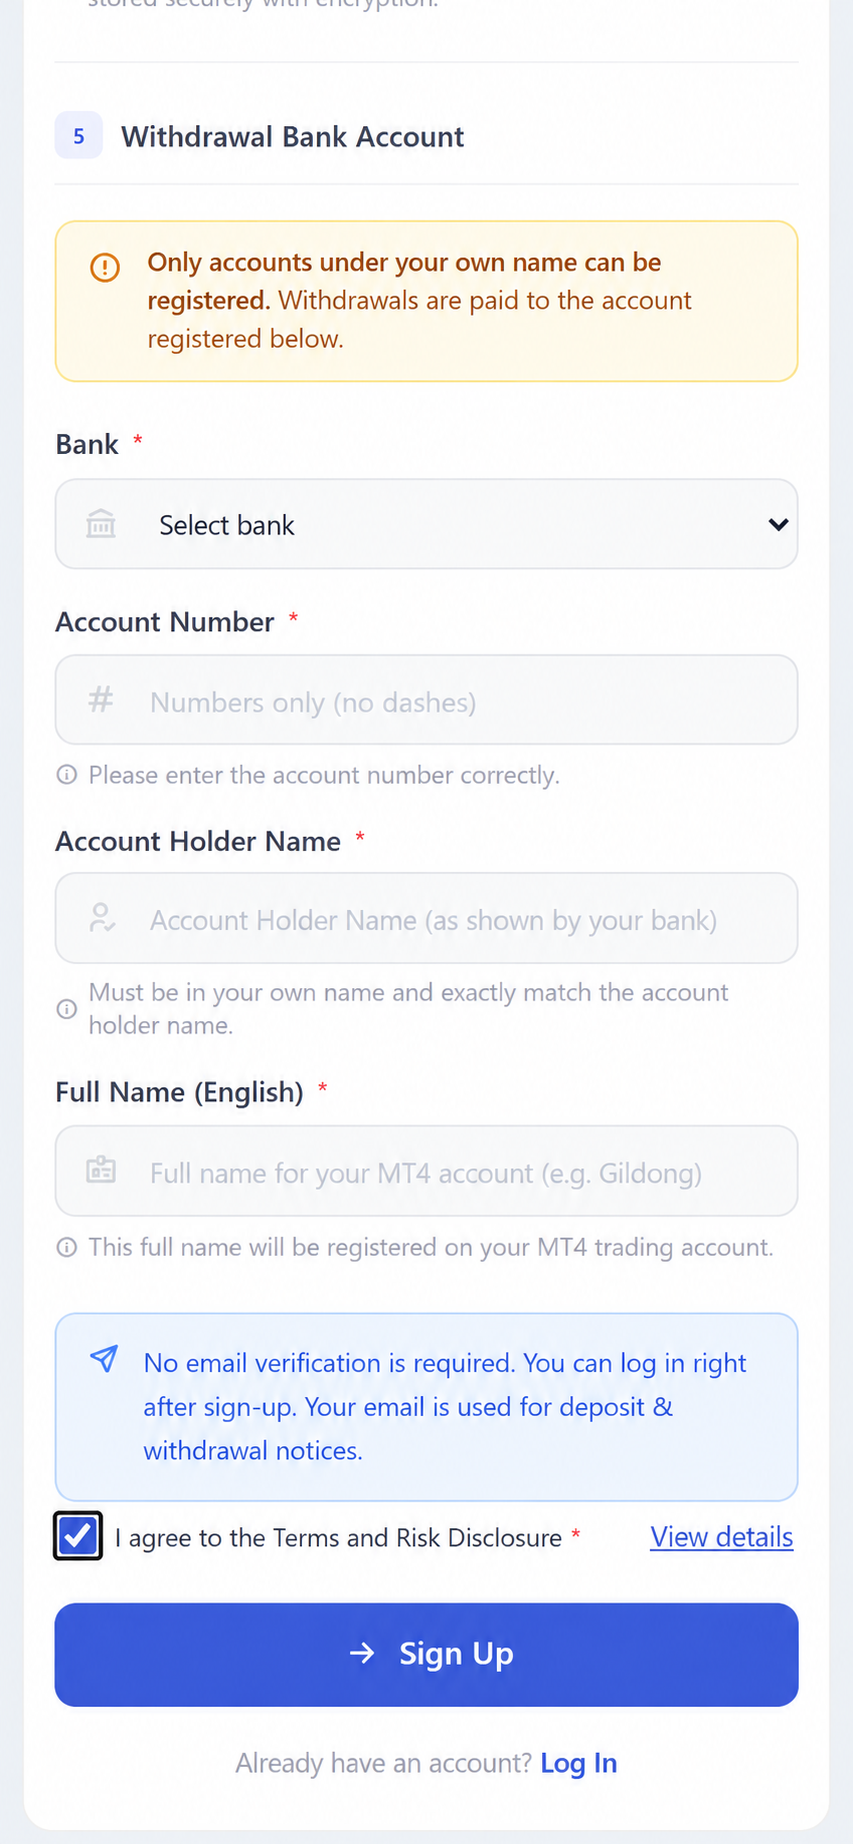
Tick the Terms and Conditions and Risk Disclosure checkbox (View details opens the full text), then select [Sign Up]. Your ID is submitted with this form, so no separate document-submission procedure is needed, and you can log in immediately after submission.
1-3
Log In → ID Verification → Automatic ProcessingNo email verification - MT4 account and credit are processed automatically
▾
- Log In Immediately - Registration is completed when you submit the form. No email verification is required; log in immediately with your chosen username and password. Your email is used for deposit and withdrawal notifications.
- ID Verification (KYC) - Staff review your submitted ID. Applications received during business hours are normally processed on the same day. For quicker assistance, contact customer support on Telegram with your registered username and request verification.
- Automatic Processing after Approval - The following two items are processed without a separate application.
| Item | Details |
|---|---|
| MT4 Live Account | Opened automatically - Maximum leverage 1:500 |
| $100 Trading Credit | Granted to the opened account after identity verification - Once per person, first live account only |
The credit principal cannot be withdrawn; only profits earned from trading with the credit may be withdrawn. Profits from registration credit become withdrawable after trading at least 2 lots. When you request a withdrawal, the remaining account credit is deducted.
After logging in, open My Accounts in the left menu to view the opened trading account's account number, master password and leverage. On the same screen, select MT4 Download to download the app, then log in using your account number, master password and provided server.
Apply for a USDT Deposit on NOVA
You do not need to hold USDT yet. First apply to obtain your wallet address and the amount to send.
2-1
Deposit Menu → USDT (TRC20)After login: Finance → Deposit - English-localized example
▾
Log in → Open Finance → Deposit. Three deposit-method cards appear at the top.
| Card / Guide | When to Use It |
|---|---|
| Direct USDT Deposit - ERC20 | If you hold USDT on Ethereum, check the address and deposit instructions. Separate confirmation of acceptance is required. |
| P2P Deposit (BaroPay) KRW payment - Automatic crediting | Up to KRW 3,000,000 per transaction. BaroPay Guide explains the application process. |
| Tether Deposit (USDT) Transfer USDT you already hold | Use this if you already hold USDT or are sending through ④ Exchange → ⑤ Binance. |
| Card Payment | For card payments, follow the separate instructions. |
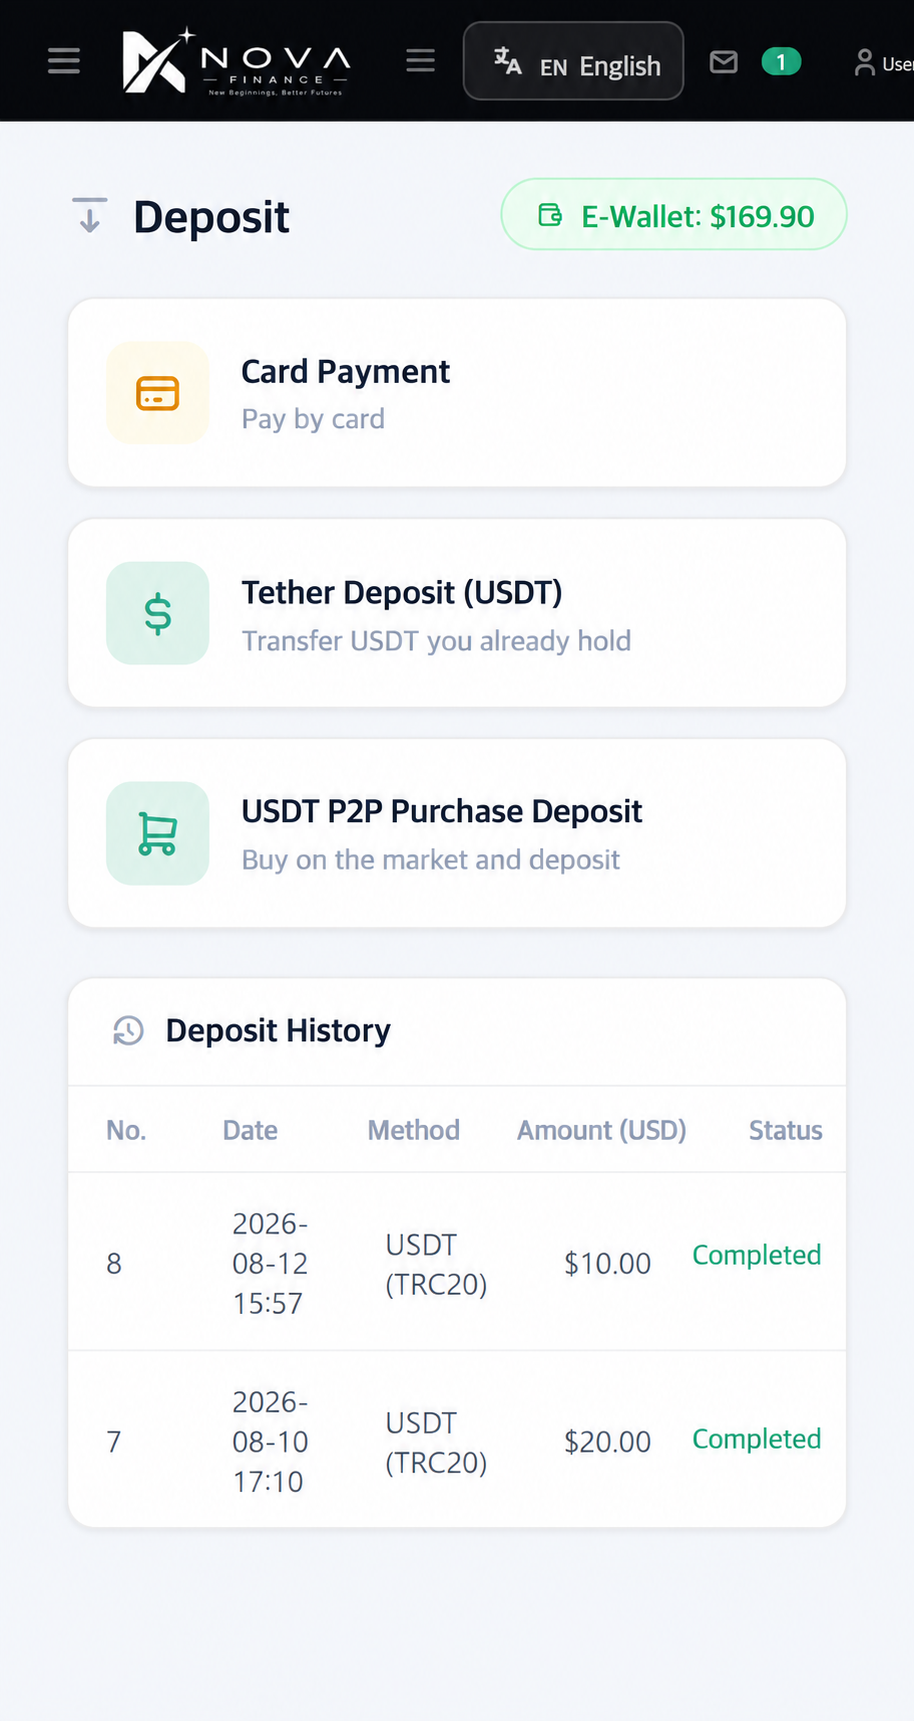
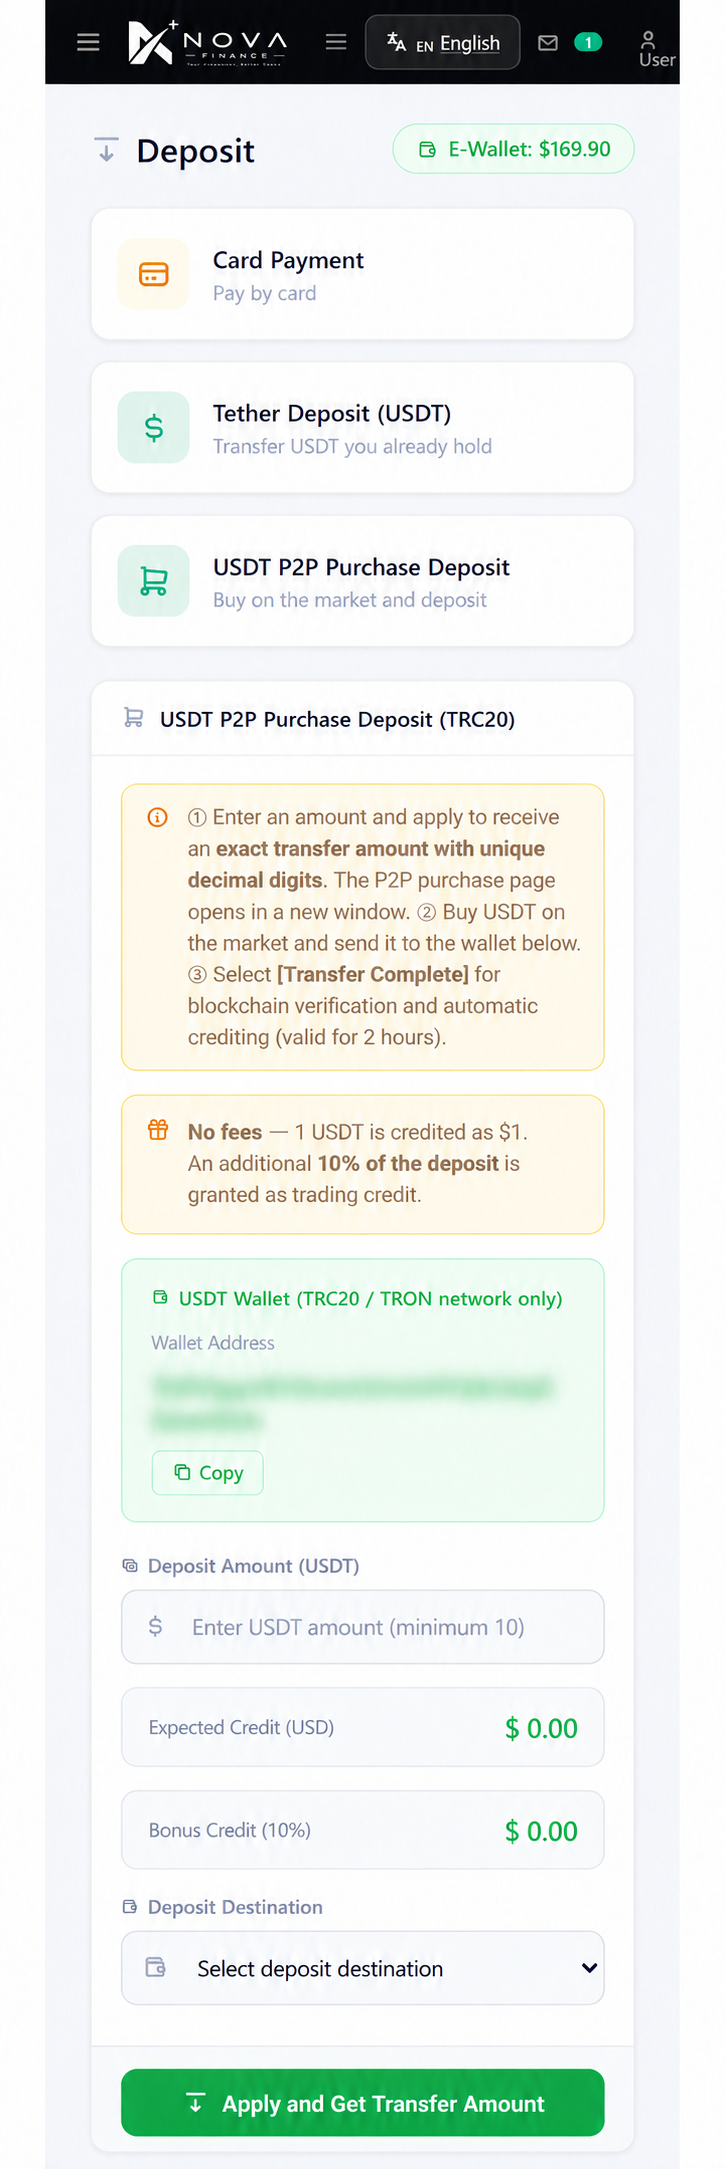
These instructions apply when you select Tether Deposit (USDT). For BaroPay, follow the KRW Payment Guide.
① Use [Copy] to copy your USDT wallet address. This address is for TRC20 (TRON network) only.
② Enter the Deposit Amount (USDT) (minimum 10 USDT). The screen calculates Expected Credit (USD) and Bonus Credit (10%) below.
③ Select E-Wallet or an MT4 account as the deposit destination, then select [Apply and Get Transfer Amount].
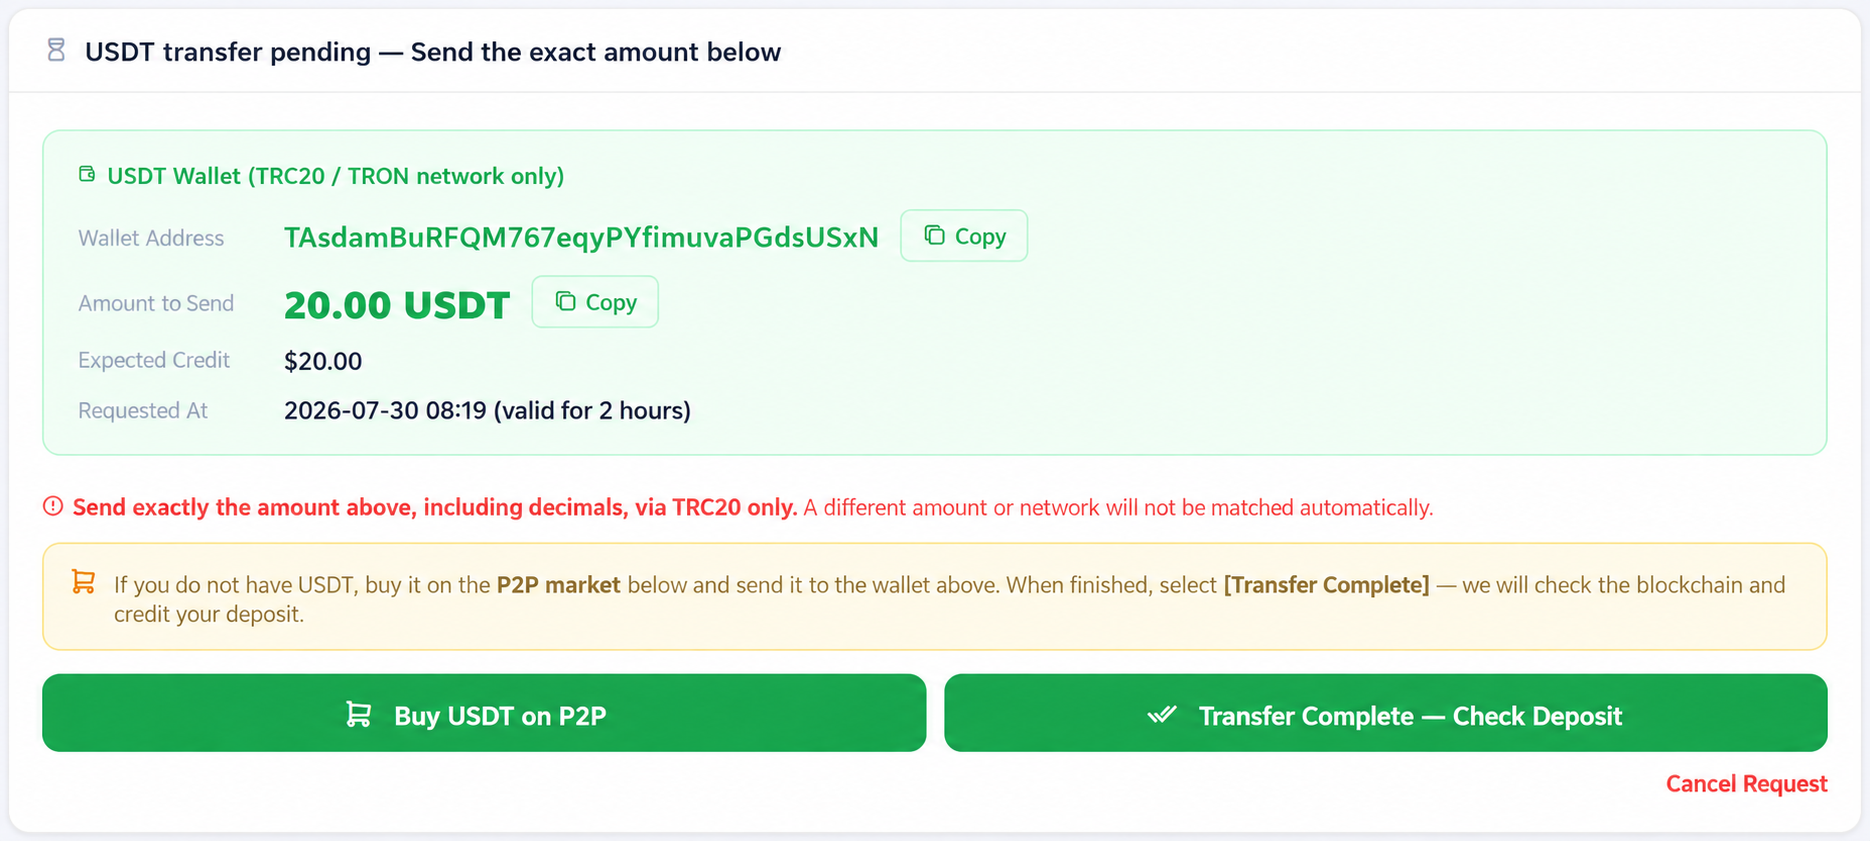
After applying, you receive an Amount to Send containing unique decimal digits(for example, 20.37 USDT). This amount identifies your application automatically, so send the exact amount, including every decimal digit.
Choose the Next Section - Where to Obtain USDT
Choose KRW payment, a transfer of USDT you hold, or purchase through an exchange.
Confirm acceptance before depositingBaroPay - KRW PaymentsApply on NOVA → Purchase and transfer → Check automatic crediting
Up to KRW 3,000,000 per transactionMetaMask - Existing USDT HoldersPrepare TRON assets and fees → Apply on NOVA → TransferBuy through Upbit or BithumbKorean exchange → Binance → NOVABinance - Existing USDT HoldersApply on NOVA → Withdraw via TRC20 → Mark Transfer Complete
P2P Purchase on Gift Flow Market
giftflowmarket.com - Register → Administrator approval → Purchase application → Sign undertaking → Bank transfer → Receive USDT. These are actual service screens.
A-1
Register on the Marketplace → Approval → Log InRegister your NOVA wallet address as your USDT receiving wallet
▾
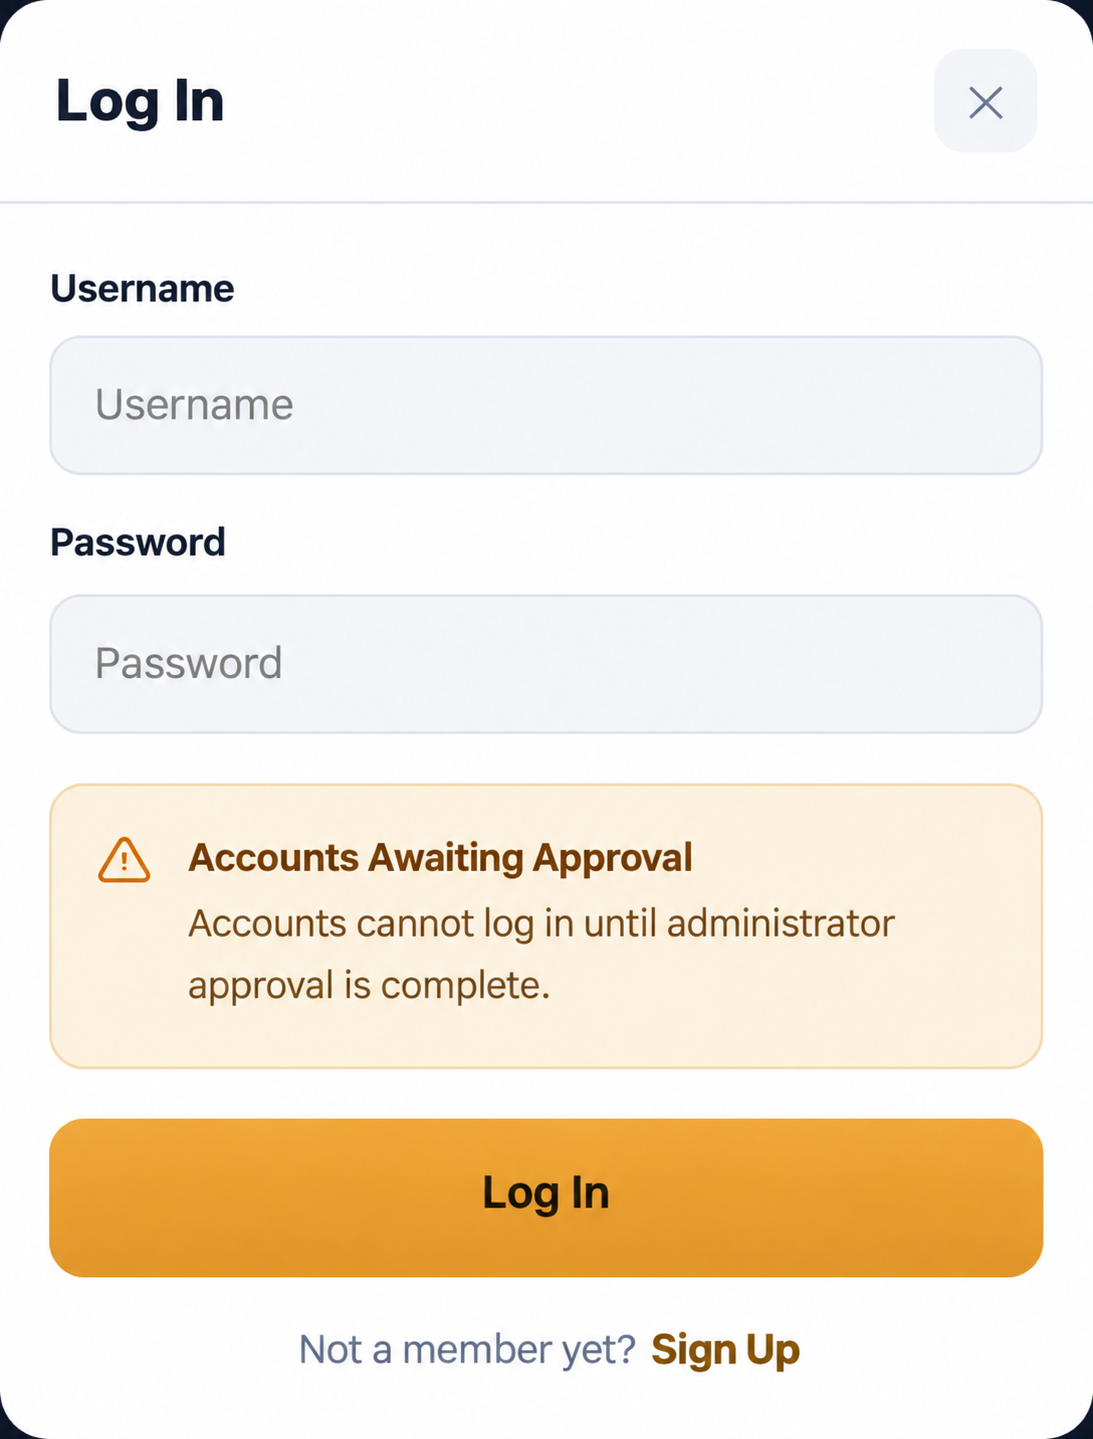
On NOVA's deposit screen, select [Buy USDT via P2P] to open the marketplace in a new window. At the top right, select [Sign Up] and choose the Buyer tab.
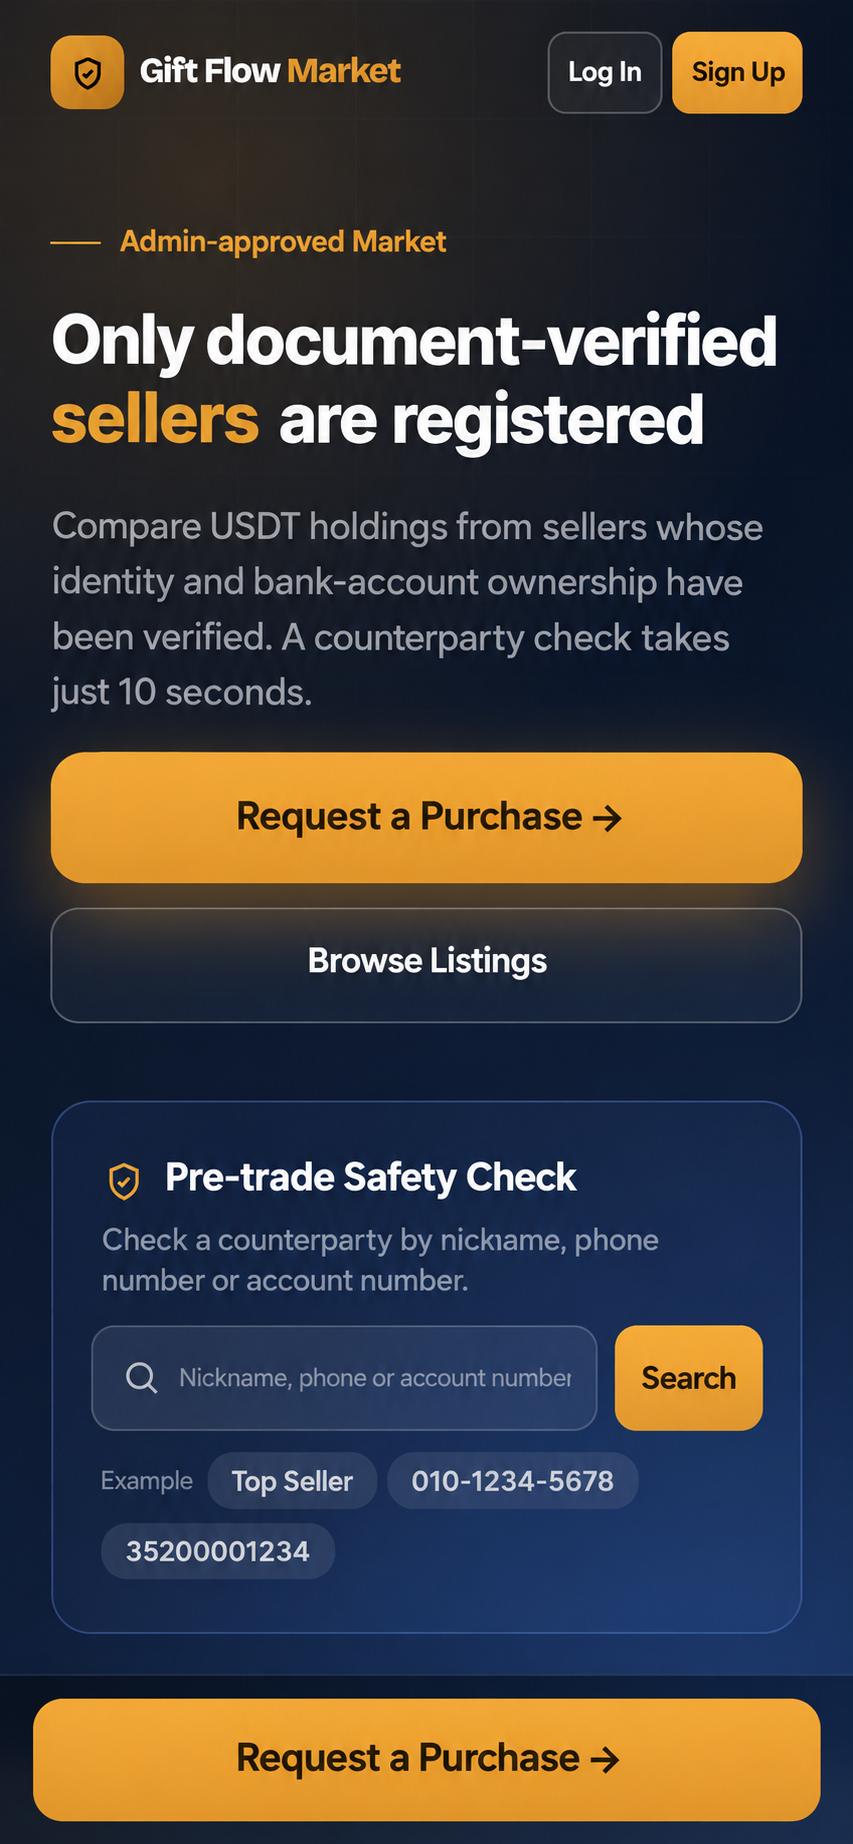
Enter your legal name, username, password (at least 8 characters) and phone number, along with a bank account in your name(the account holder's name must match your registered name for approval) and your USDT receiving wallet address. Attach your ID photo, then select [Submit Registration].
When the transaction is completed, USDT is sent to this address. Use Paste to enter the NOVA address copied in section ②. After registration, you cannot change it directly; submit a change request through [My Profile] and wait for administrator approval.
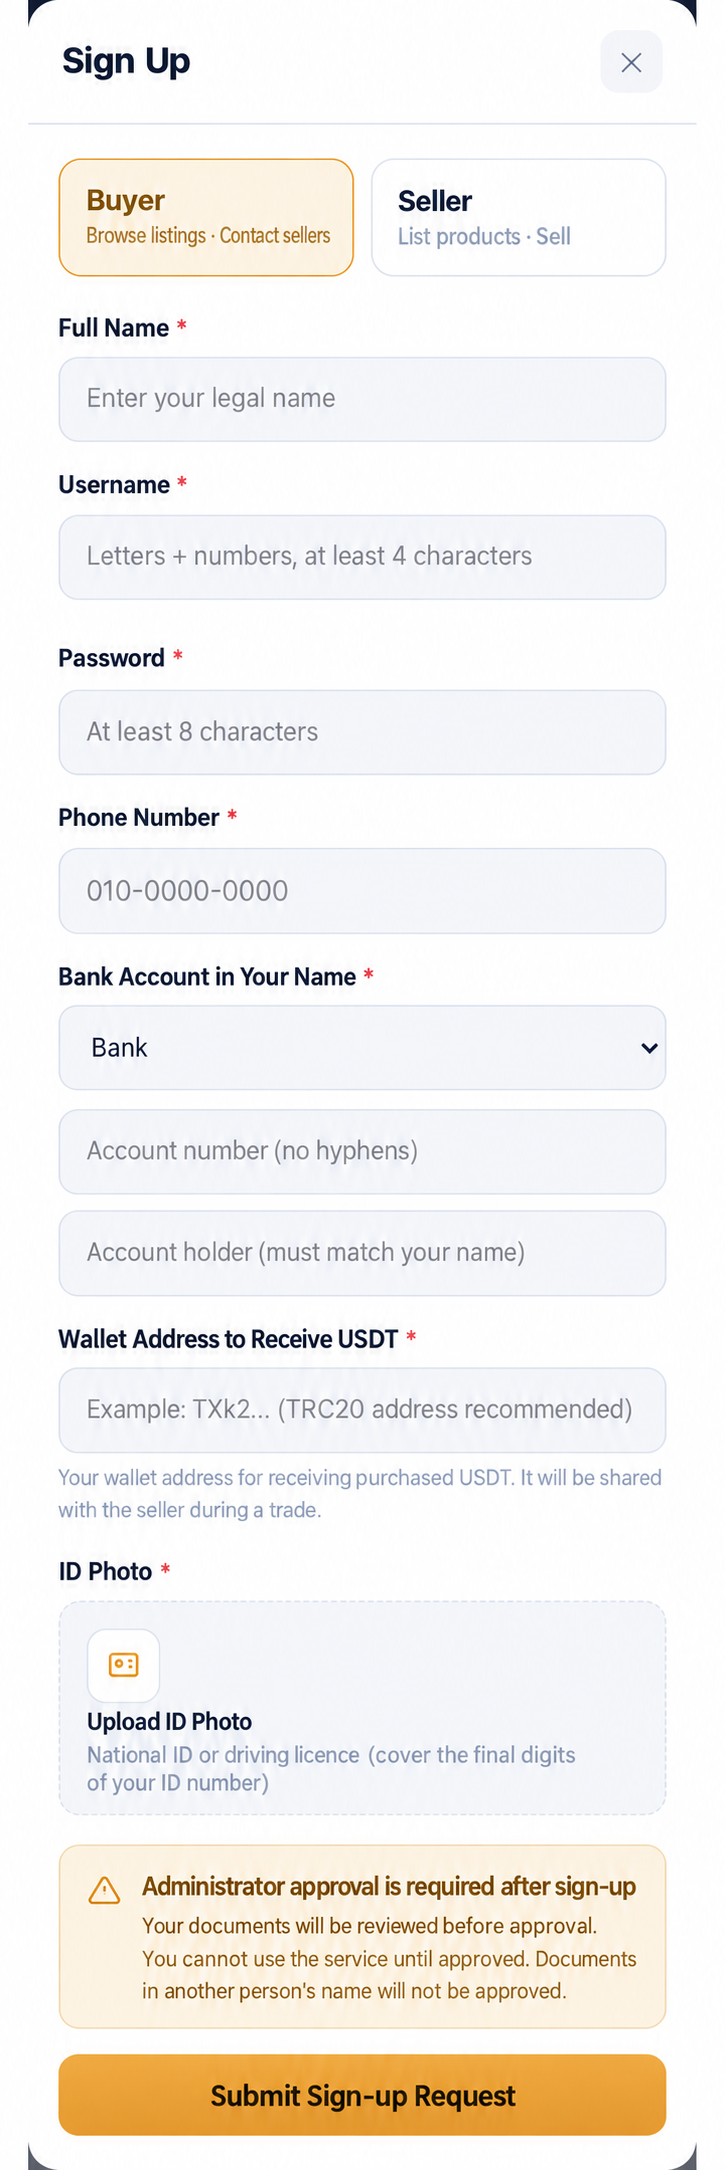
An administrator reviews your documents after registration. Until approval, the screen shows "Awaiting Administrator Approval" and login is unavailable. Once approved, select [Log In] and enter your username and password.
A-2
Purchase ApplicationAutomatic matching or a direct purchase from a selected seller
▾
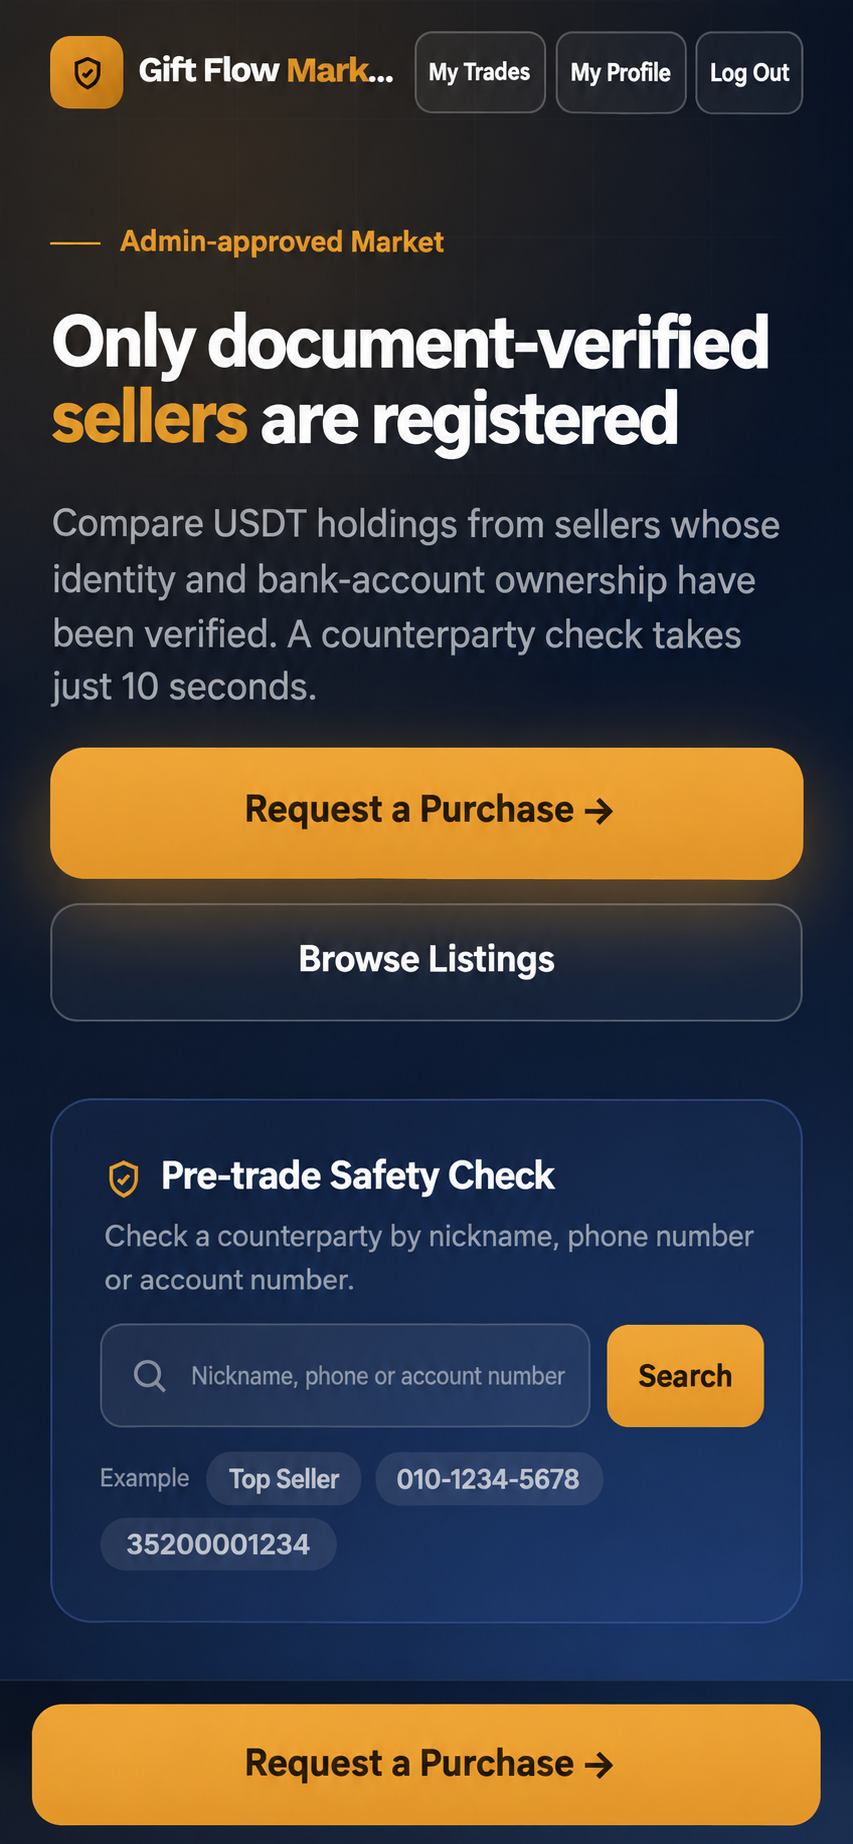
After login, the home screen (or fixed bottom button on mobile) contains [Apply to Purchase]. At the top, [My Trades] shows progress, while [My Profile] is for personal details and wallet management.
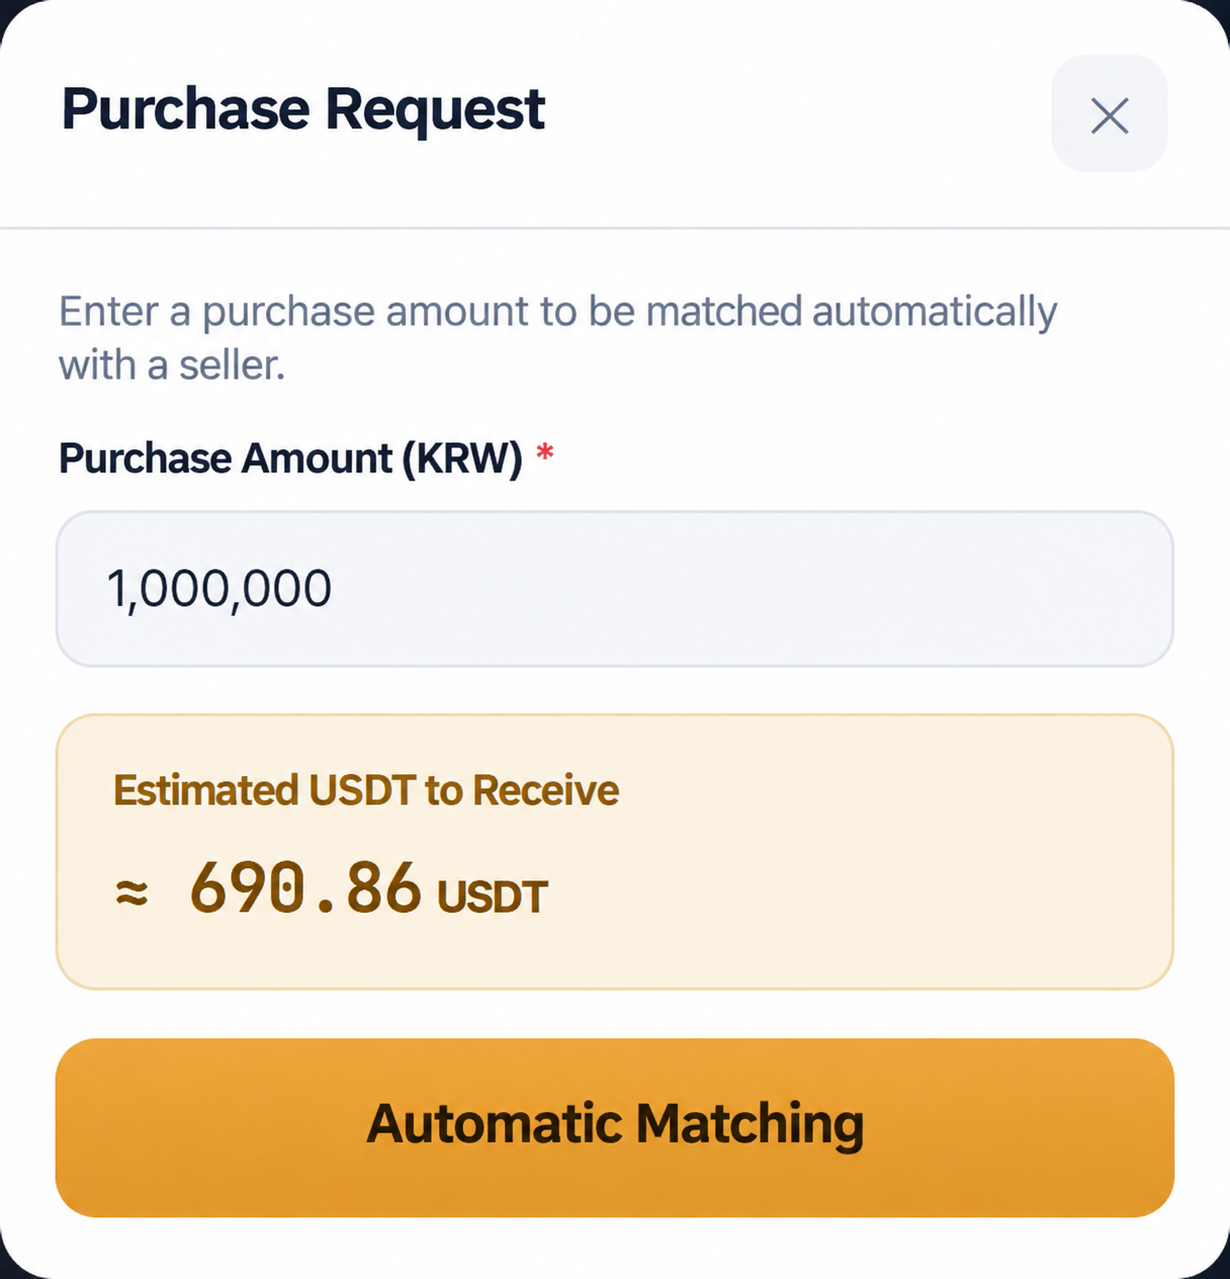
Enter the purchase amount in KRW to calculate the USDT to receive in real time, including the Bithumb rate and seller fees. If one seller can handle the full amount, it is assigned to that seller; larger amounts are distributed among multiple sellers. After checking, select [Start Trade], or select [Cancel].
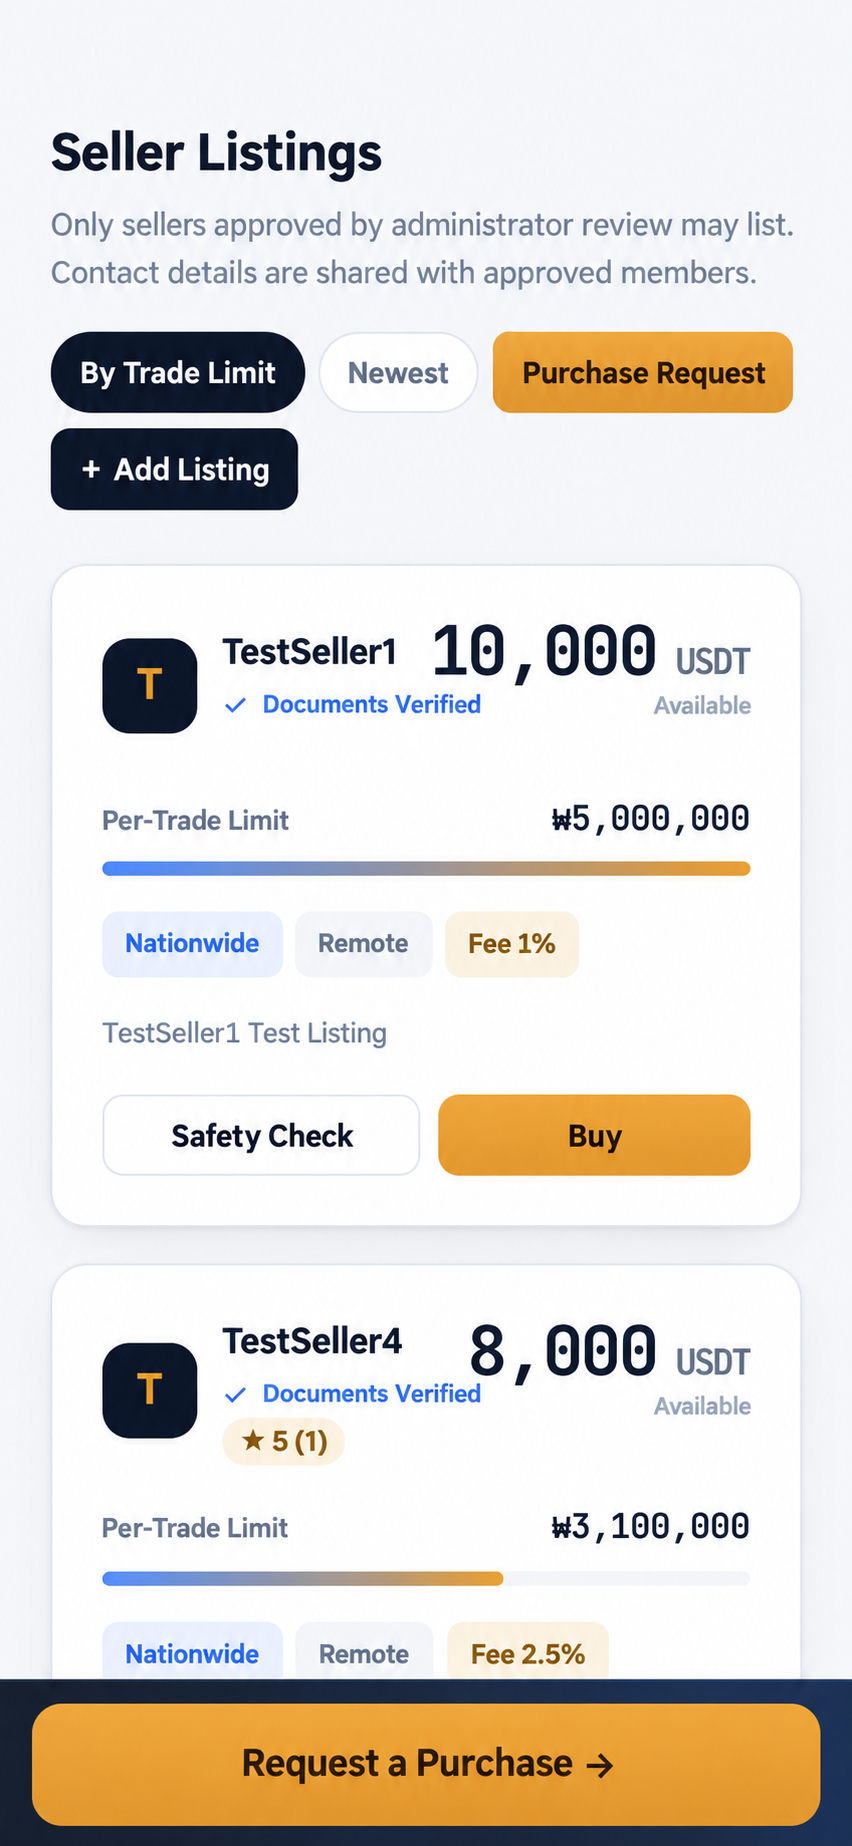
On the seller listings screen, select the seller's [Buy] button to trade directly with that seller. Compare the card's fee rate, per-transaction amount and star rating, and use [Safety Check] to check the counterparty.
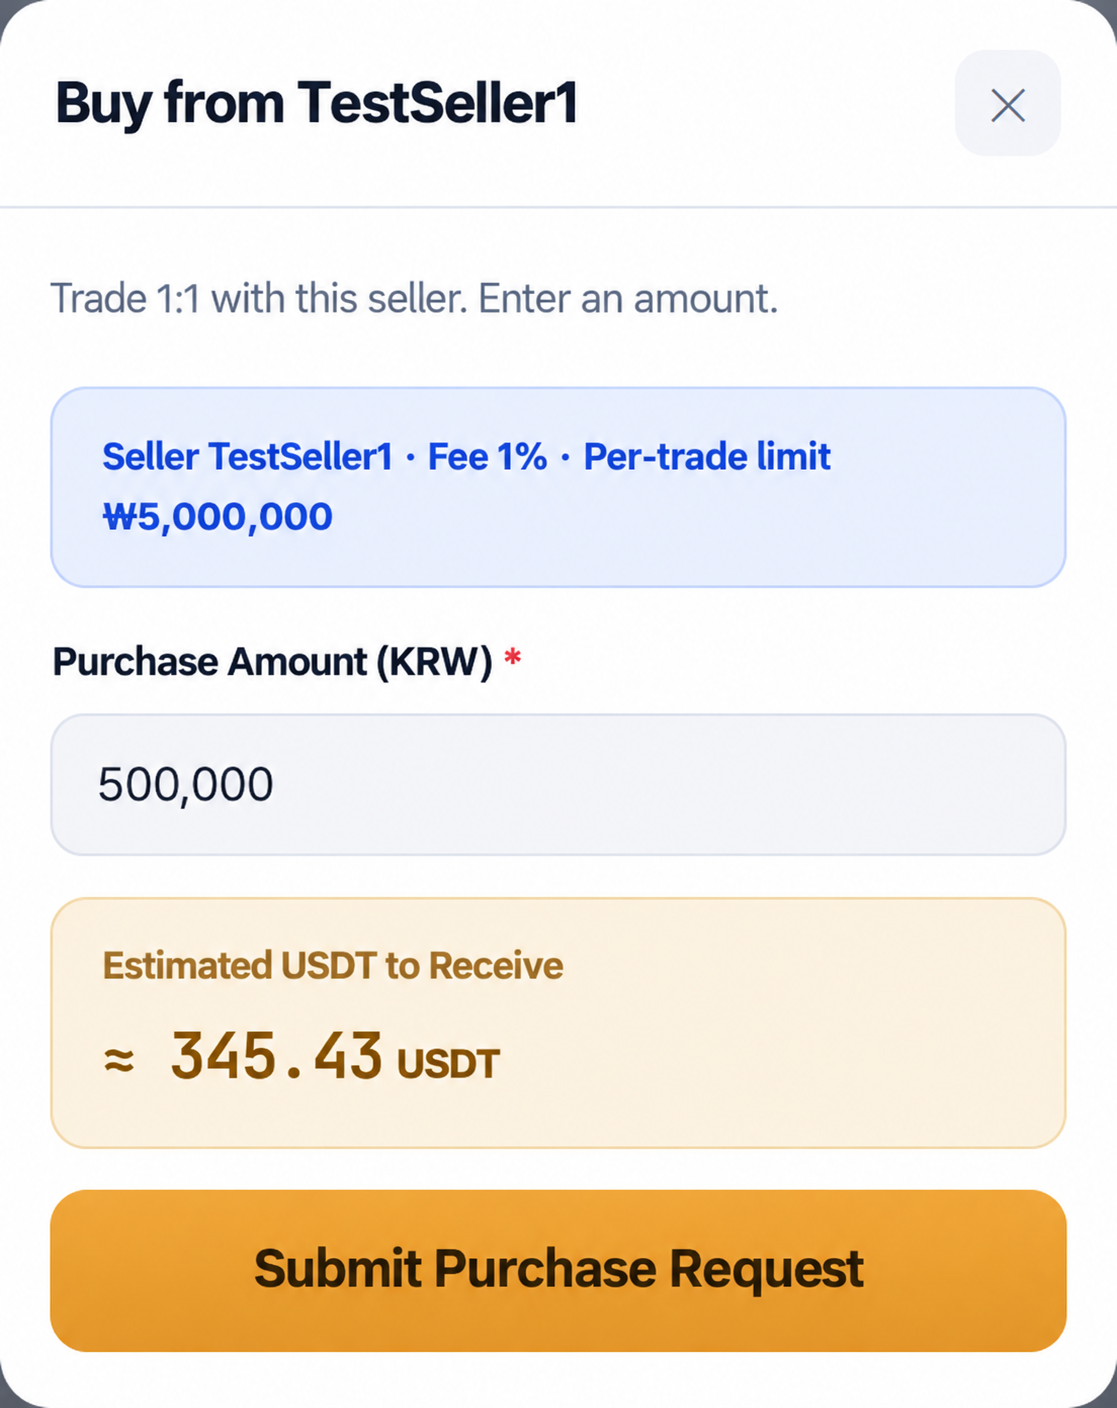
The seller's name, fee and per-transaction amount are shown. Enter an amount to calculate the USDT to receive. [Apply to Purchase] matches you only with this seller. Amounts above the per-transaction limit cannot be submitted; reduce the amount or use automatic matching.
A-3
Sign → Bank Transfer → Receive USDTContinue in [My Trades]
▾
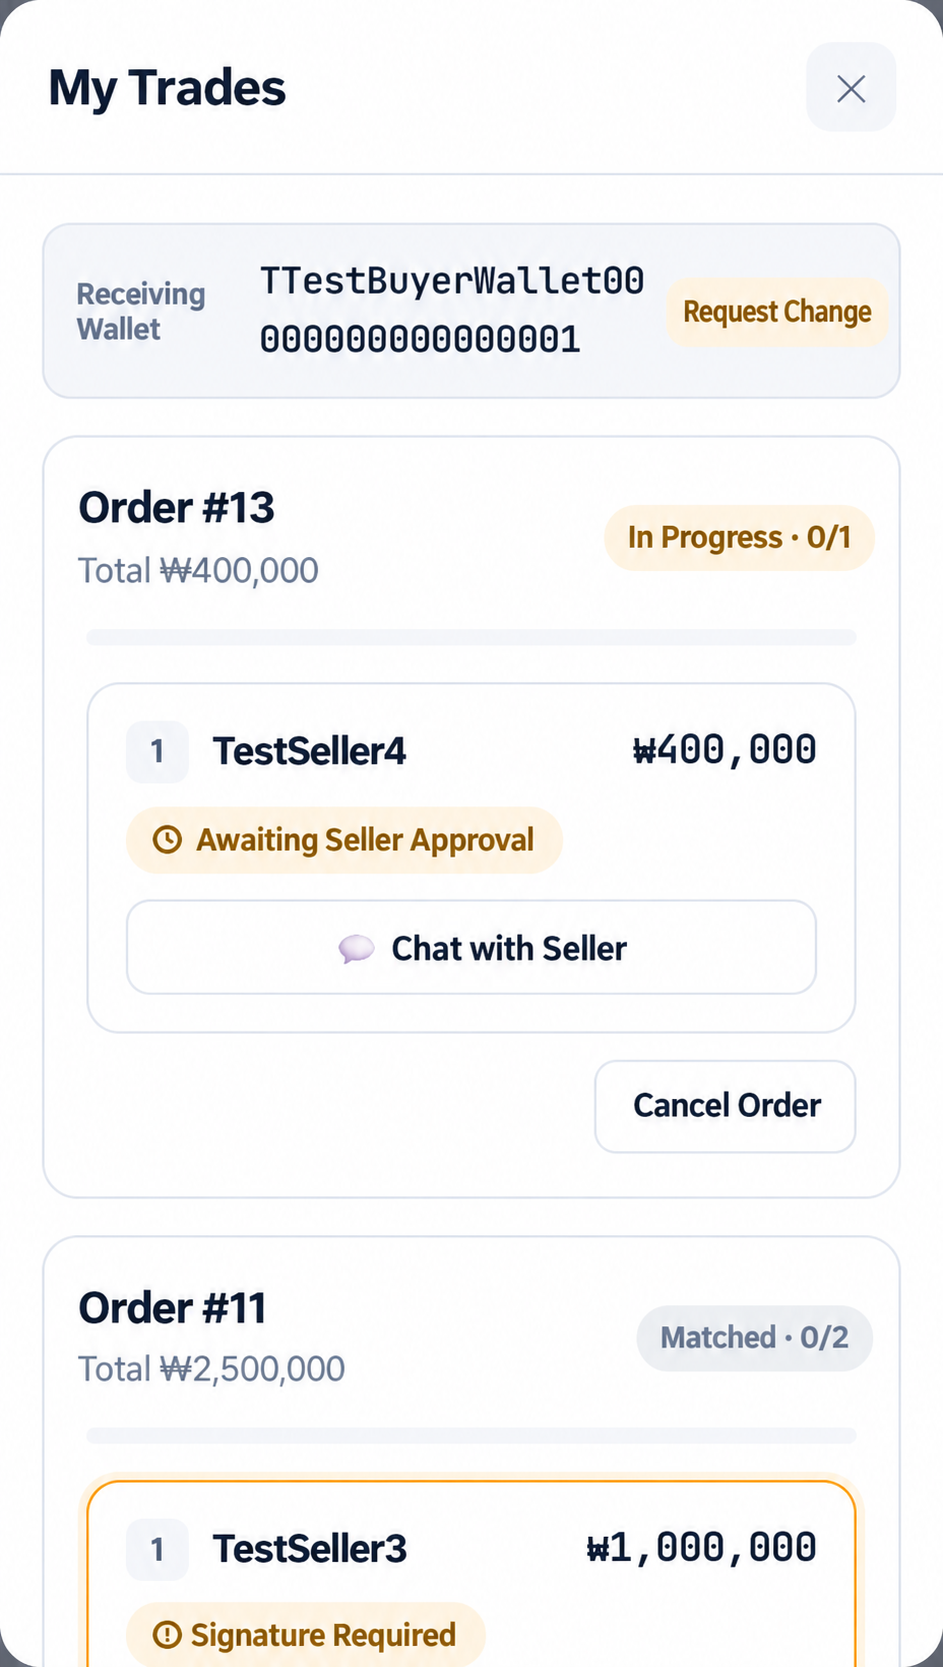
Open [My Trades] at the top to see each order's progress. For each matched seller, select [Sign]. The steps are ① Sign → ② Bank transfer → ③ Seller approval → Complete. Your receiving wallet (NOVA address) is always shown at the top.
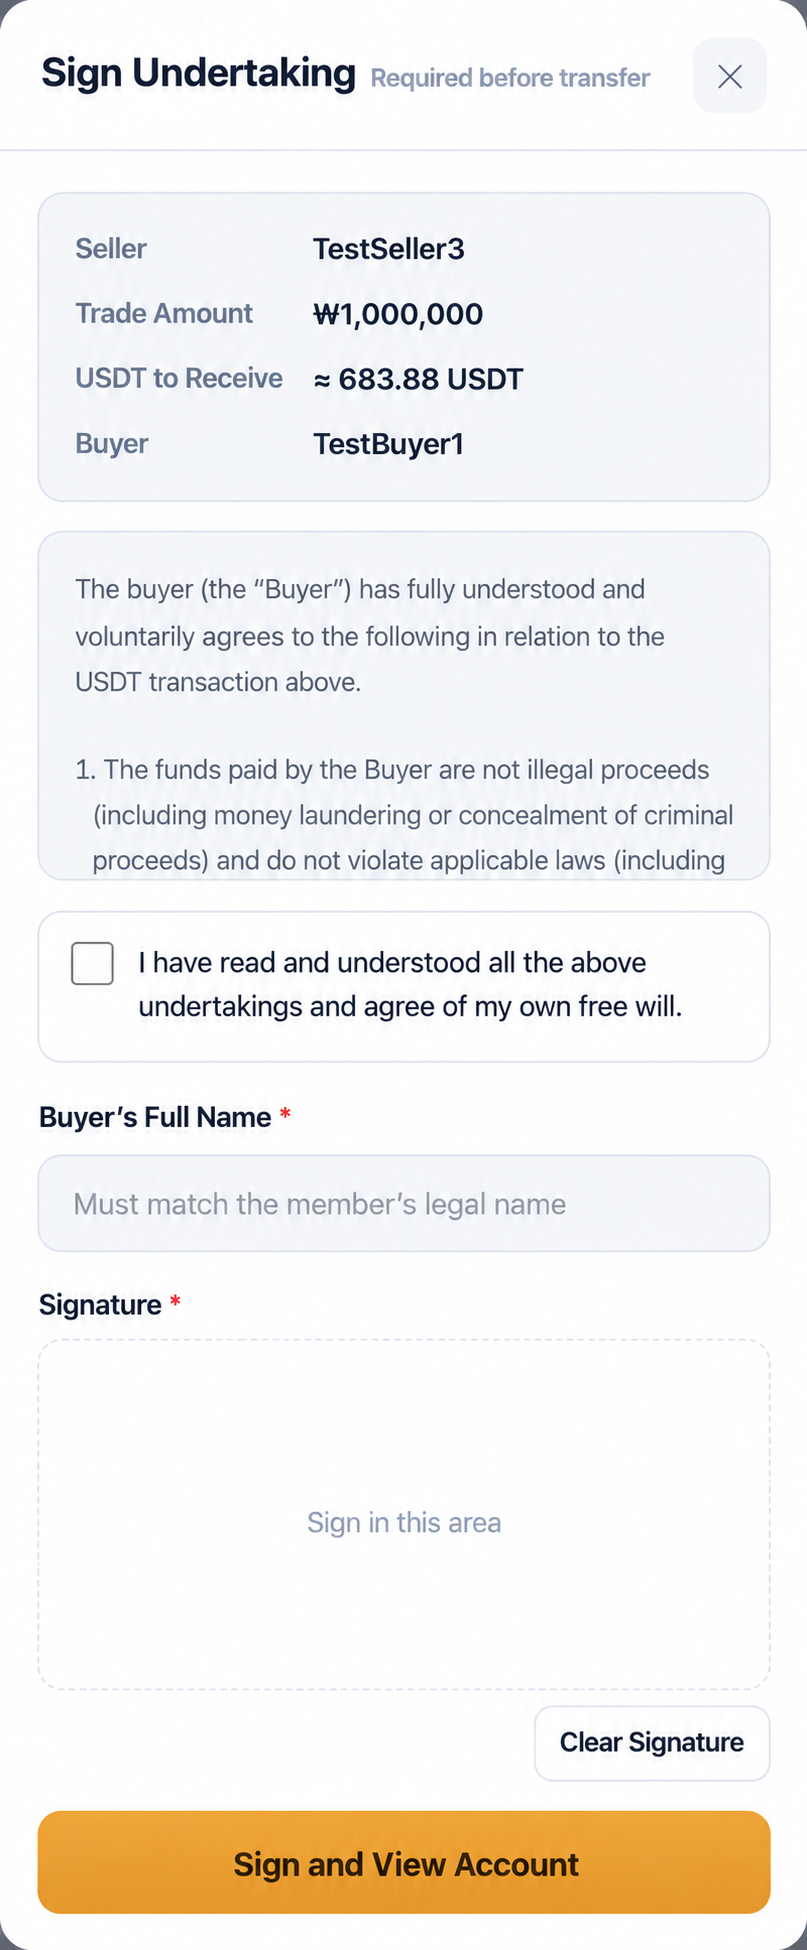
Check the transaction amount and USDT to receive, read the undertaking, then enter your name and sign with your finger. The seller's receiving bank account is displayed only after you sign. The signature is retained as evidence of the transaction.
After signing, the receiving account, account holder and transfer amount are displayed. Use [Copy] to copy the details accurately and make the transfer. Once it is sent, always select [Transfer Complete].
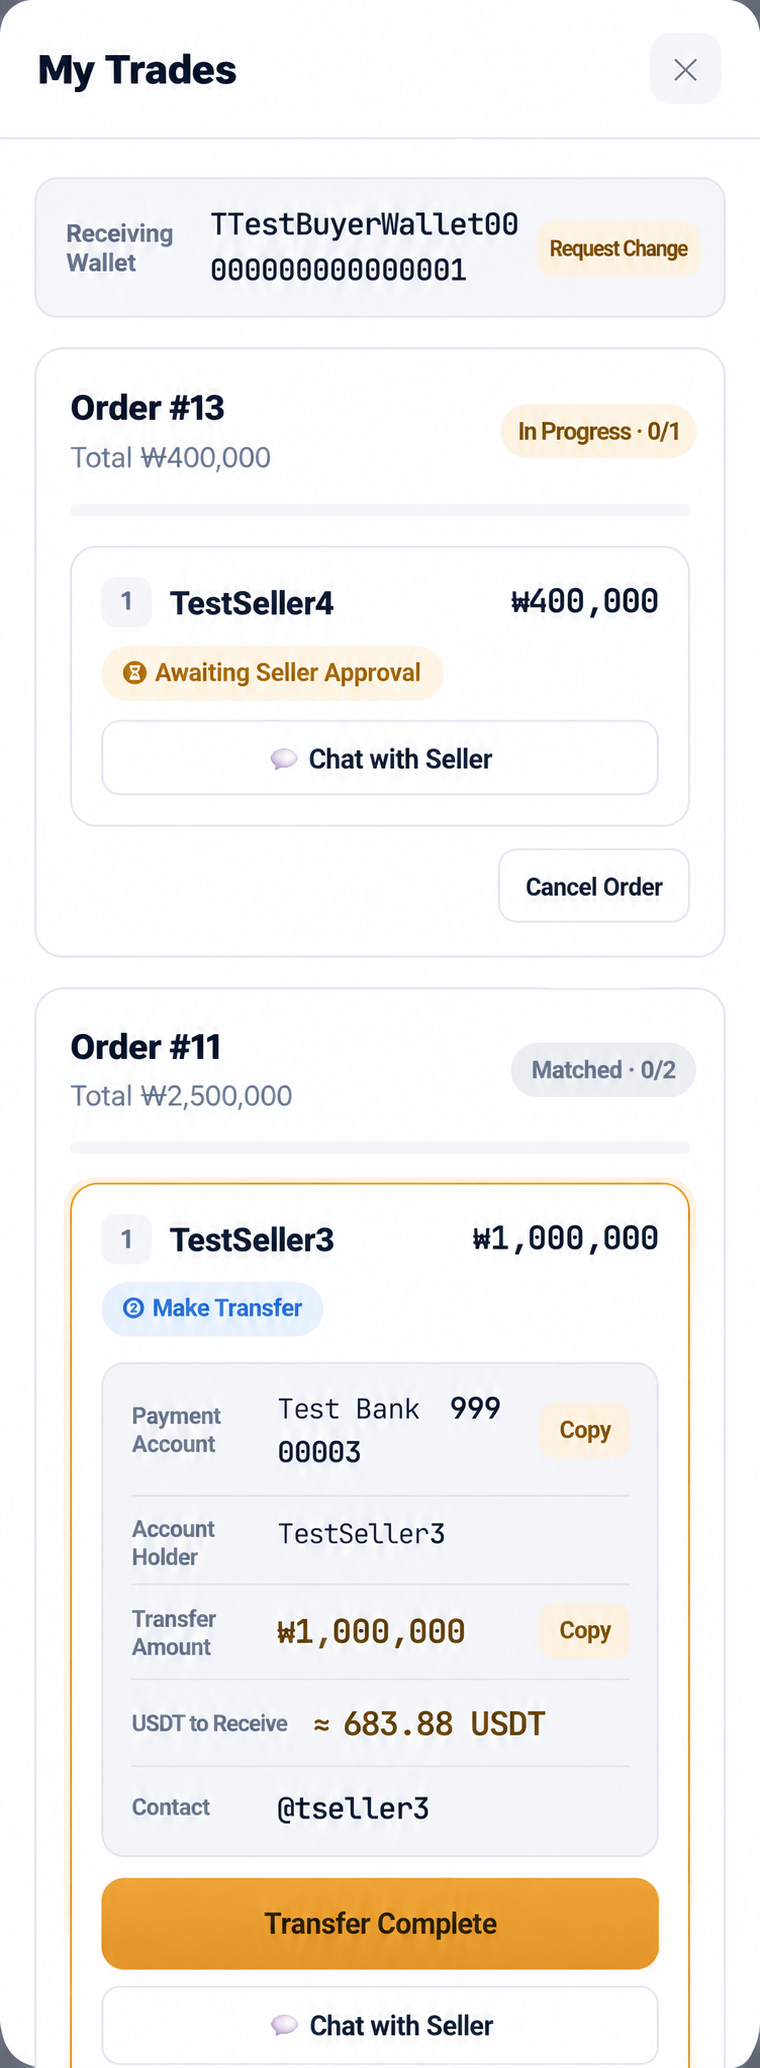
When the seller confirms receipt and approves, the trade is completed and USDT is sent to the wallet registered at signup (your NOVA wallet). Then go to ⑥ Transfer Complete and select the NOVA screen's [Transfer Complete].
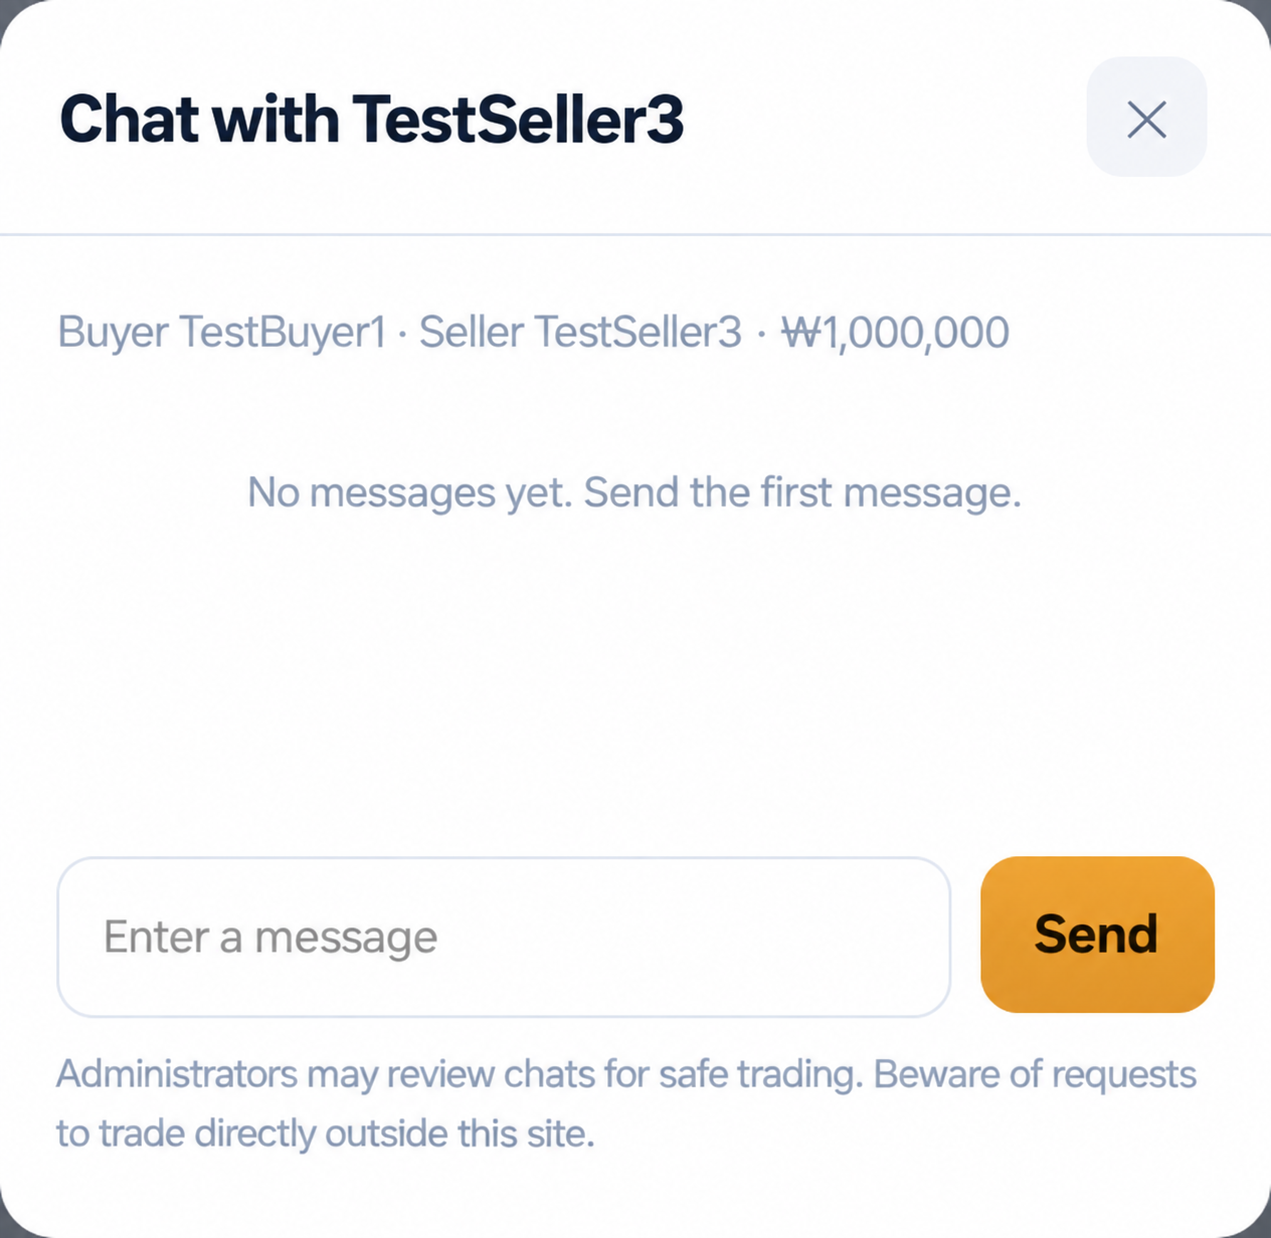
Each trade in [My Trades] includes [Chat with Seller], available even before signing. Administrators may review chats in case of a dispute. When the trade ends, select [★ Leave a Review] to leave a star rating and a short review.
MetaMask ERC20 · Direct deposit address · MetaMask TRON guide · BaroPay illustrated guide (up to KRW 3 million per payment)
Buy on Upbit or Bithumb
Select the tab for your exchange. Withdrawal holds (72 hours / 24 hours) apply equally to both exchanges.
!
⚠ Withdrawal holds — 72 hours / 24 hoursUpbit and Bithumb · The most common obstacle
▾
These measures help prevent voice phishing losses and apply without exception. Customer support cannot shorten the waiting period.
| Category | Details |
|---|---|
| 72 hours First deposit |
On Upbit or Bithumb, your first KRW deposit starts a 72-hour (3-day) hold on all crypto withdrawals. The hold expires automatically; no separate request is required. |
| 24 hours Subsequent deposits |
From your second deposit onward, the total KRW deposited within the preceding 24 hours is the only amount subject to the withdrawal hold. Example: if you already hold USDT and deposit another KRW 1 million today, you may withdraw your other holdings now, excluding that KRW 1 million's worth. |
Register 3 days before your trading date and make even a small KRW deposit so the 72-hour hold can expire before you need to transfer funds.
B-1
Register with UpbitFrom app installation to ID verification · 12 illustrated steps
▾
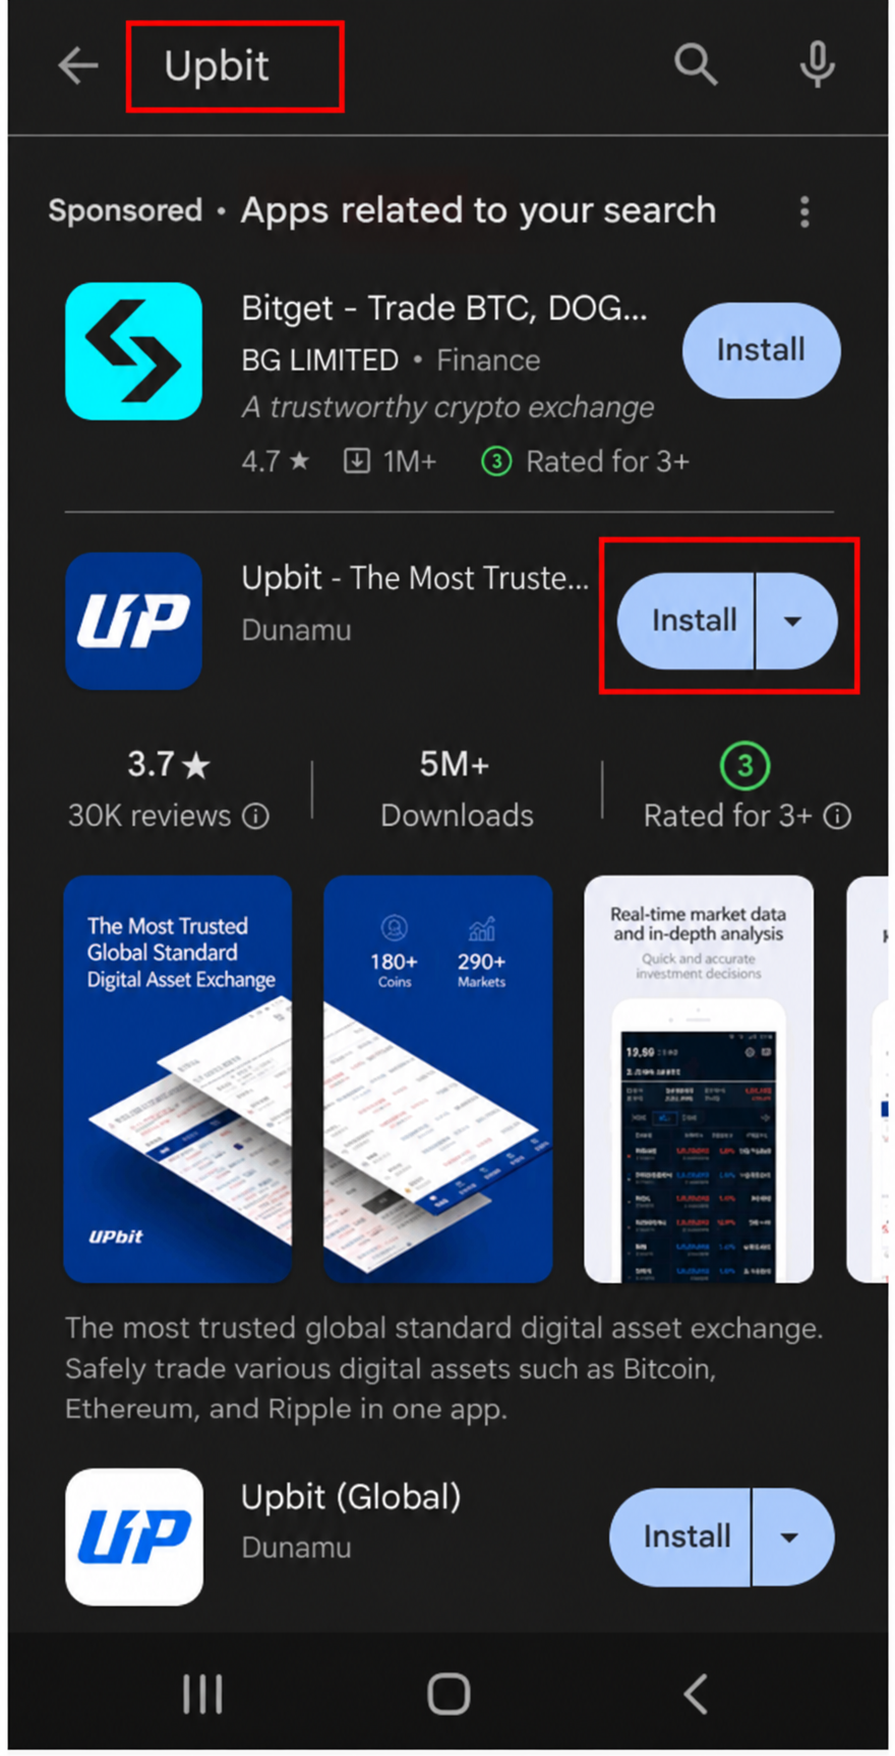
In the App Store or Google Play, search for Upbit. Check that the publisher is Dunamu. The first result may be an advertisement for a different exchange. Upbit (Global), shown below, is the international version and does not support Korean KRW deposits.
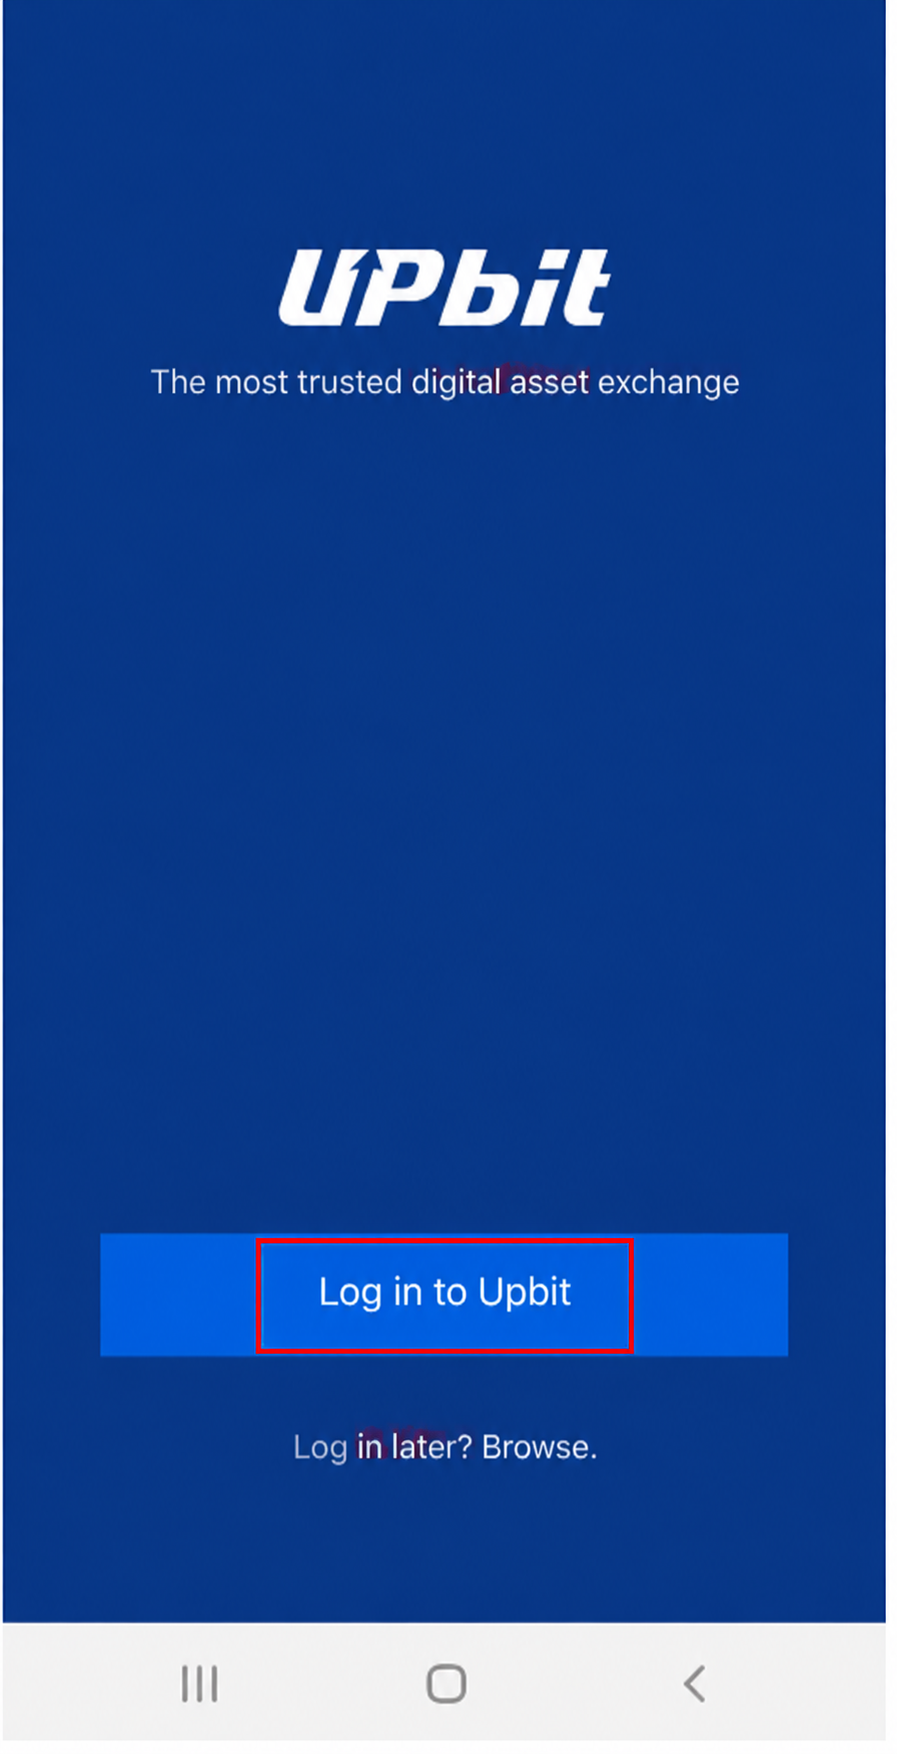
Open the app and tap [Log in to Upbit]. You can also start registration through this button if you do not have an account.
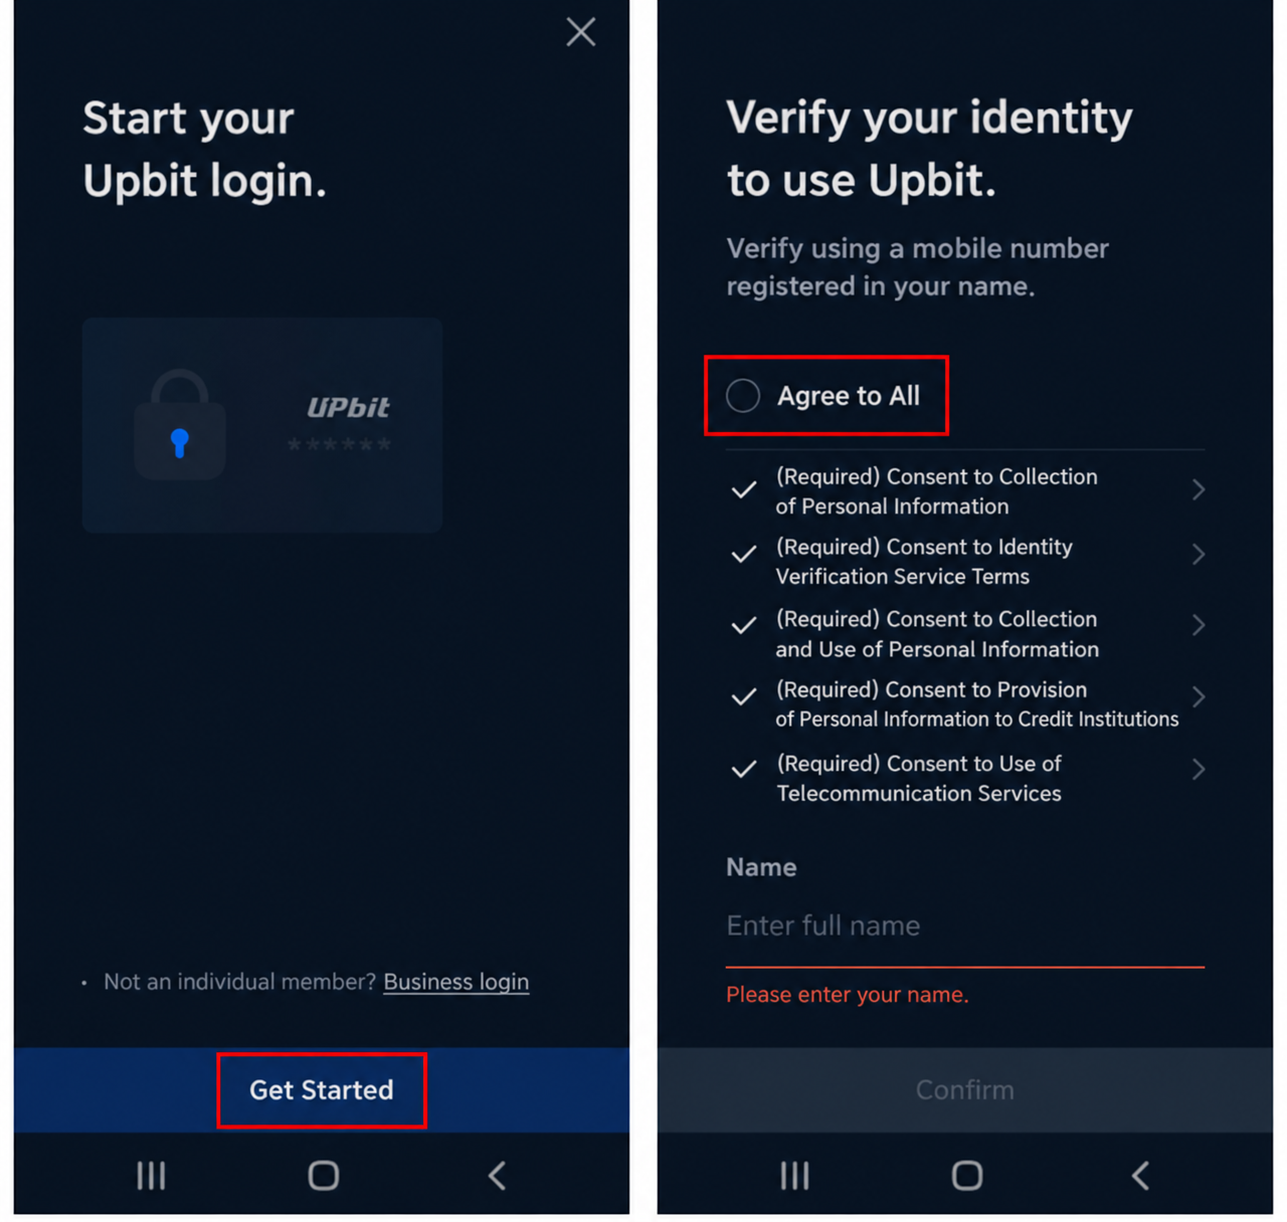
Tap [Start Upbit], then select [Agree to all]. Verification requires a phone registered in your own name; a family member's phone cannot be used.
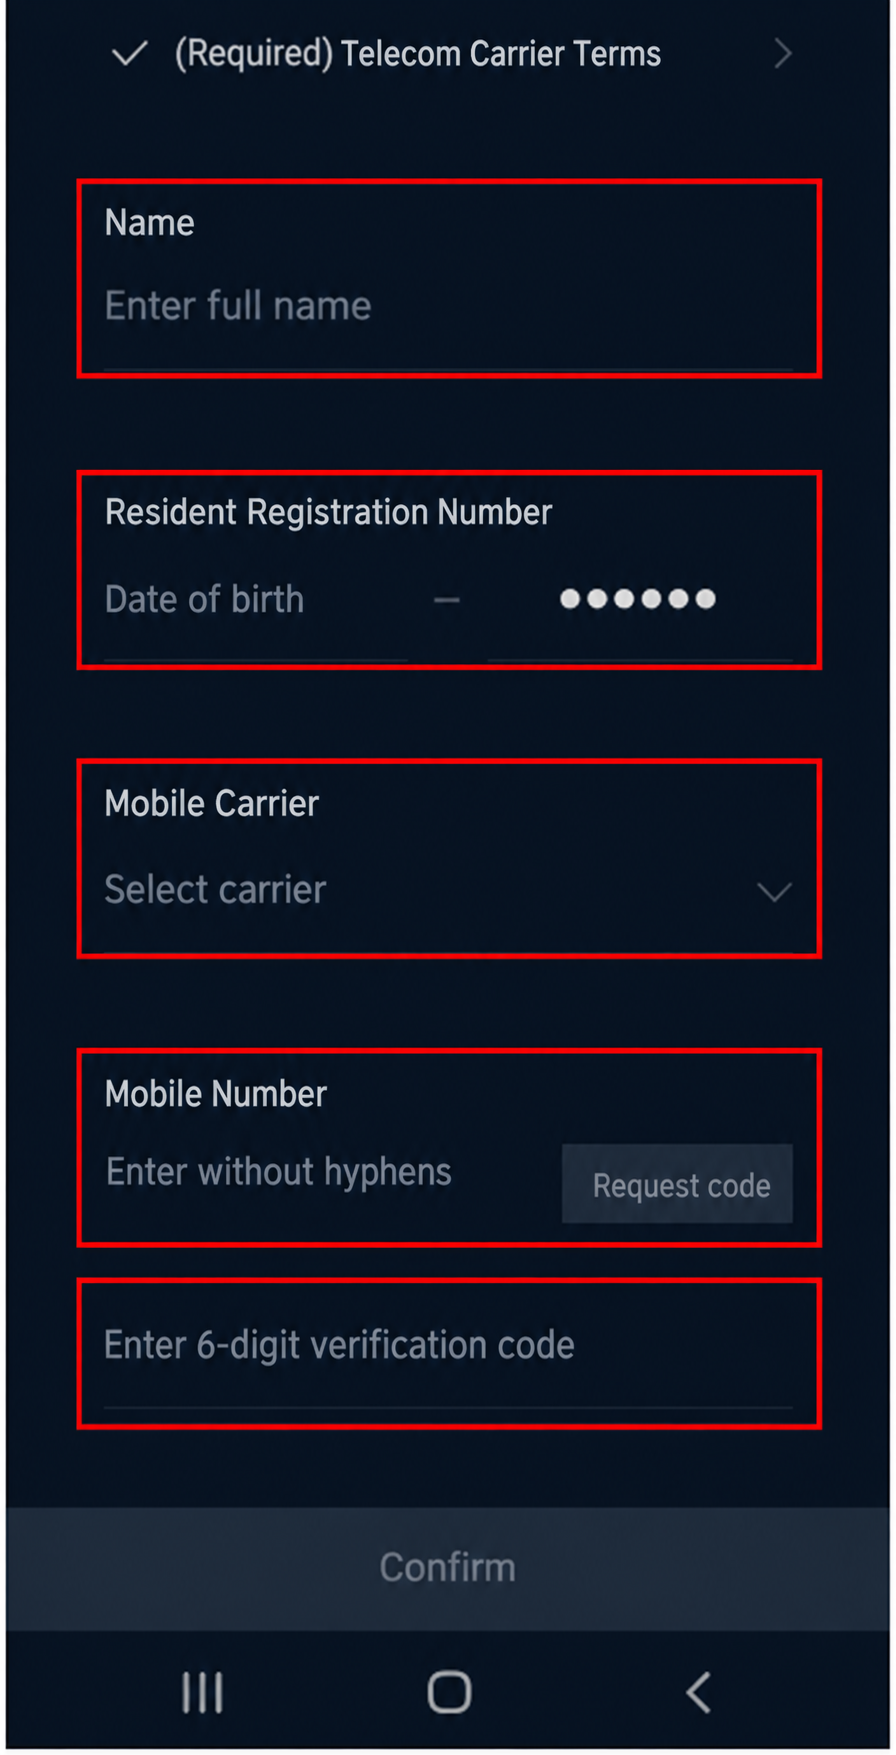
Enter your name, resident registration number, mobile carrier, and phone number, then tap [Request verification] to receive a text message containing a 6-digit code. Enter your phone number without hyphens (-) or spaces.
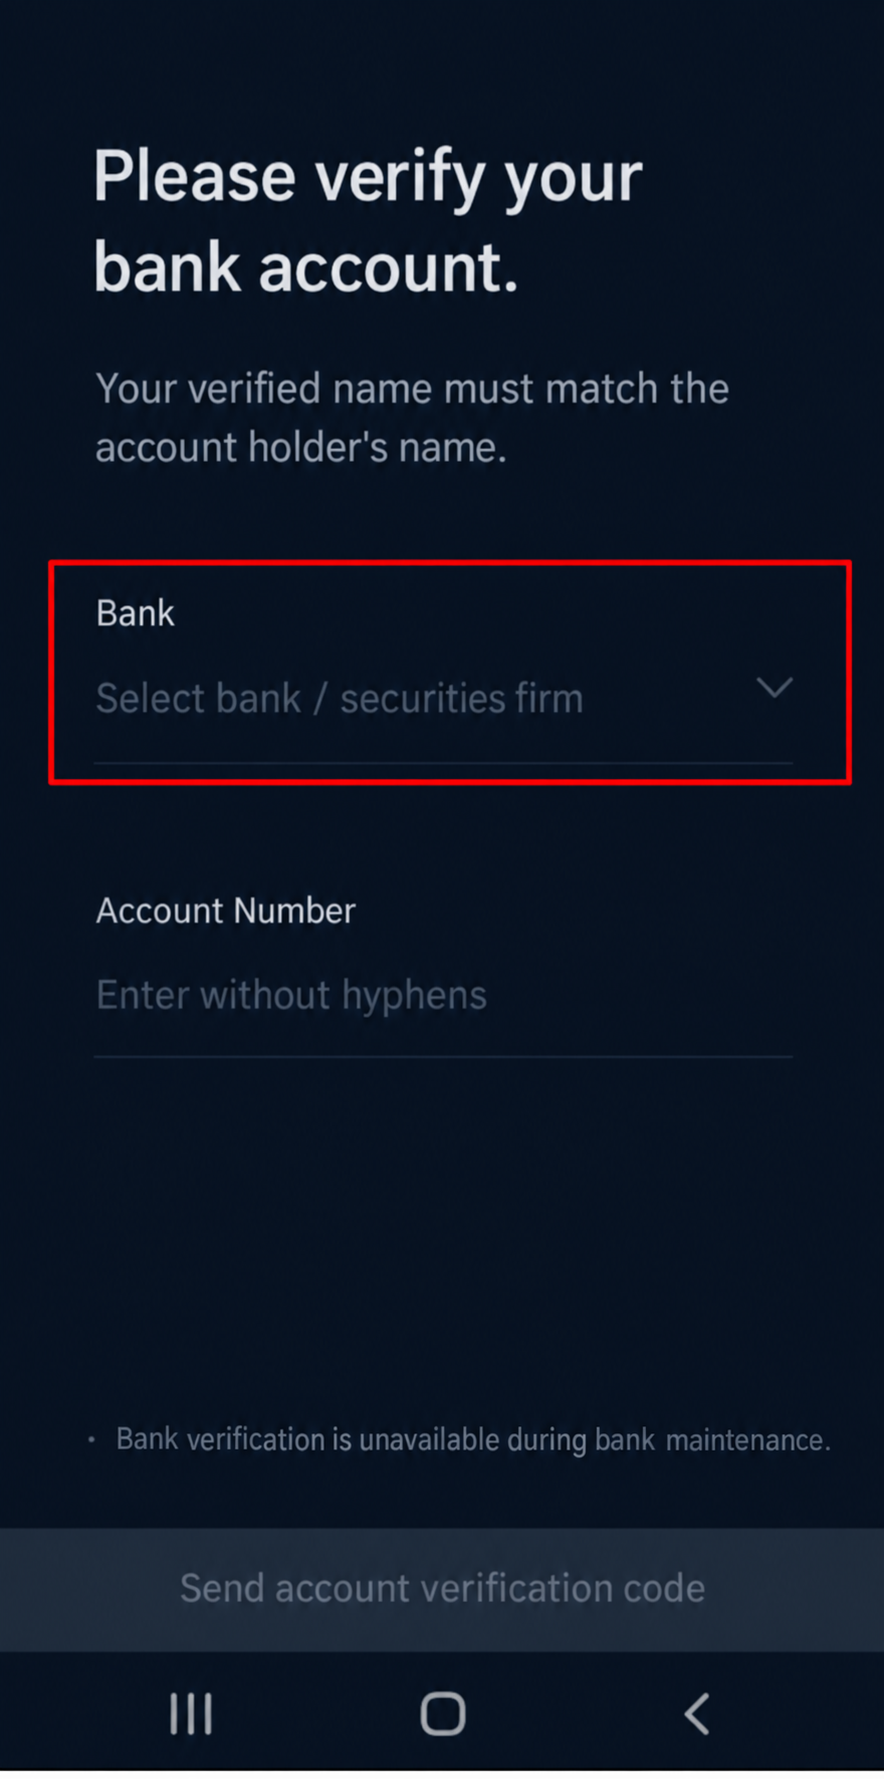
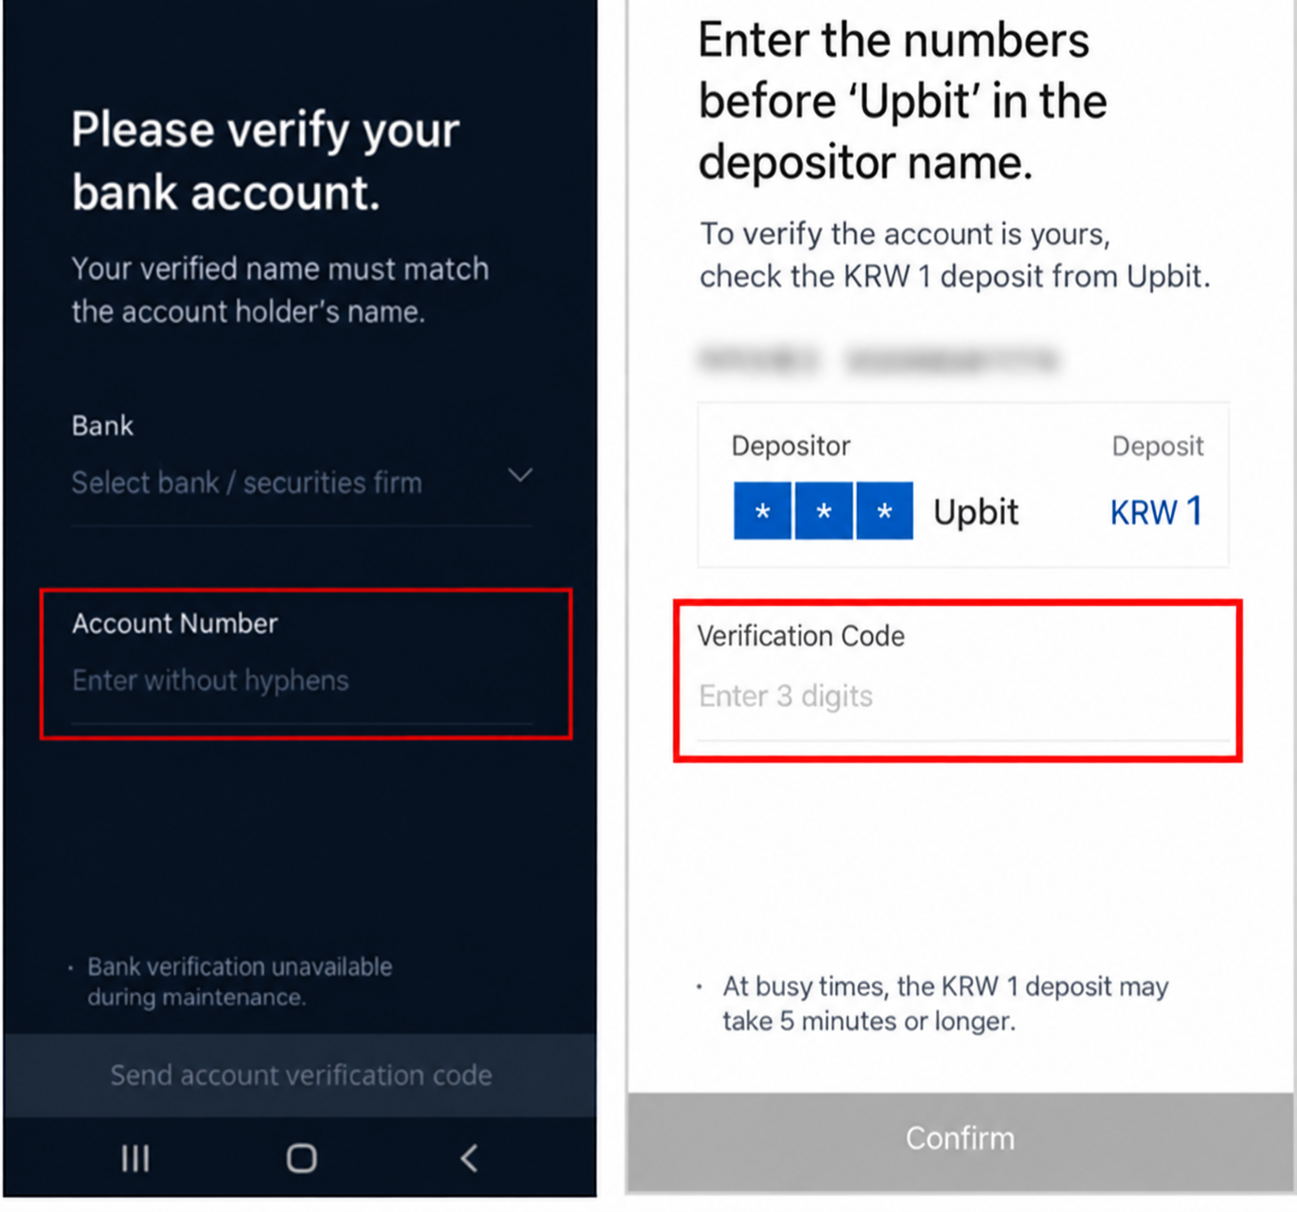
This step verifies your real name using a bank account in your own name. The account holder's name must match your legal name for verification to succeed.
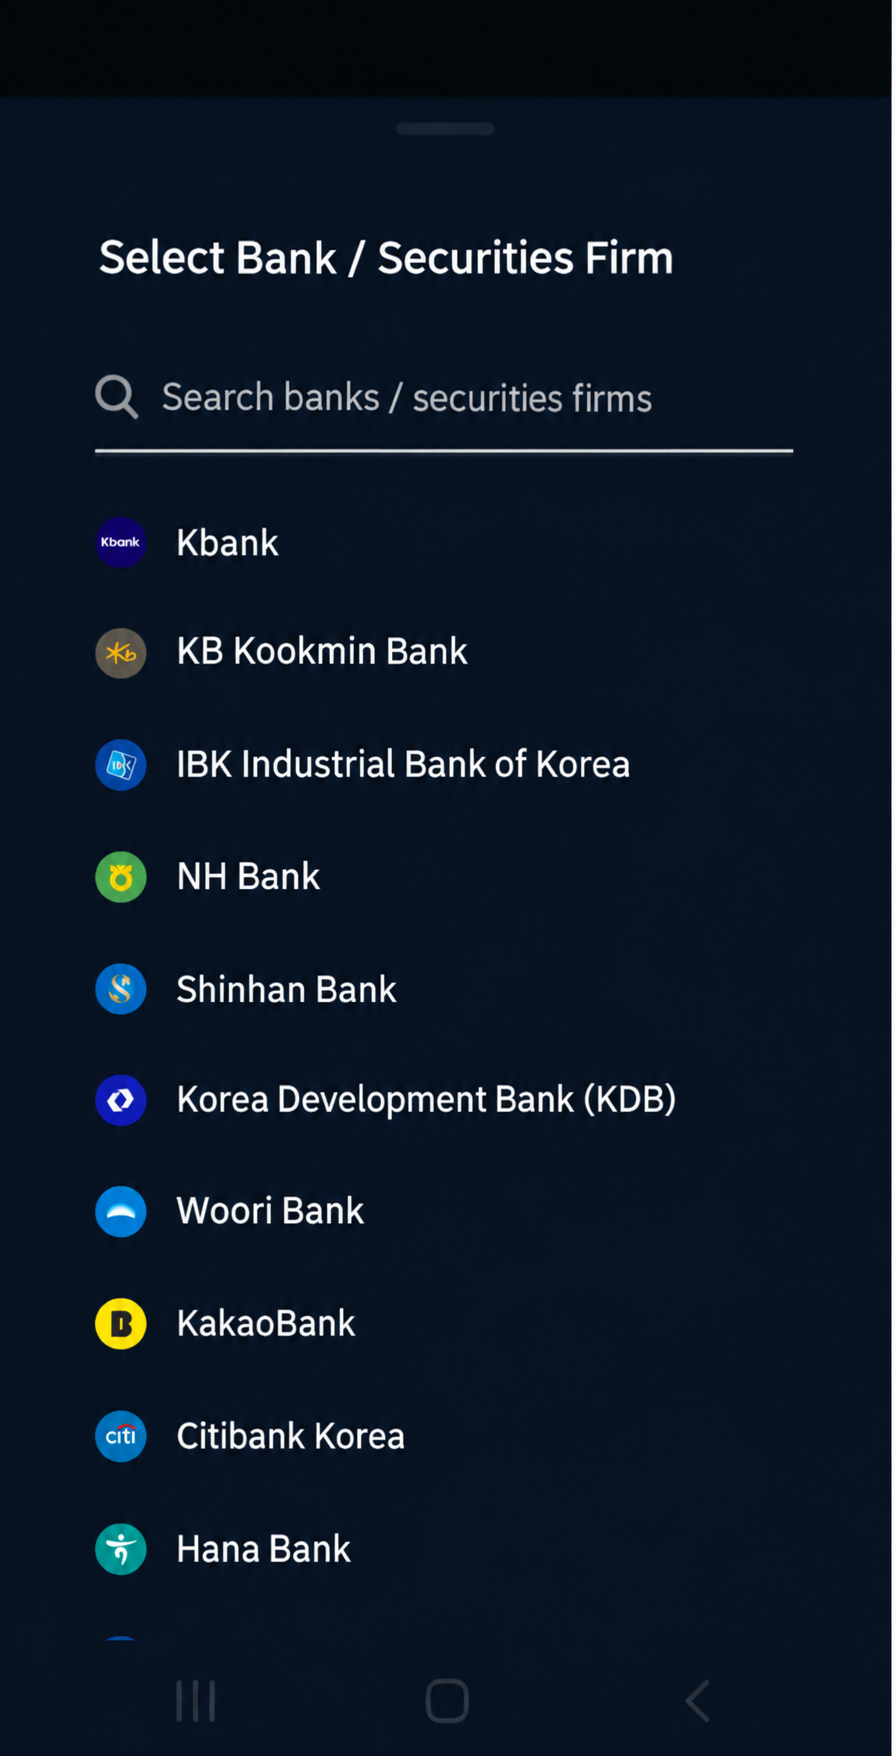
Several banks appear in the list, but select Kbank. On Upbit, a Kbank account is required for KRW deposits and withdrawals. If you use another bank at this stage, you will need to register a Kbank account later.
Enter your account number and tap [Send account verification code]. Upbit sends KRW 1 to the account.
Open the deposit history in the Kbank app. The sender appears as
“○○○ Upbit”. Enter the first 3 digits to complete verification.
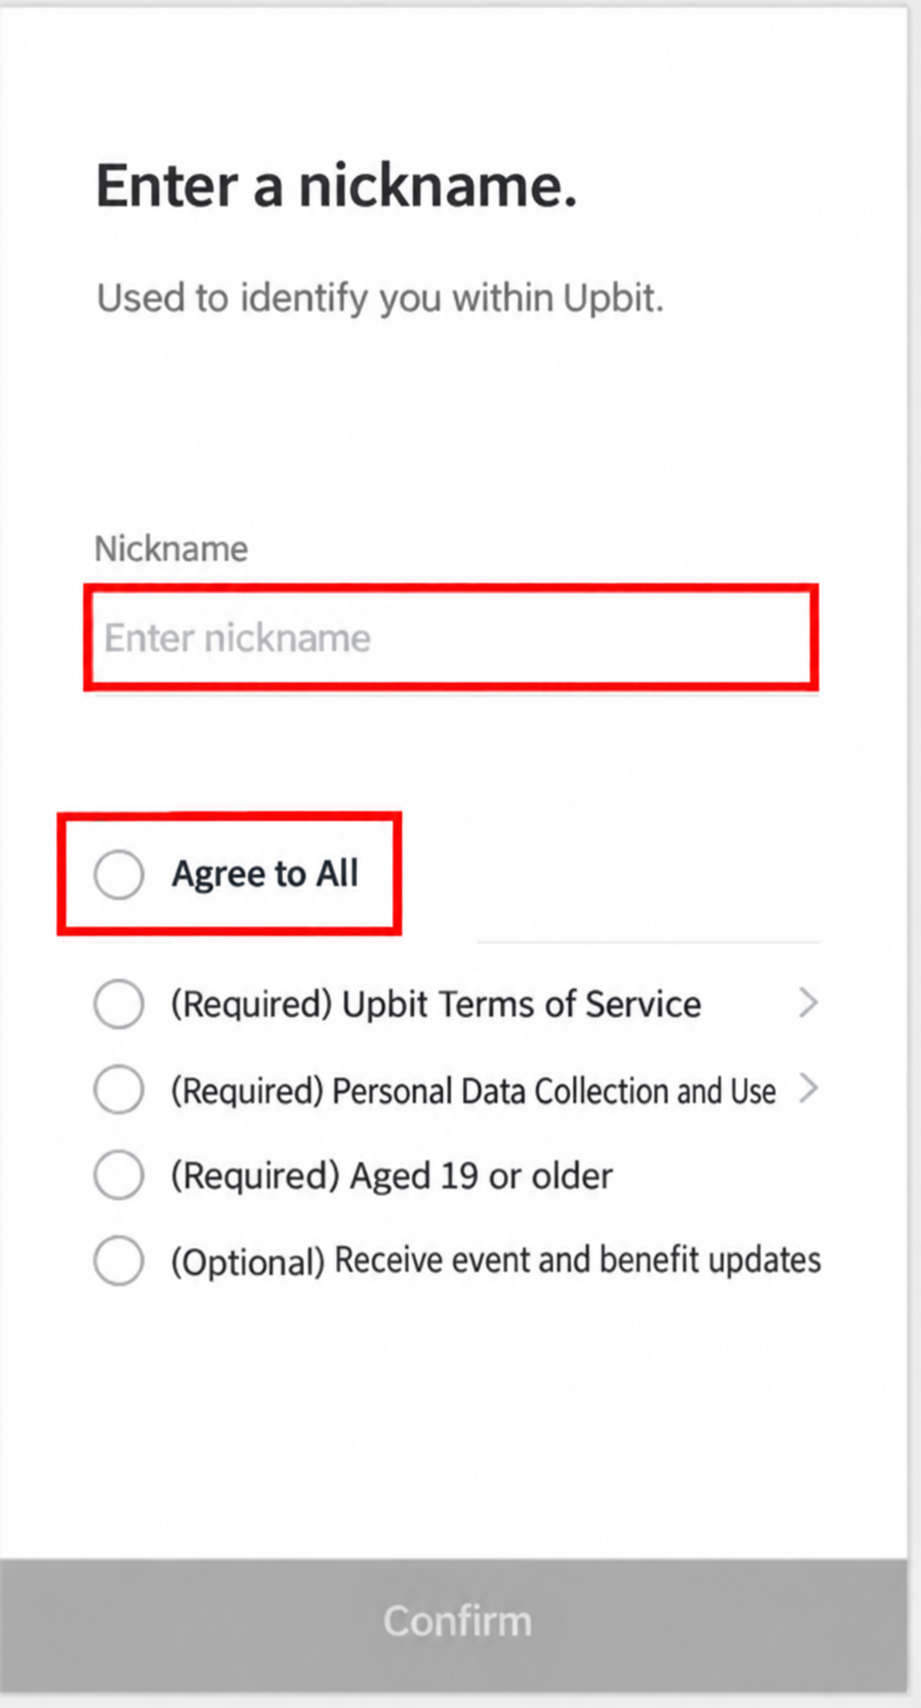
Choose a nickname for Upbit and select [Agree to all]. The final option, Optional event notifications, does not need to be selected.
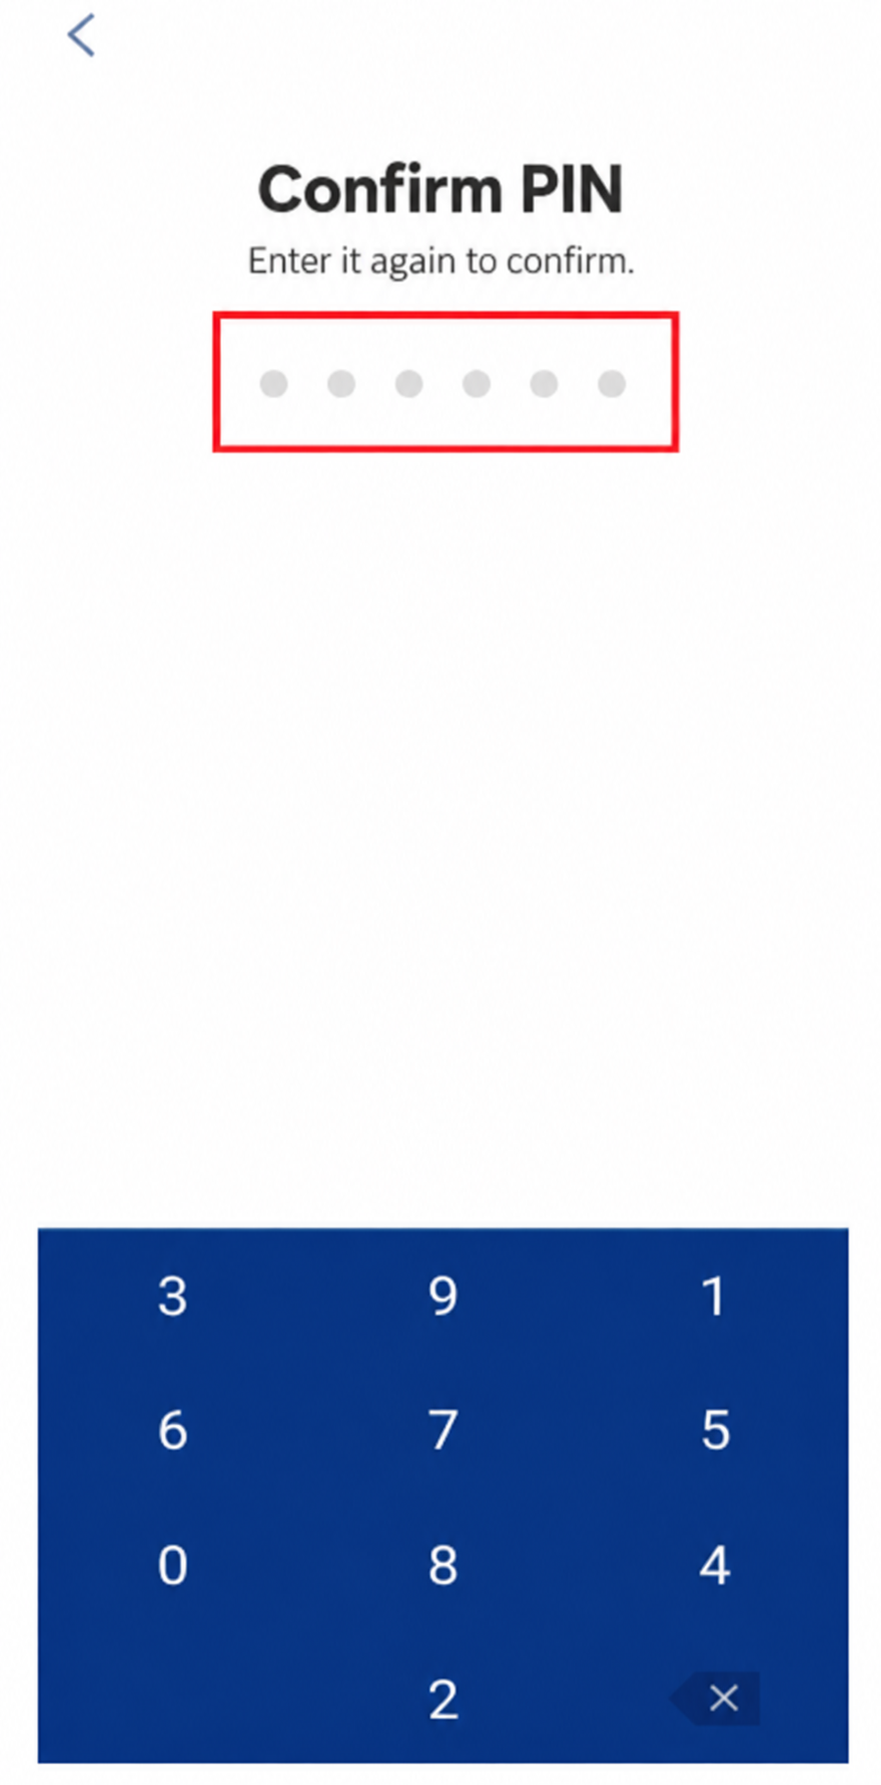
Create a 6-digit PIN to open the app, then enter it again to confirm. For security, the numeric keypad changes its key positions each time. Remember this PIN; if you forget it, you must complete the reset procedure.
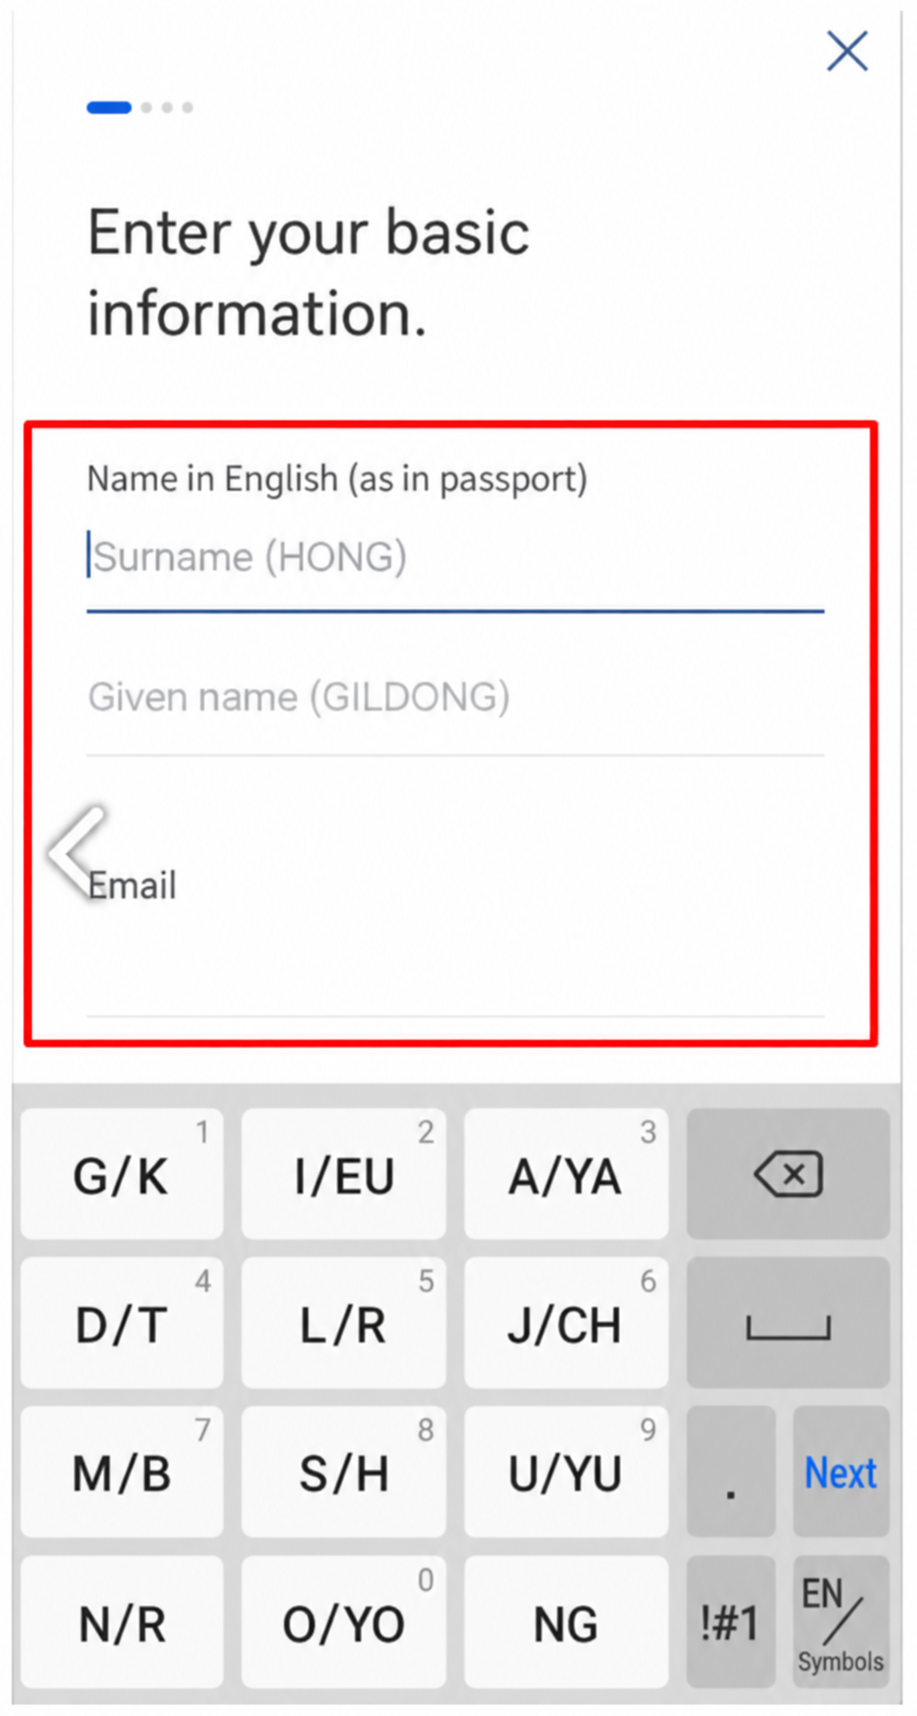
Enter your surname and given name in English. Example — Surname: HONG / Given name: GILDONG
Use exactly the English spelling shown on your passport. When you later send KRW 1 million or more to Binance, your registered name and date of birth on both exchanges must identify the same person for the withdrawal to proceed under the Travel Rule. Entering a different name here can block that transfer.
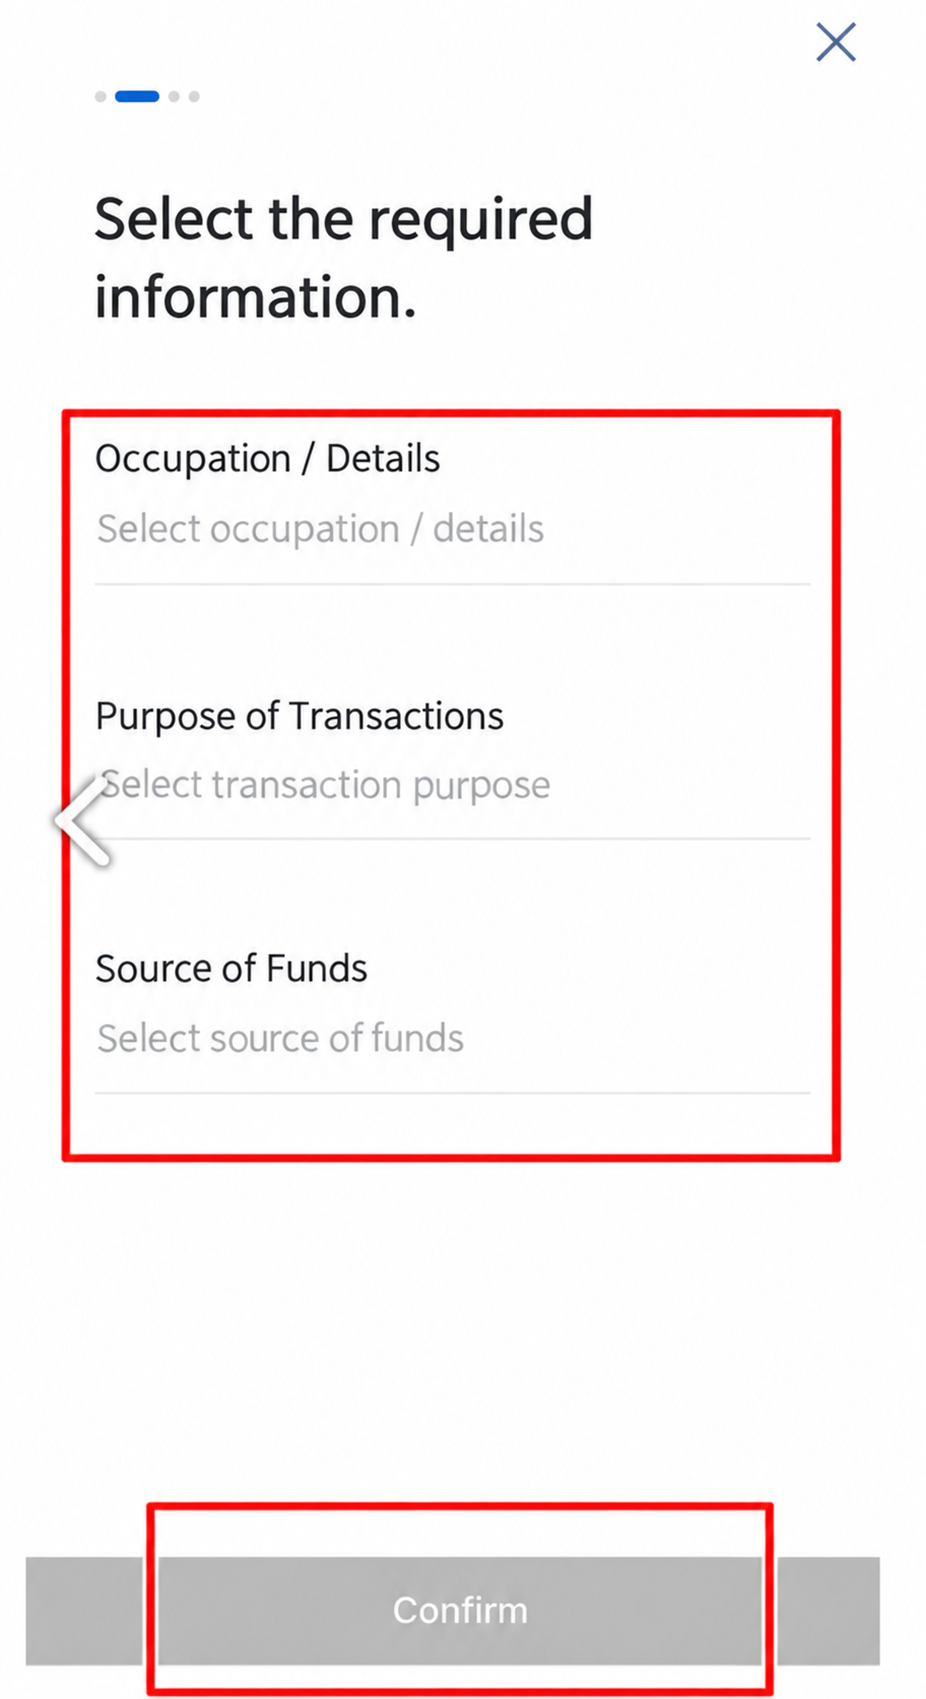
Select an answer for each of these three fields. They are required Know Your Customer (KYC) information under the law. Answer truthfully— Inaccurate information can lead to trading restrictions later.
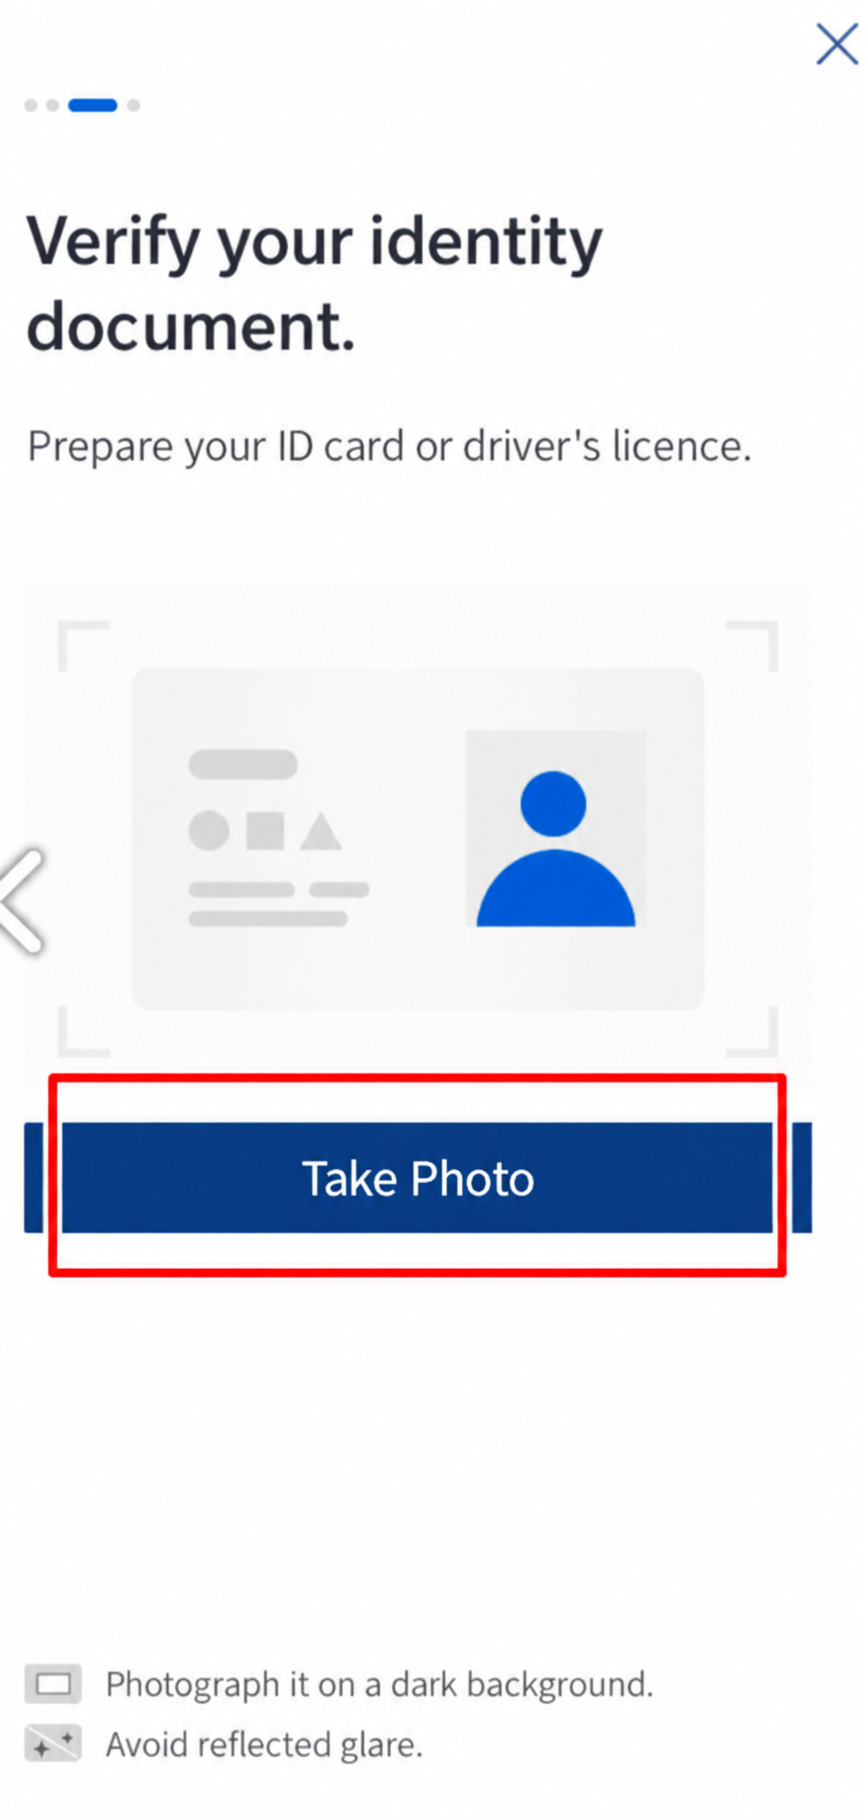
A resident registration card or a driver's license is required. Tap [Take photo] to continue.
KRW deposits become available after review. This usually takes a few minutes to a few hours, although high application volumes can increase the time. Continue when you receive approval notification.
The name on your Upbit account, Kbank account, and ID must be exactly the same. You cannot use a family member's account. Each Kbank account can be connected to only one Upbit account.
B-2
Add KRW fundsKbank → Upbit · 8 illustrated steps
▾
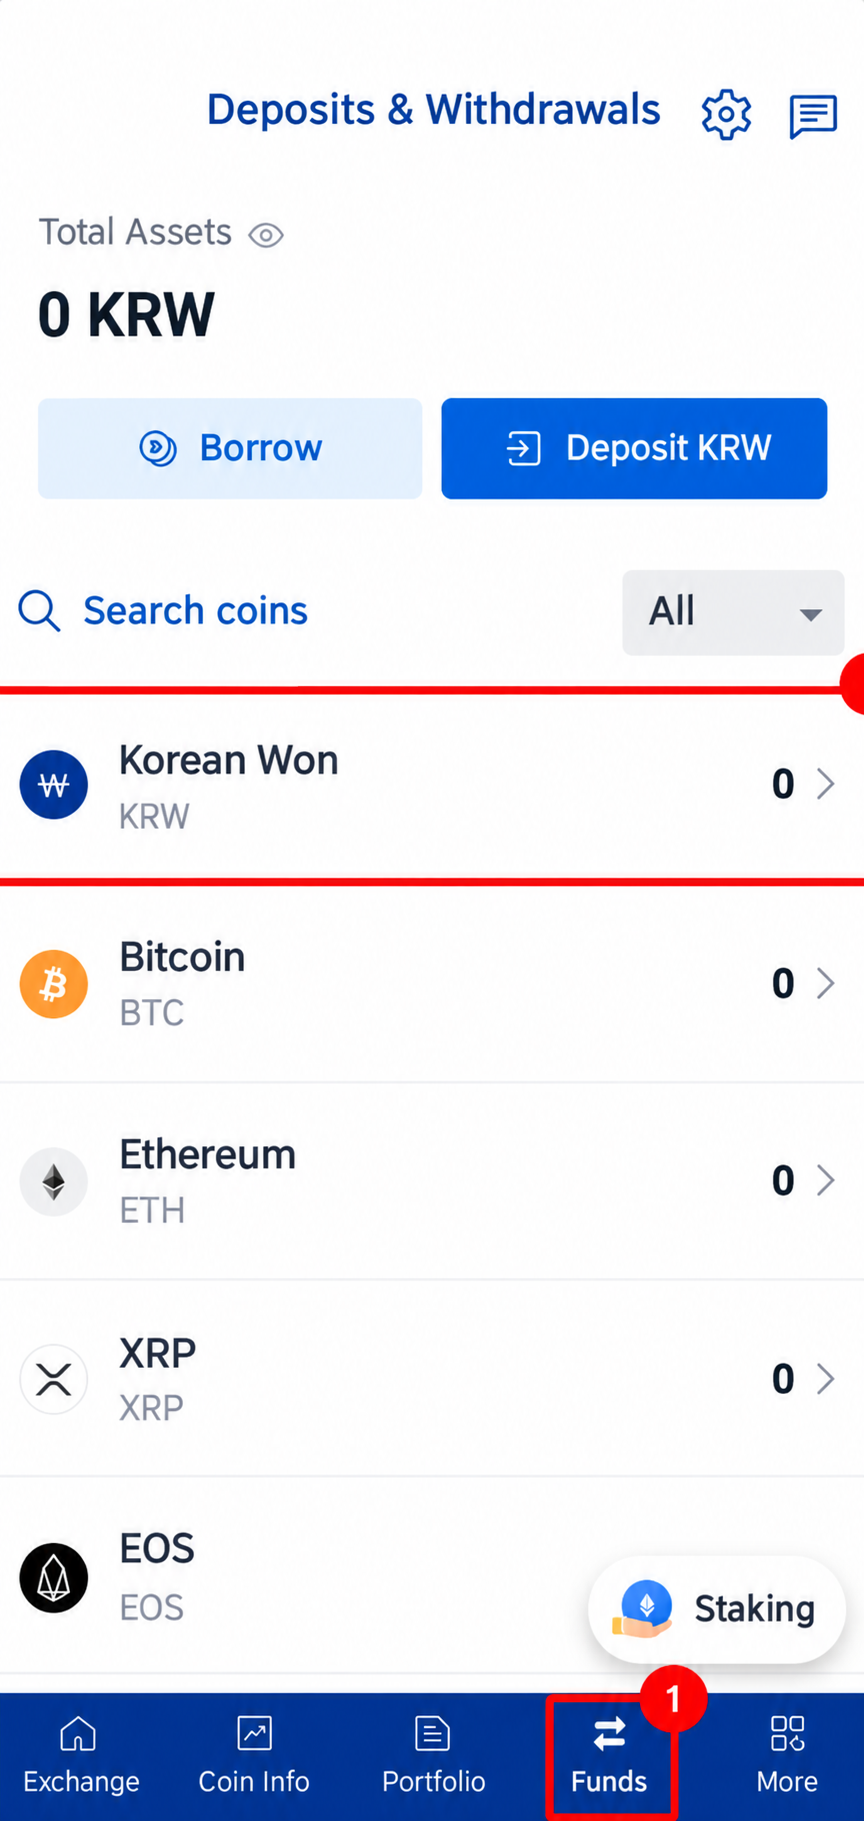
At the bottom of the app, ① [Deposit/Withdrawal] opens the list. Select the first item, ② KRW, to continue.
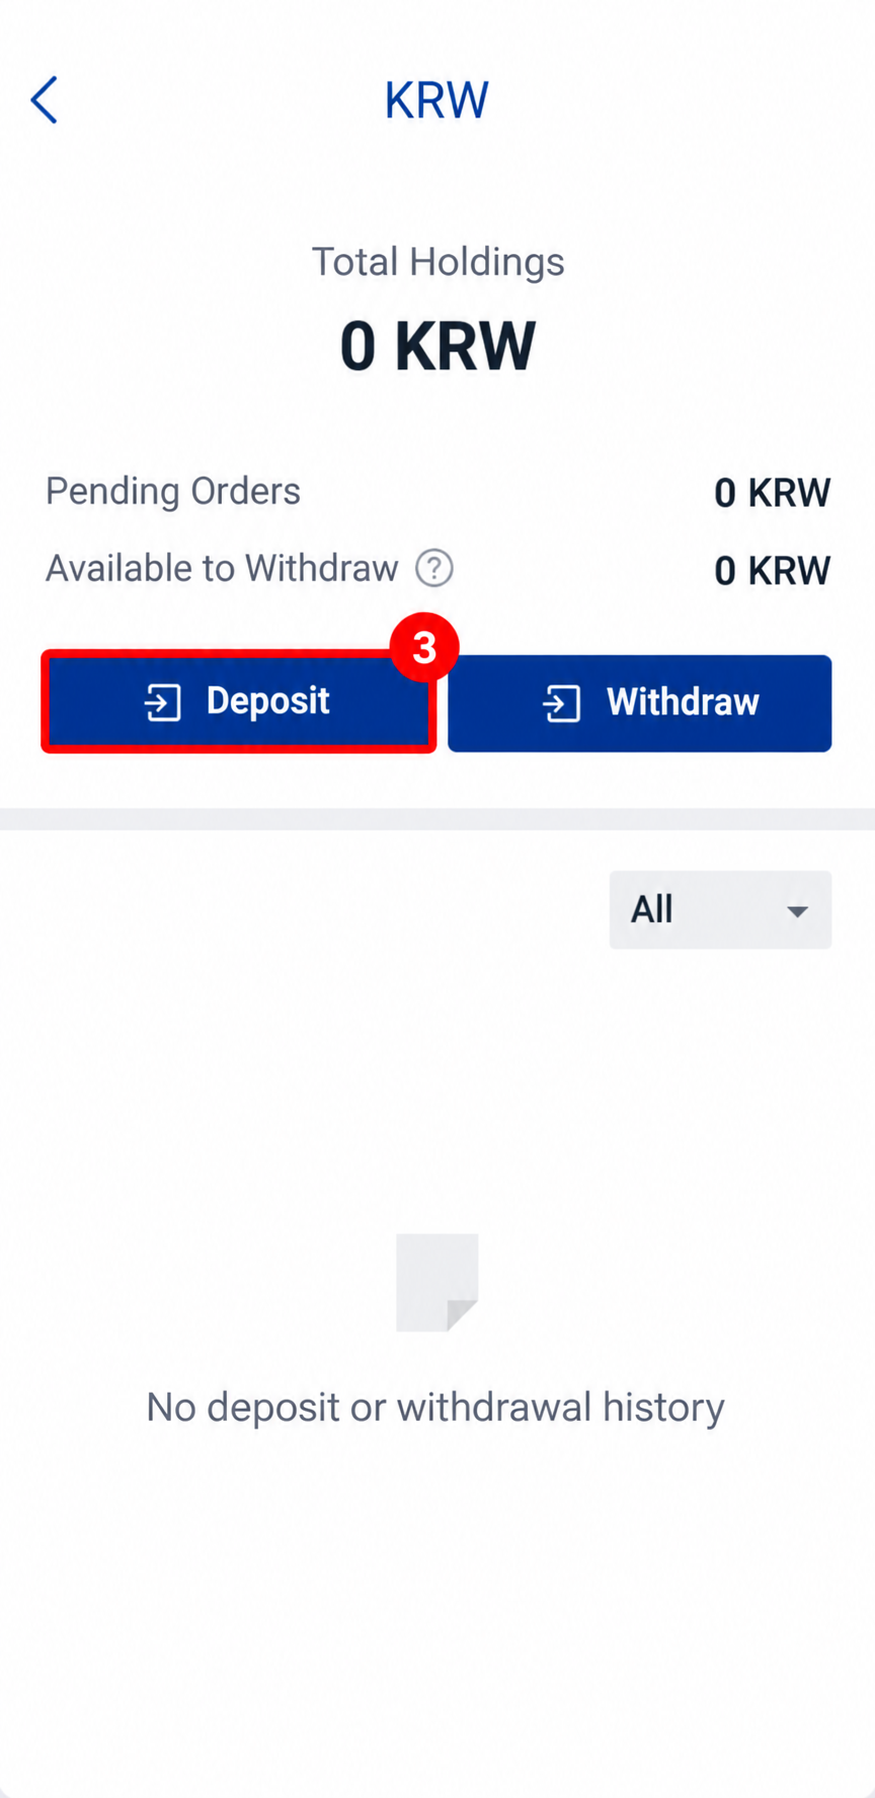
On the left, tap ③ [Deposit].
Your linked Kbank real-name account appears at the top. ④ Enter the amount to deposit and tap ⑤ [Request deposit] to continue.
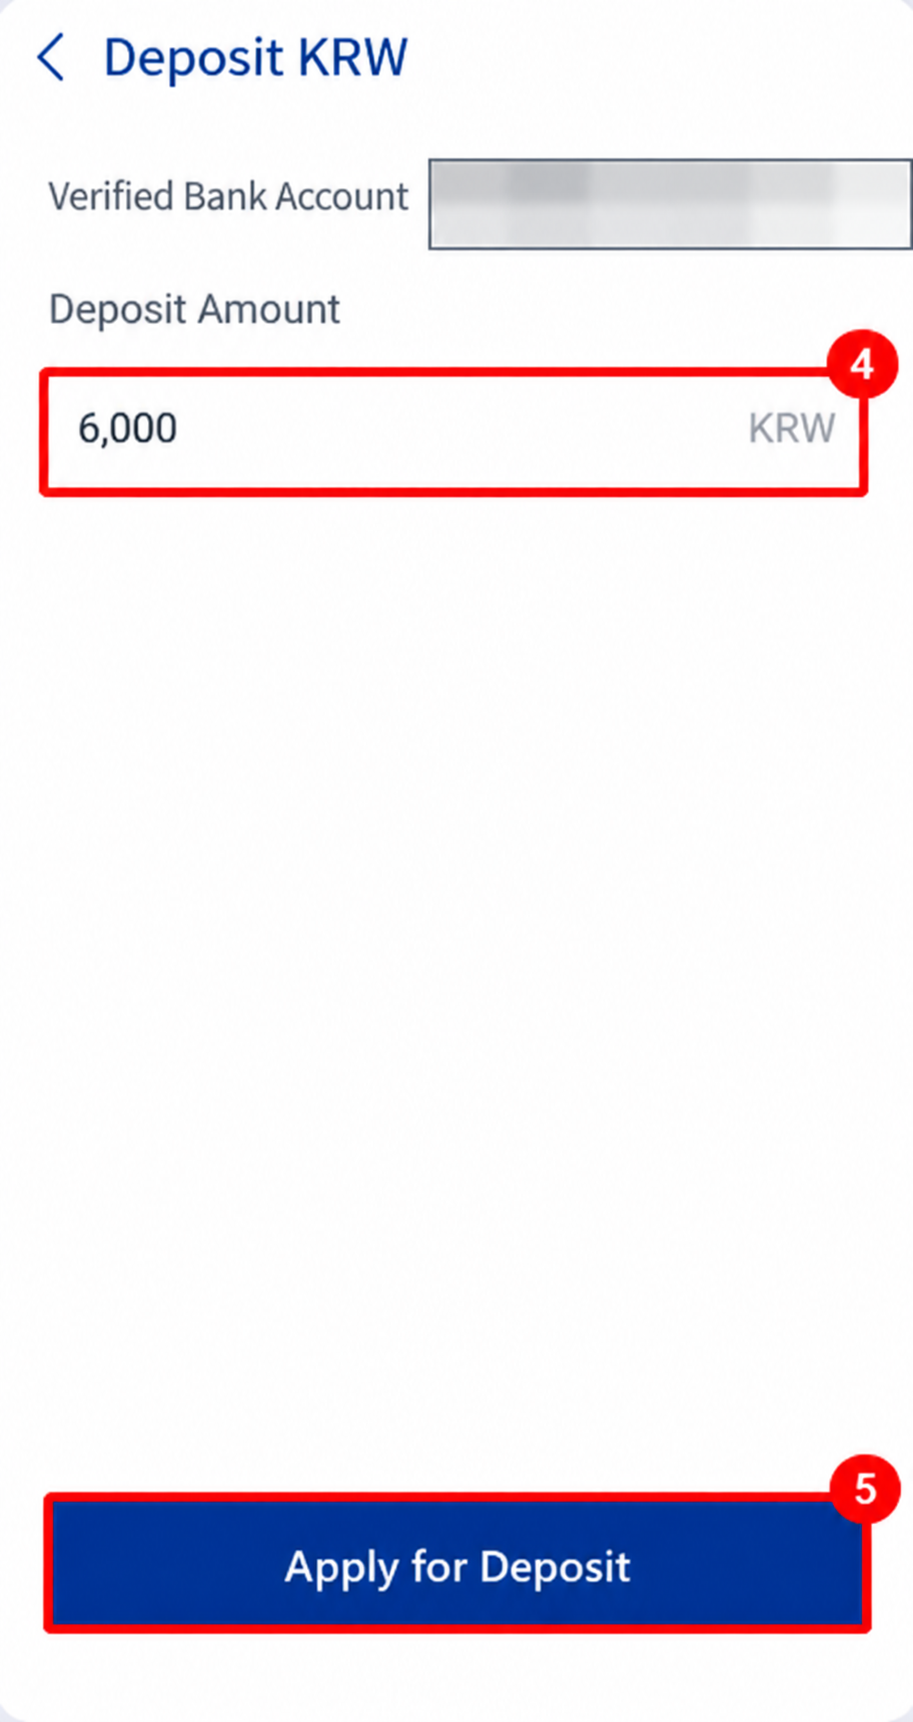
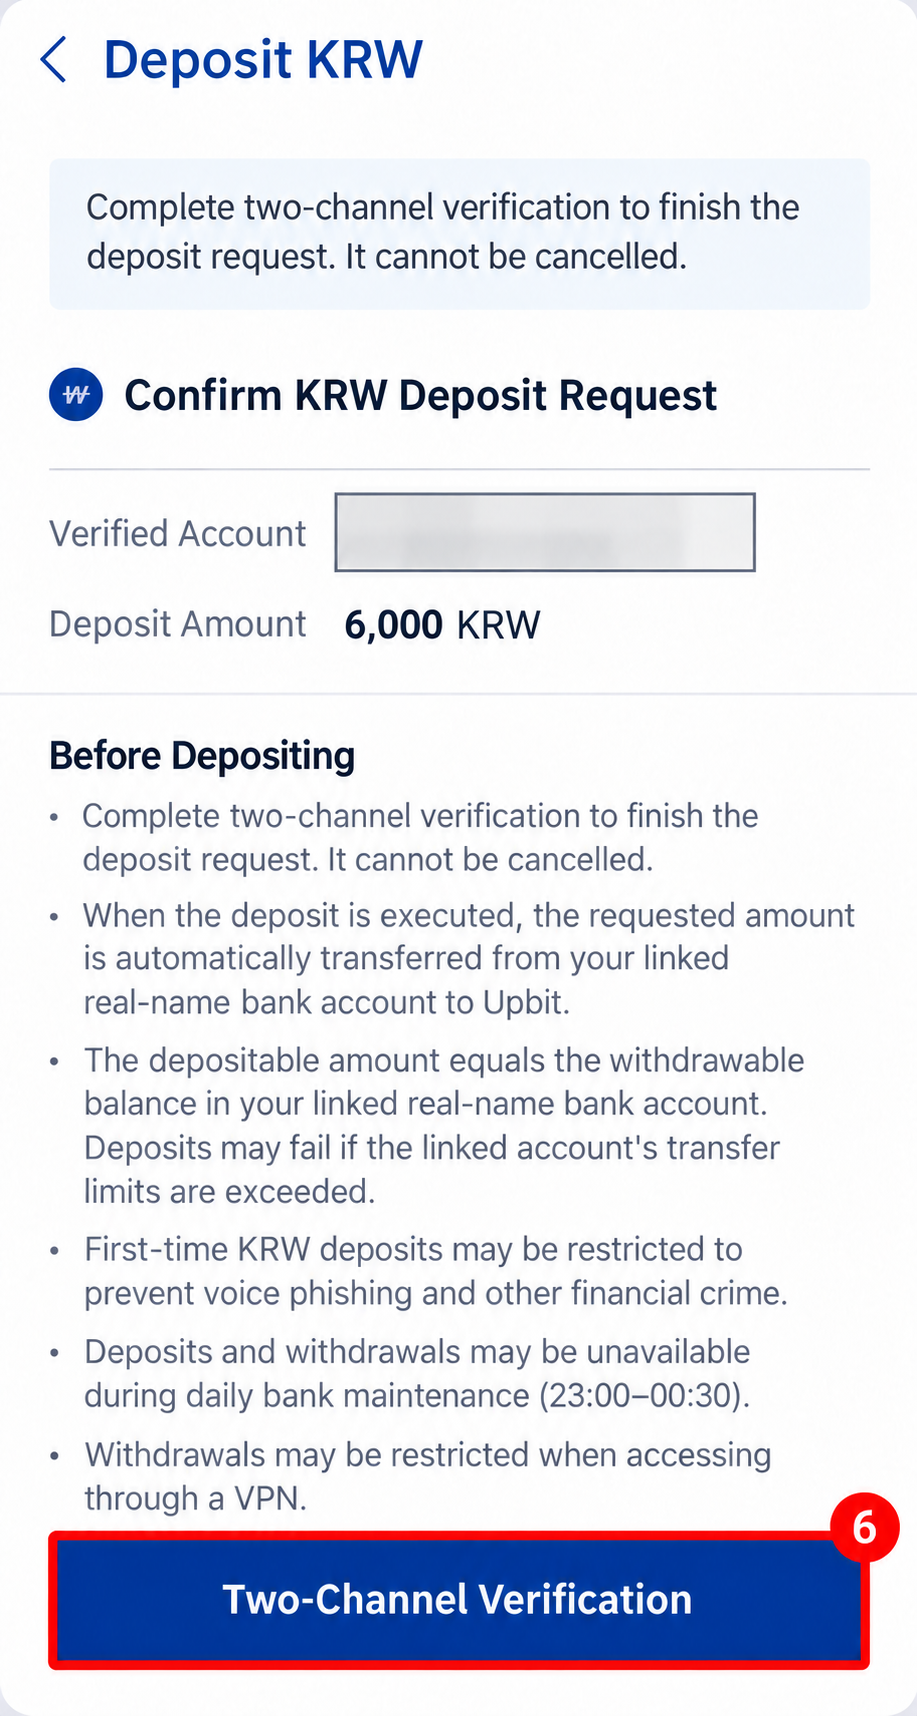
Check the amount one final time, then tap ⑥ [Two-channel verification].
· Bank maintenance (daily, 23:00–00:30) can interrupt deposits and withdrawals
· Your Kbank account's transfer limit must not be exceeded or the deposit cannot proceed
· VPN may restrict withdrawals if enabled when you connect
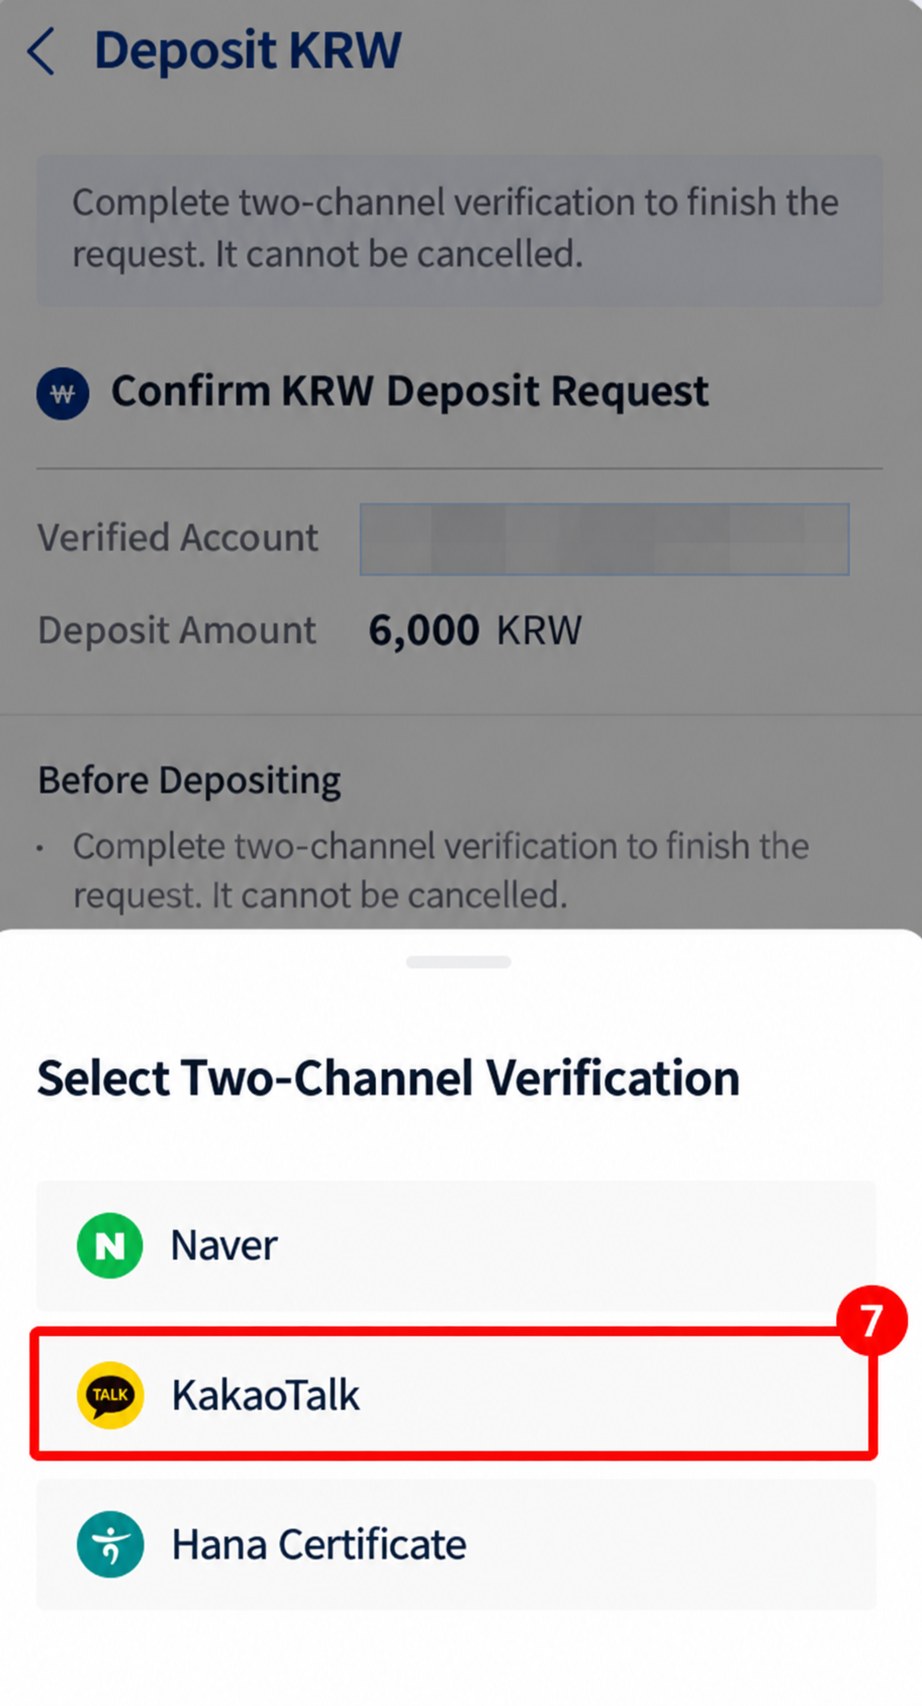
Naver · KakaoTalk · Hana Certificate are the available options. ⑦ KakaoTalk is the simplest option.
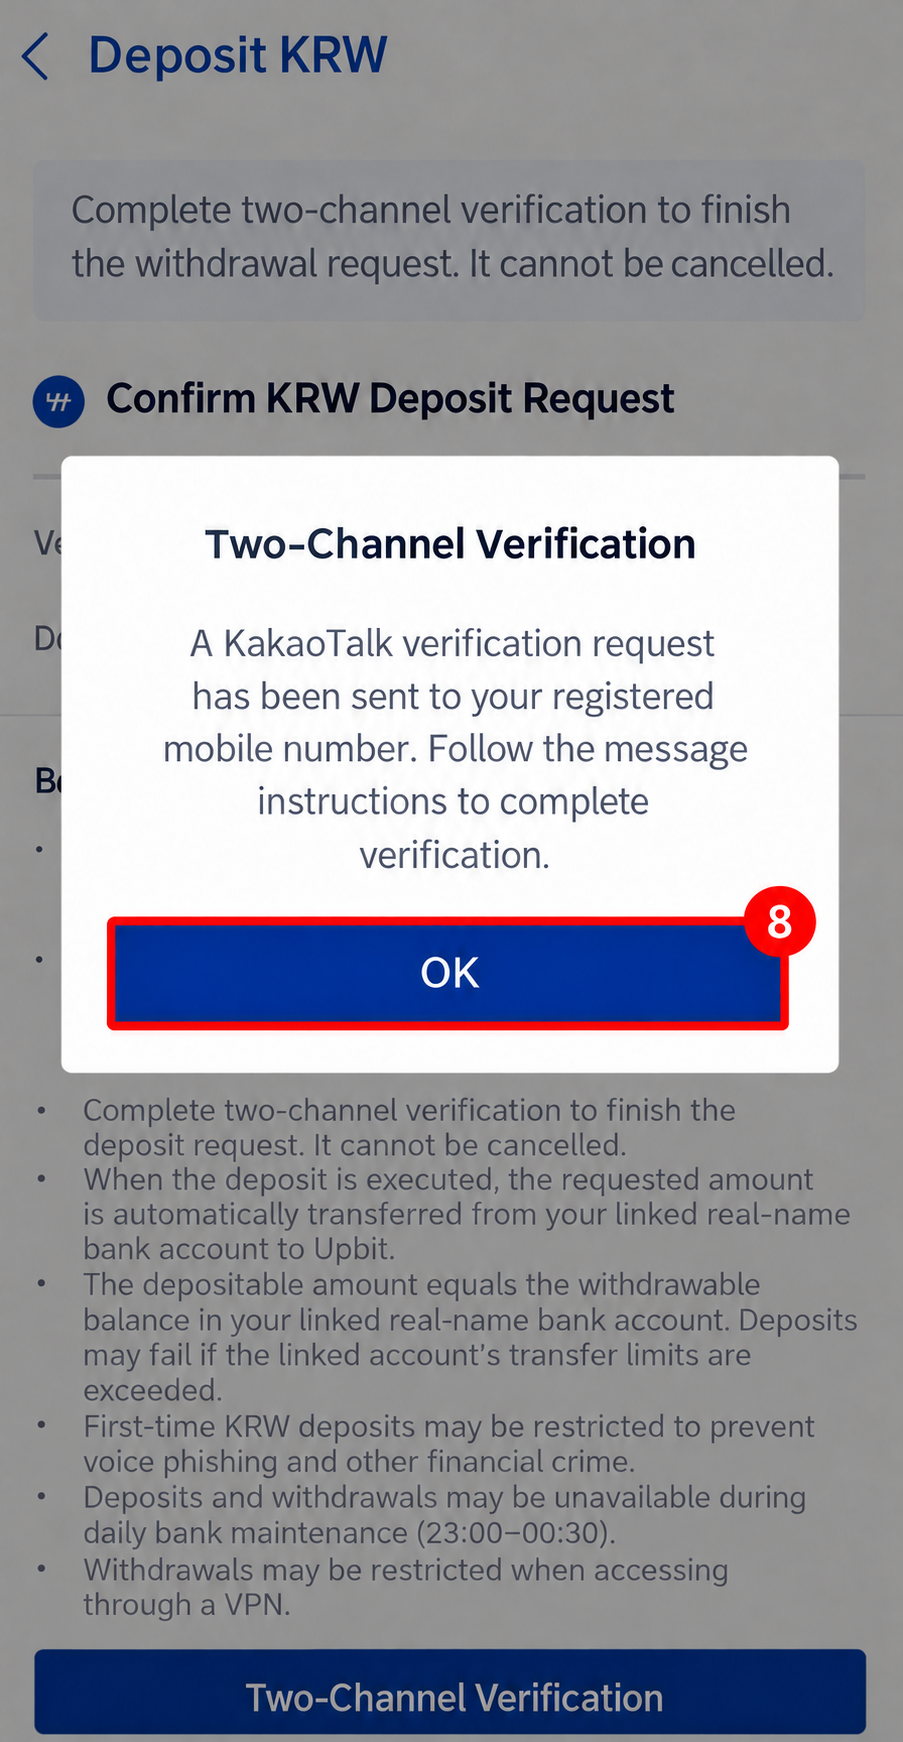
A verification message is sent to your registered mobile phone. Tap ⑧ [Confirm], then open KakaoTalk.
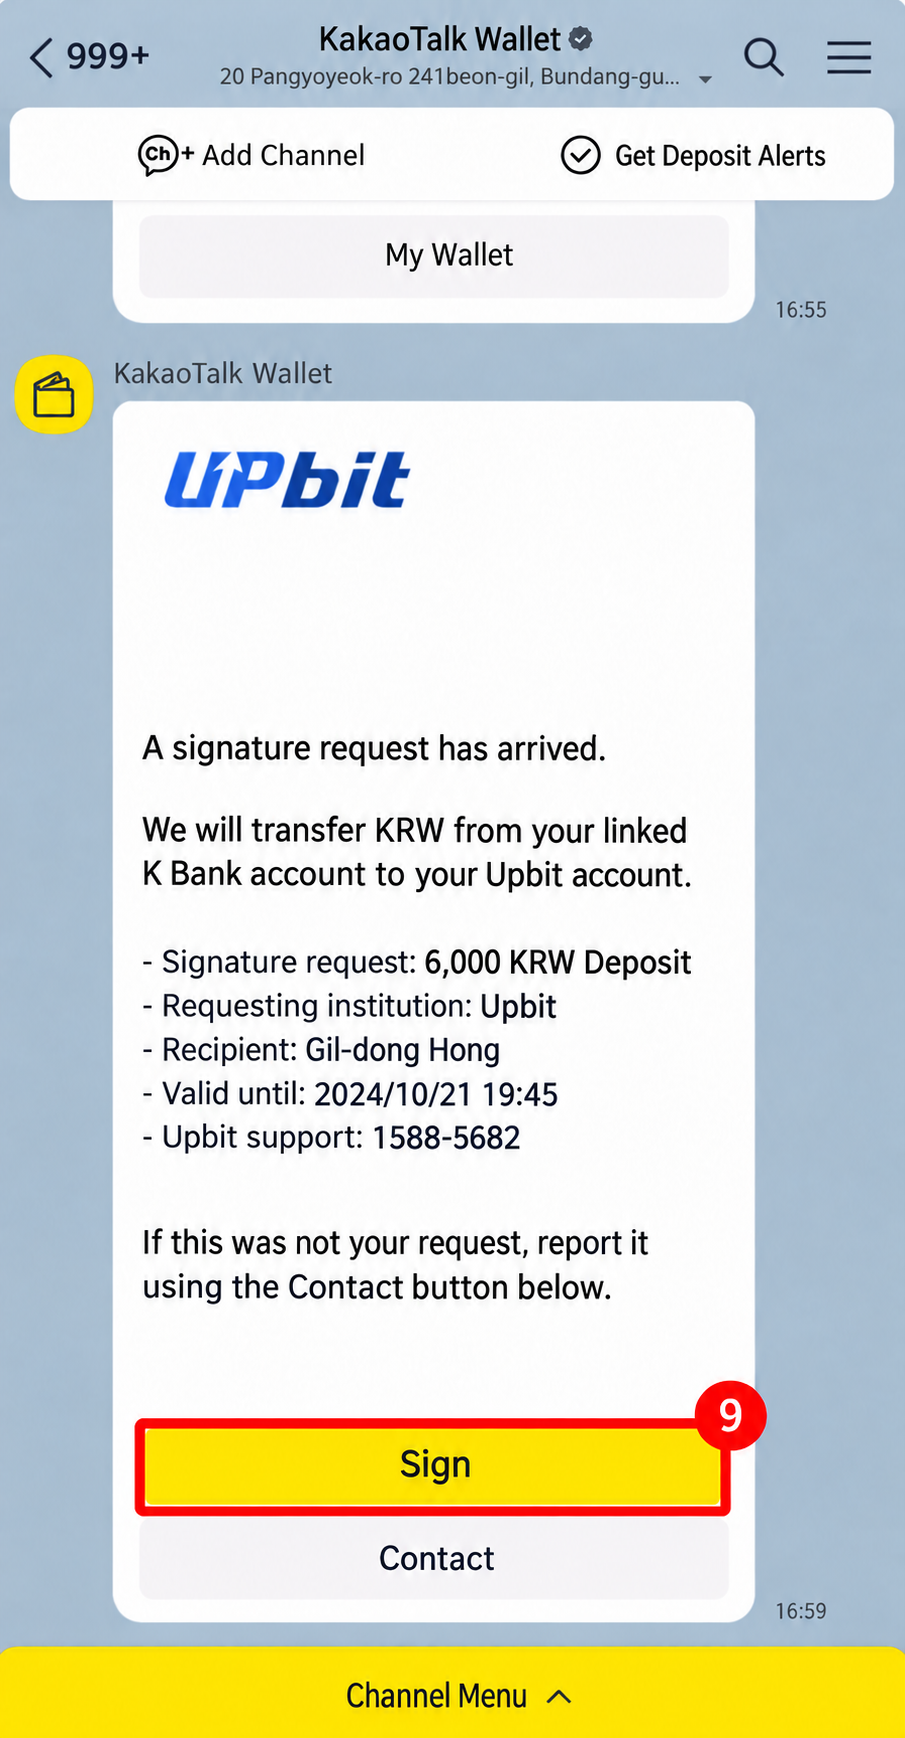
KakaoTalk Wallet sends a signature request. Check the amount and recipient (Upbit), then tap ⑨ [Sign].
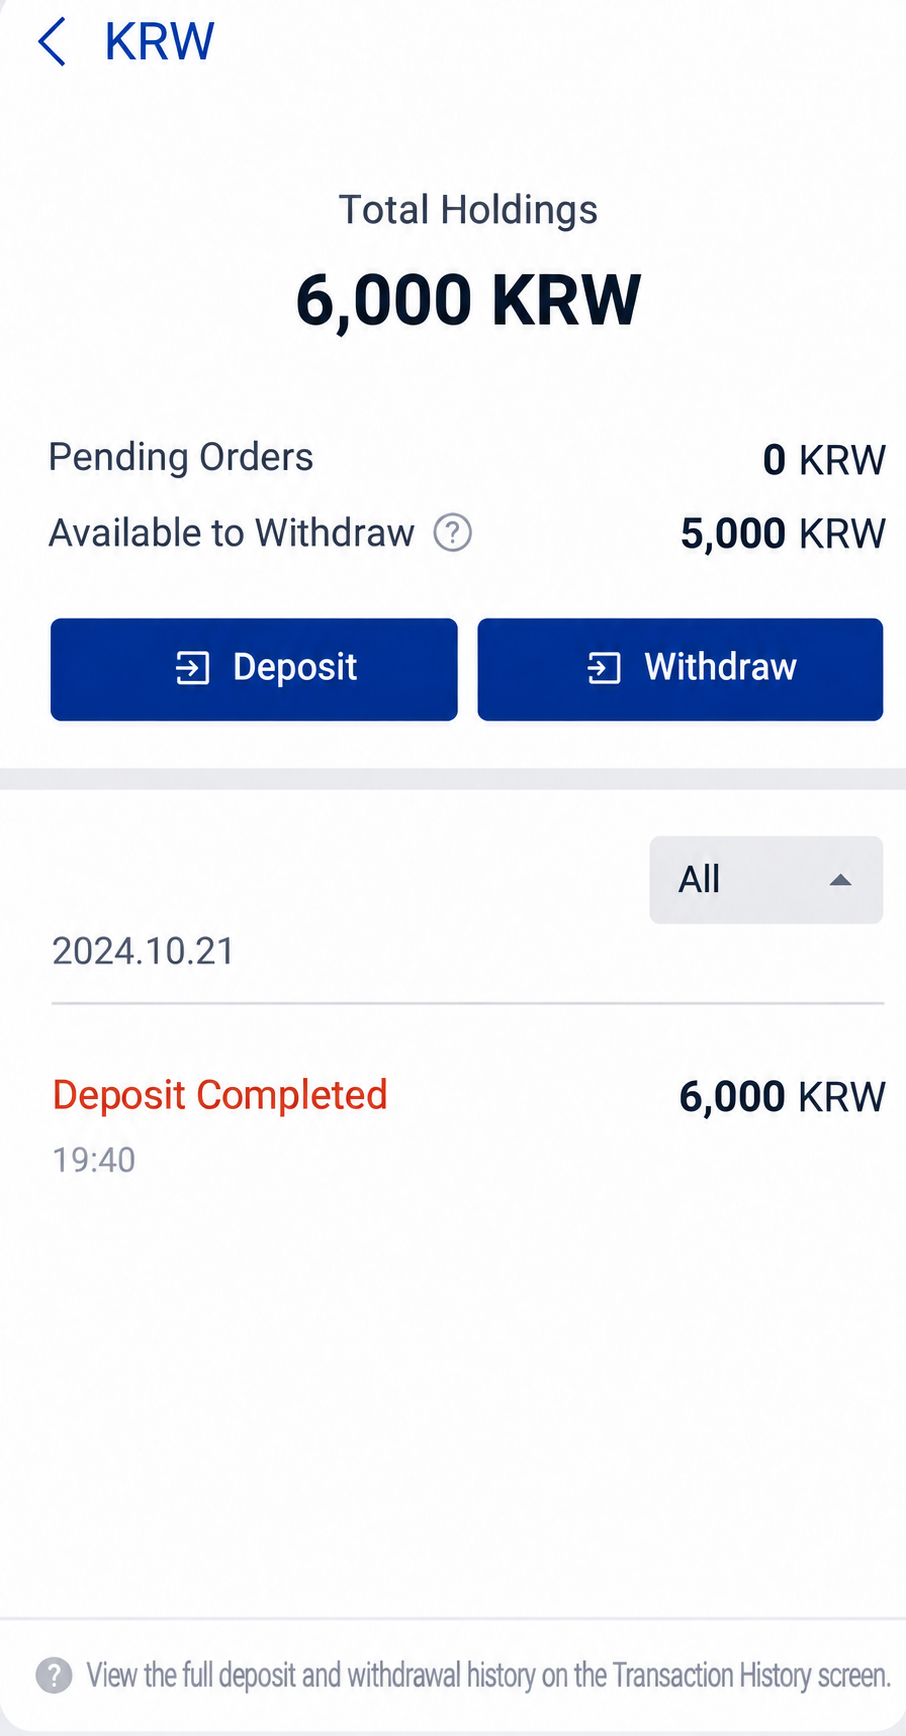
Deposit complete appears and the amount is reflected in your balance, usually immediately.
You may immediately buy or sell crypto with the deposited KRW, but transfers out of the exchange (withdrawals) are subject to a hold. Read the next step carefully.
B-3
Buy Tether (USDT)Buy USDT with KRW · 4 illustrated steps
▾
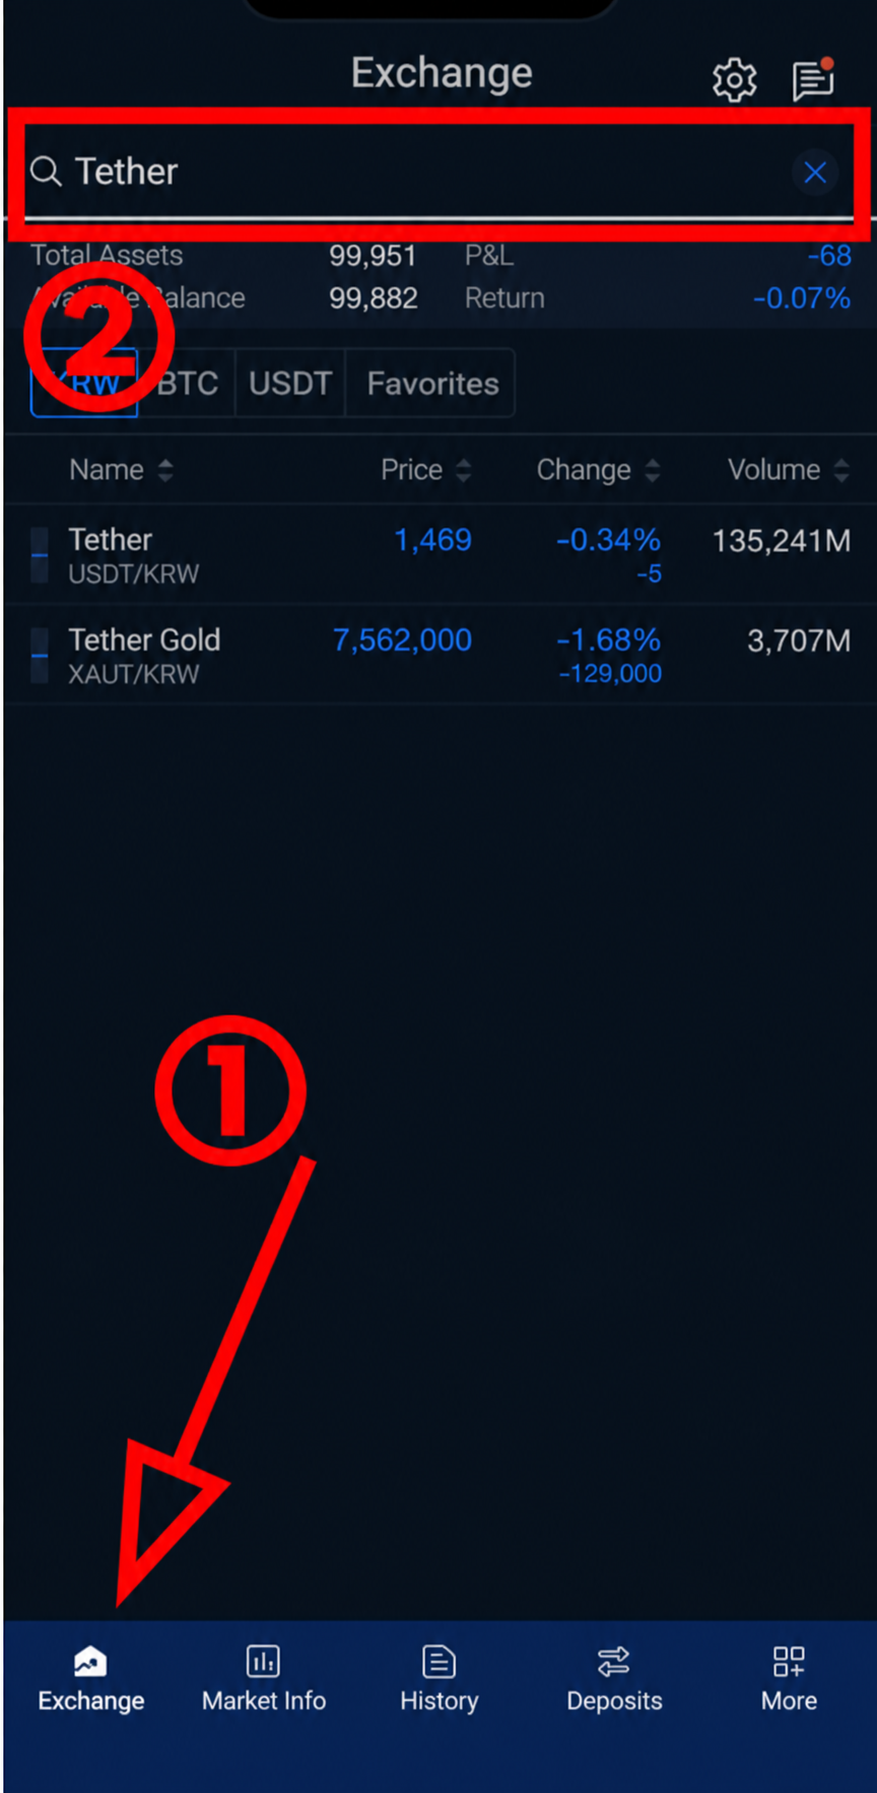
At the bottom of the app, ① [Exchange] opens trading. In the search field at the top, enter ② Tether. From the results, select Tether USDT/KRW.
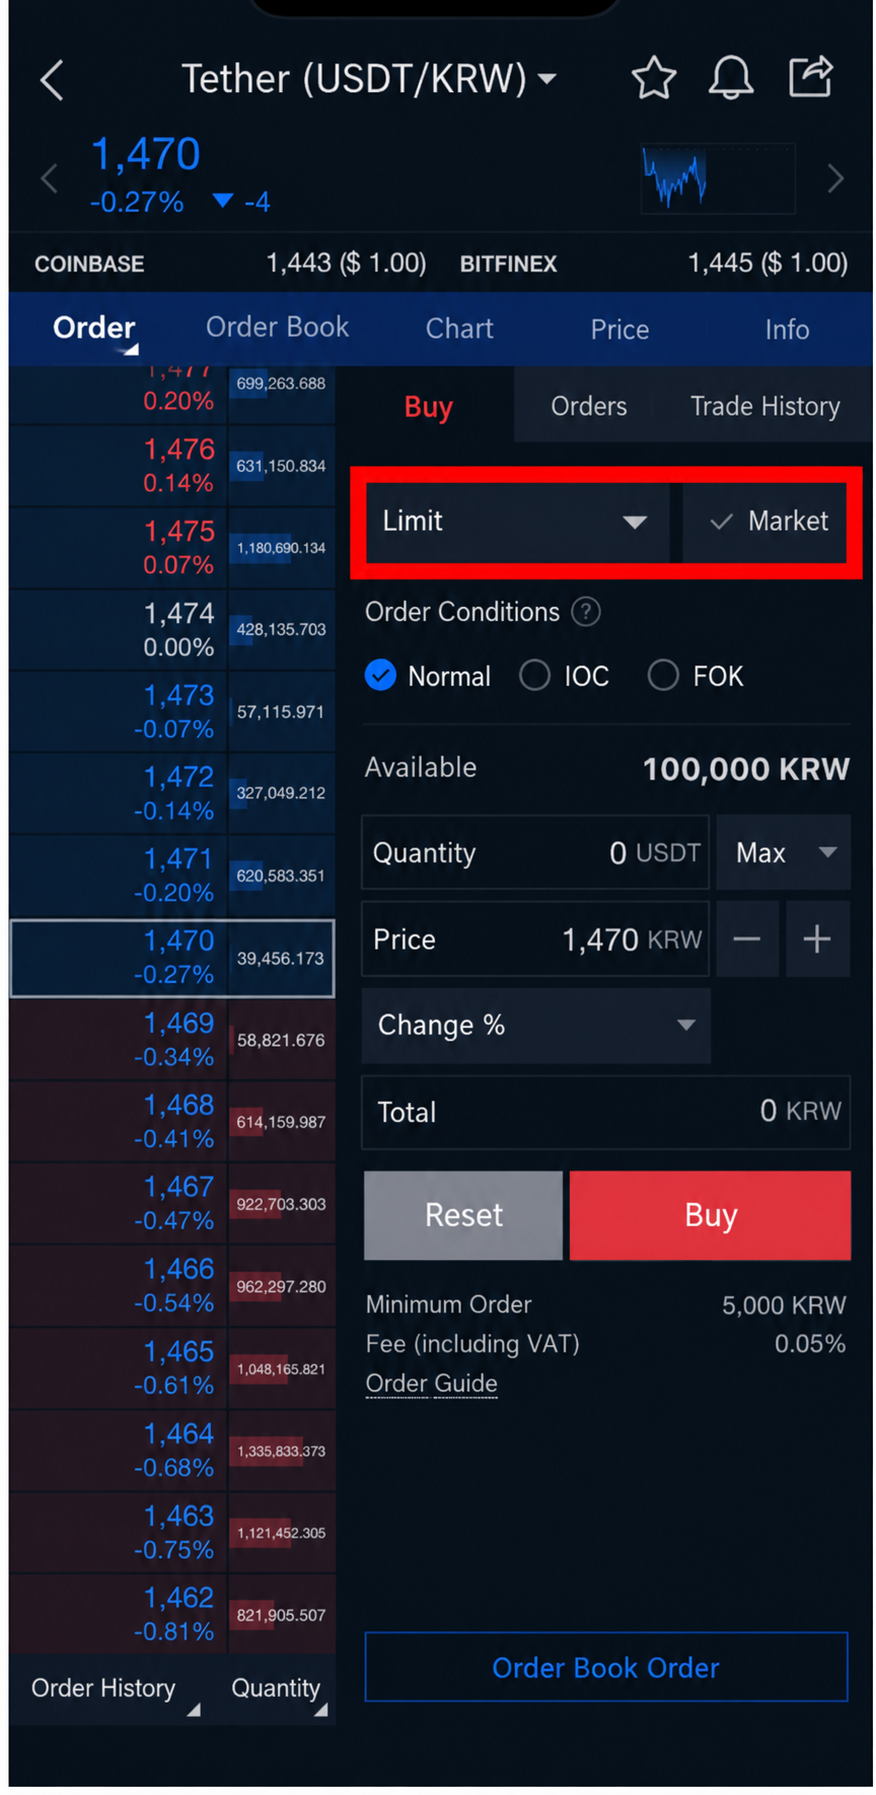
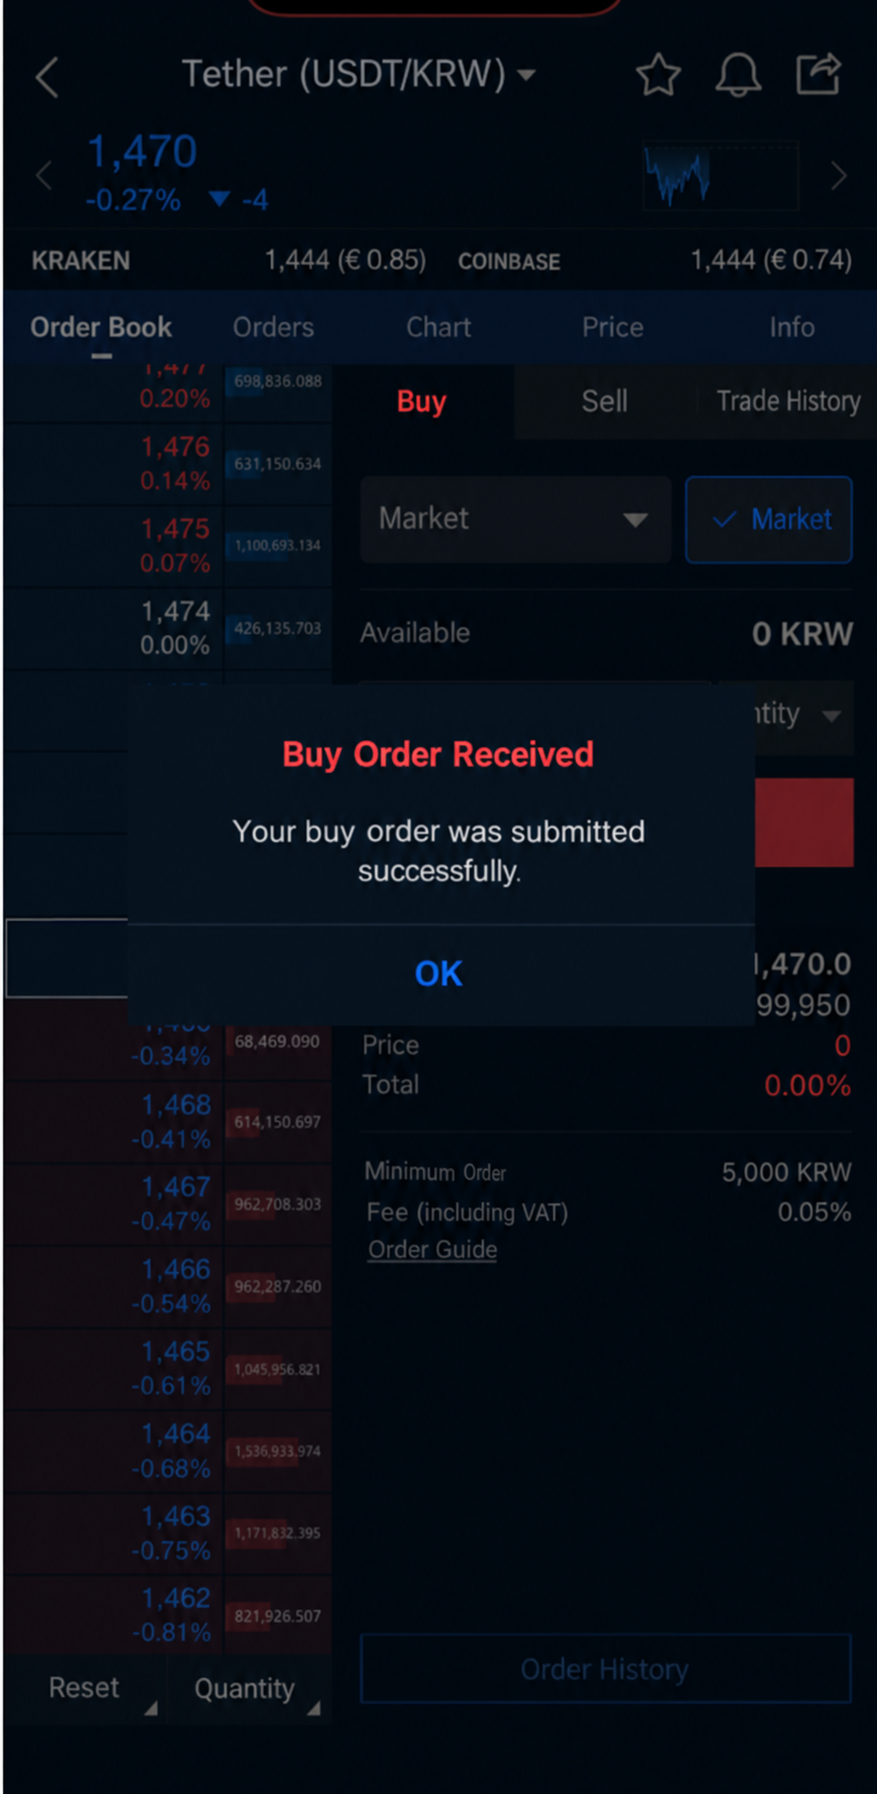
[Buy] opens the buy tab. Change the order type to Market. The default type is Limit, which places an order at your chosen price and may remain unfilled.
Select Market, enter the amount, then tap [Buy] to execute the order immediately.
“Your buy order has been completed successfully” confirms completion.
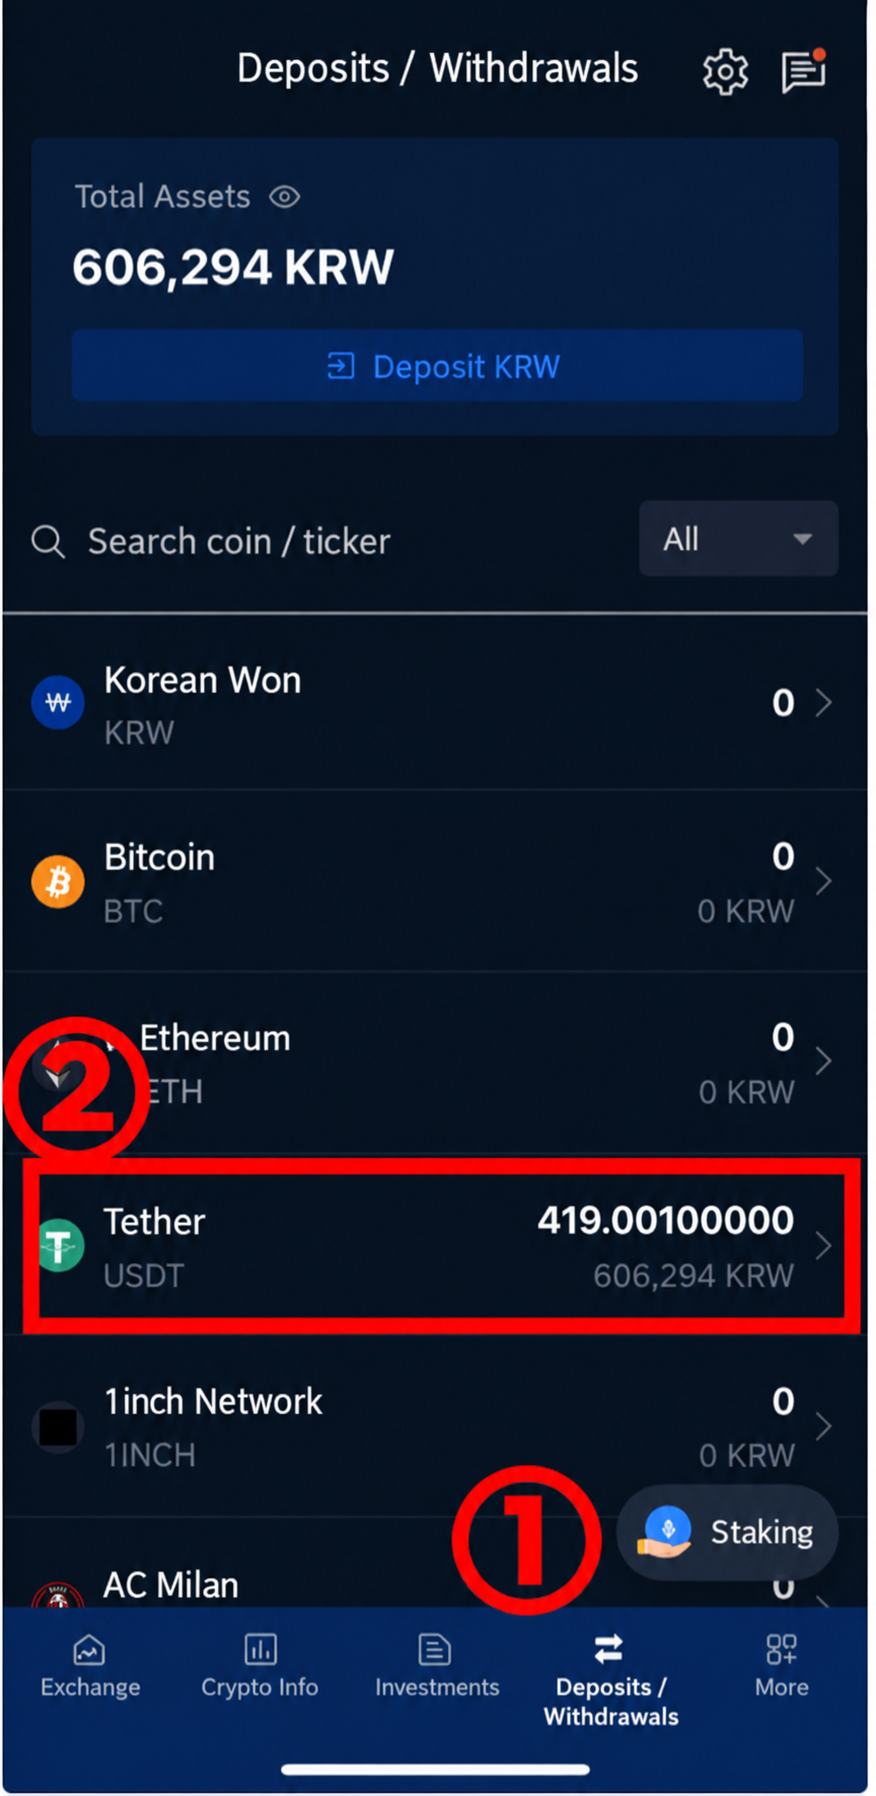
At the bottom, select ① [Deposit/Withdrawal], then find ② Tether in the list. Check that your holdings have been added.
B-4
Withdraw from Upbit to BinanceUse Tron (TRC20) · 9 illustrated steps
▾
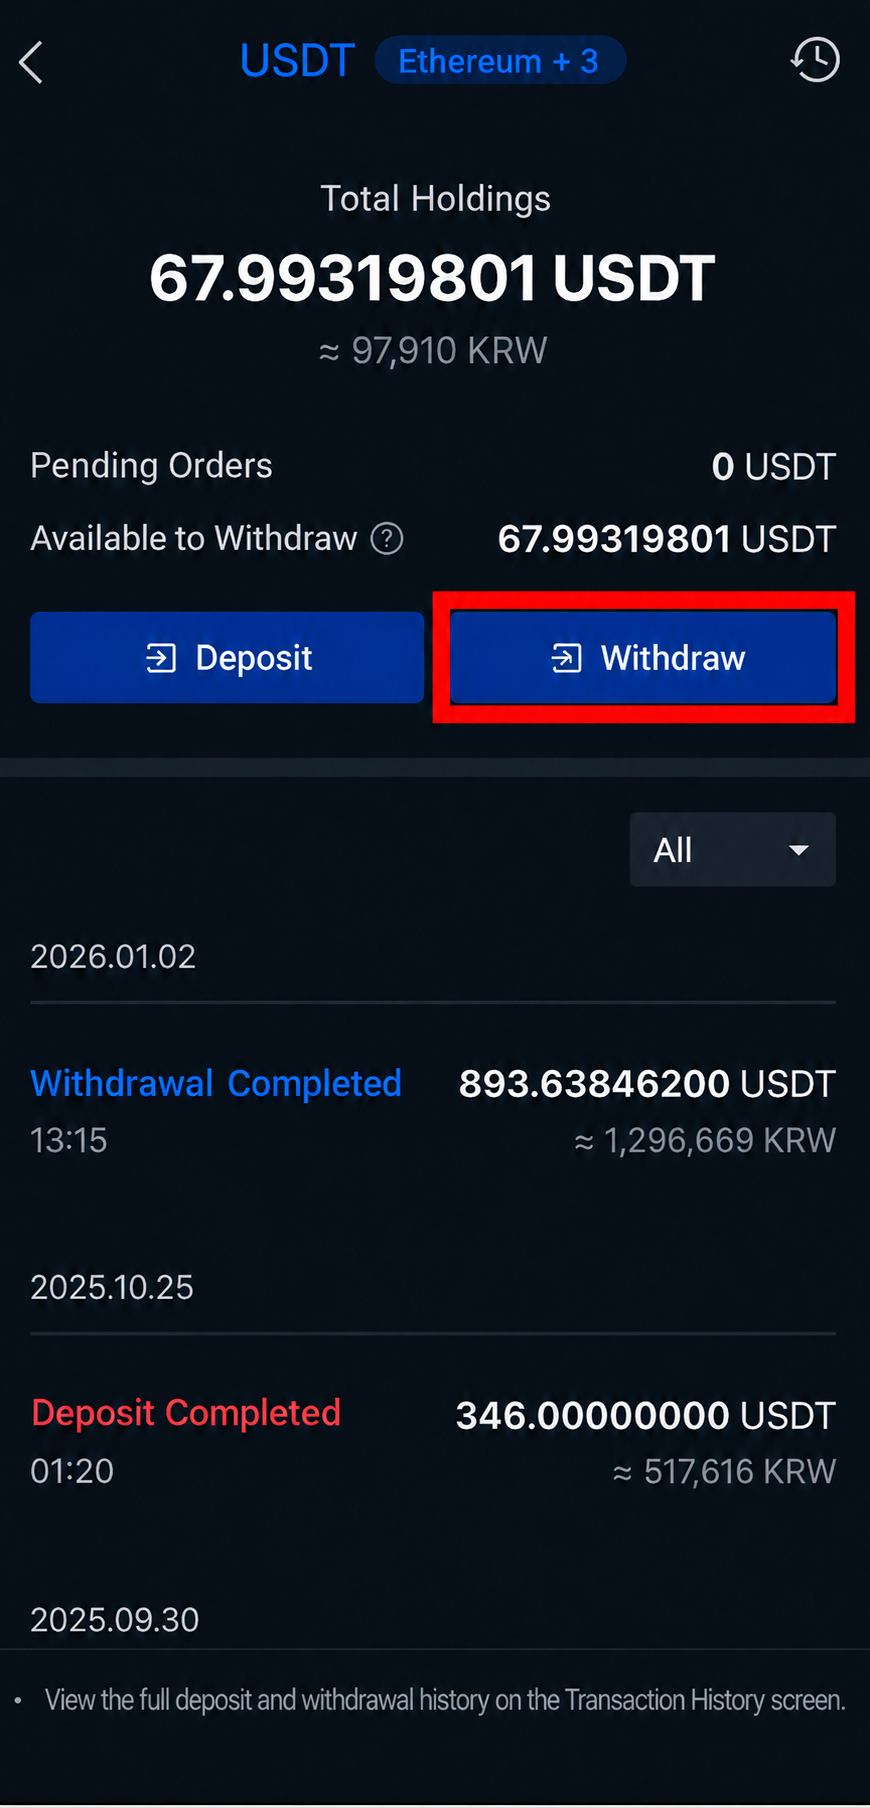
In Upbit, open [Deposit/Withdrawal] → Tether (USDT) → [Withdraw]. Check the Available to withdraw amount first — it appears as 0 while a withdrawal hold applies.
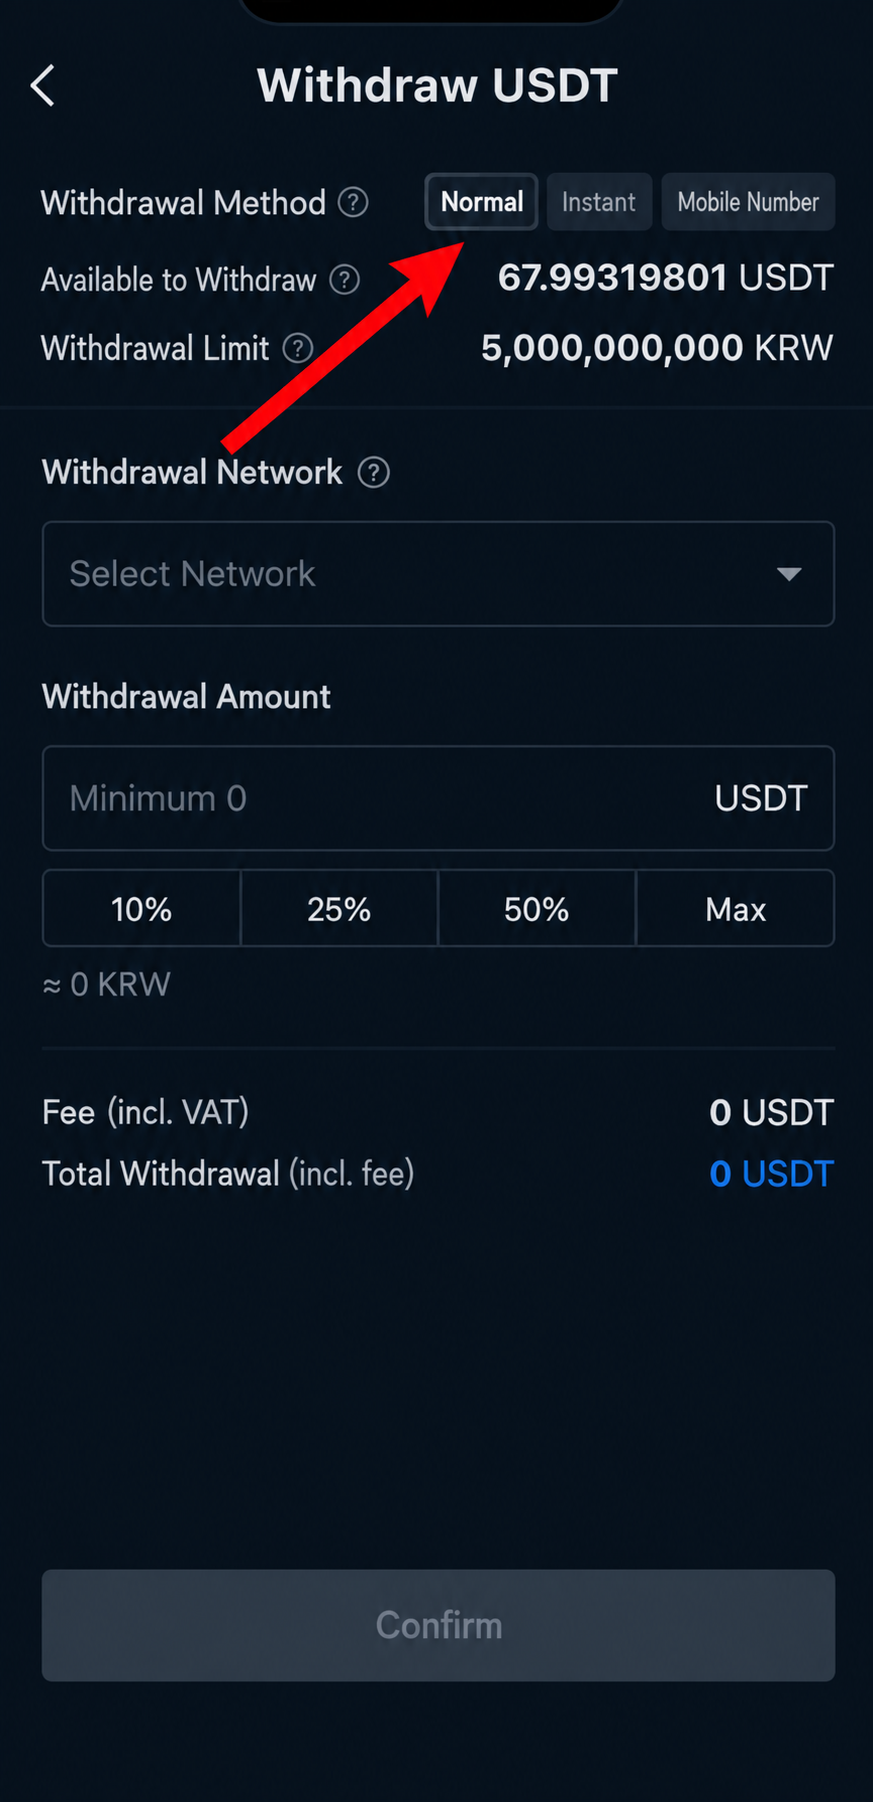
Keep the withdrawal method set to [General]. (Instant and Mobile number are methods for transfers between Upbit users)
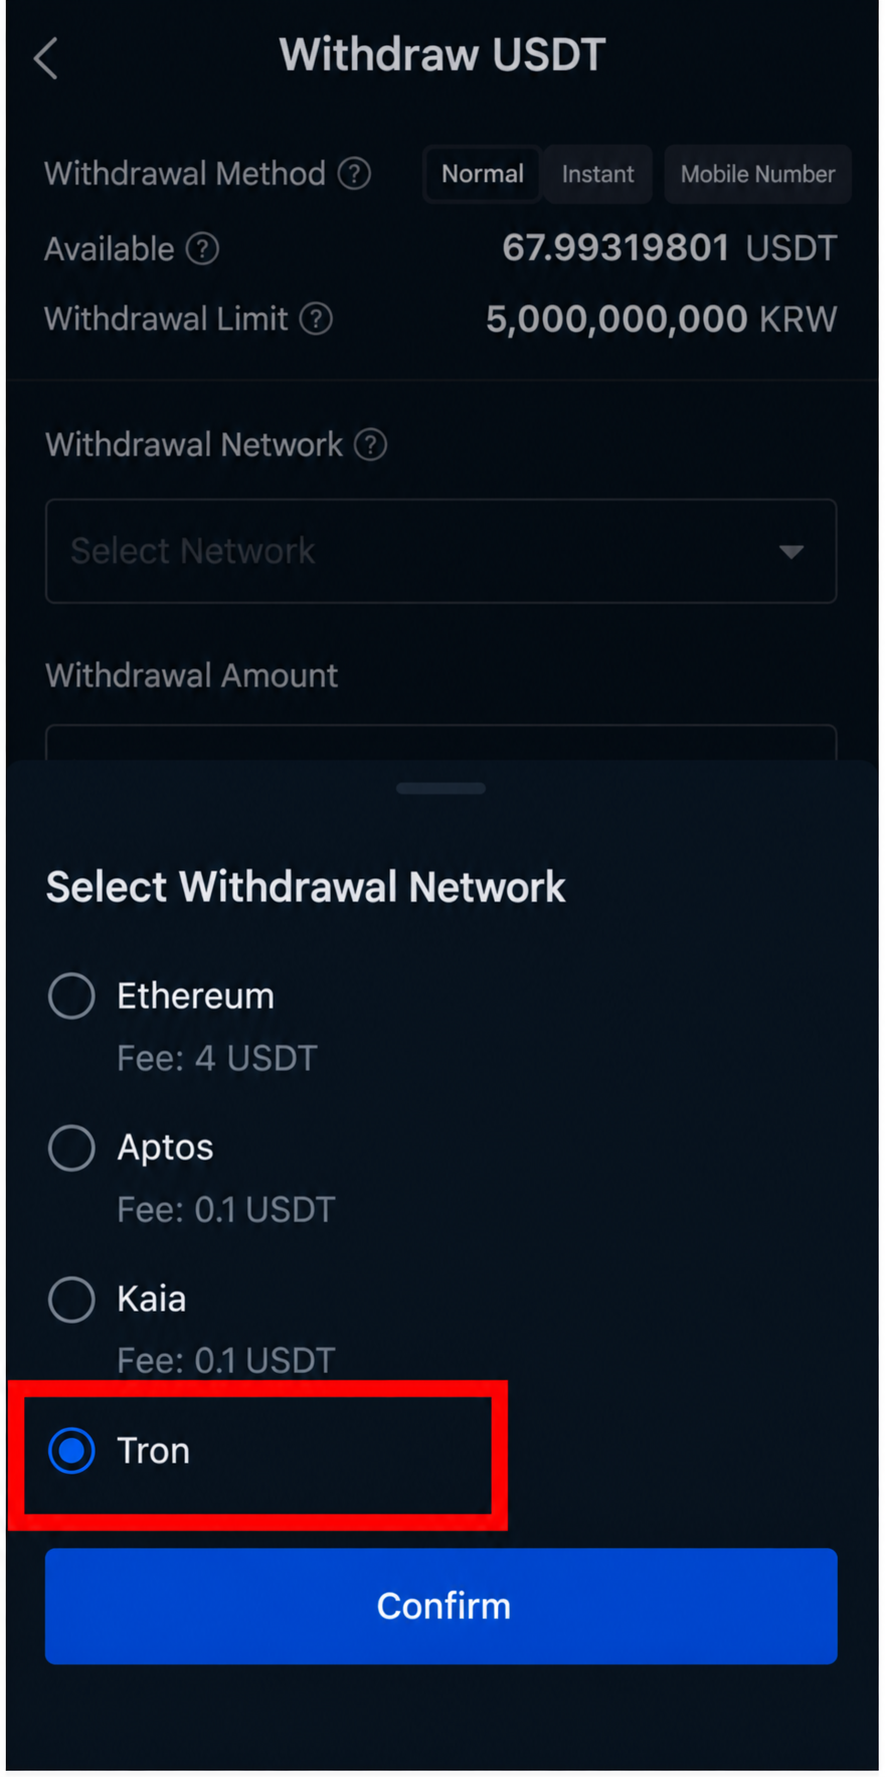
Withdrawal network opens the choices. Select Tron. This is the same network as TRC20 selected on Binance.
| Network | Fee | |
|---|---|---|
| Tron (TRC20) | 0 USDT | ✓ Select |
| Aptos | 0.1 USDT | |
| Kaia | 0.1 USDT | |
| Ethereum | 4 USDT | High |
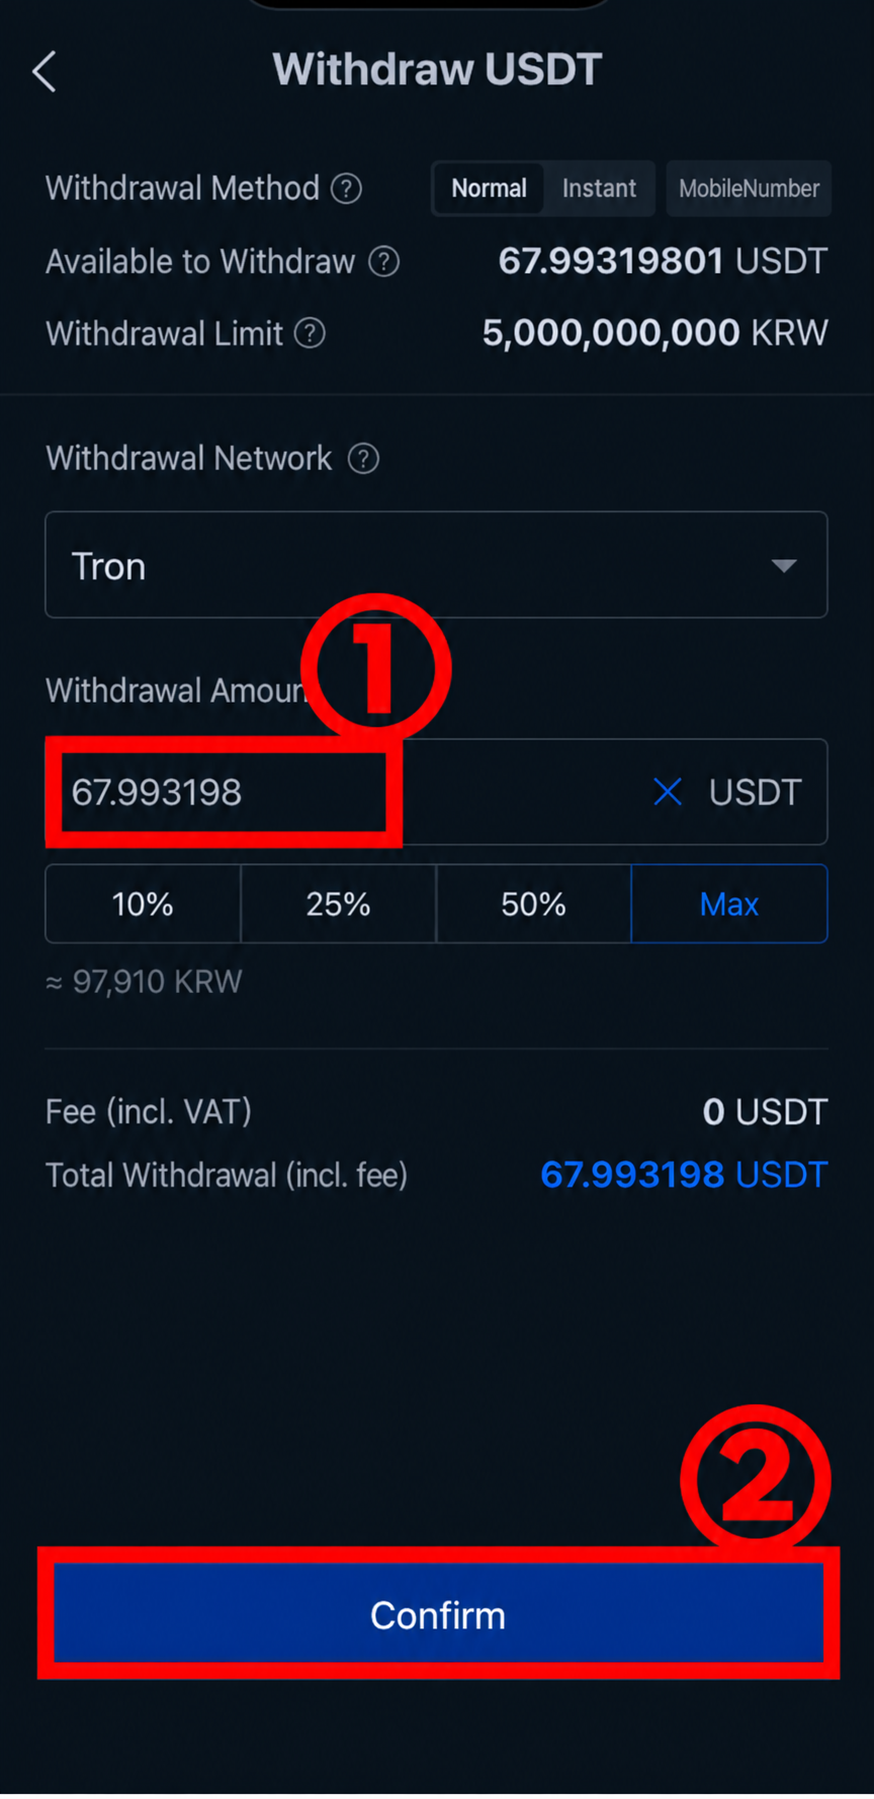
① Enter the amount to send and tap ② [Confirm]. To send your full balance, tap [Max].
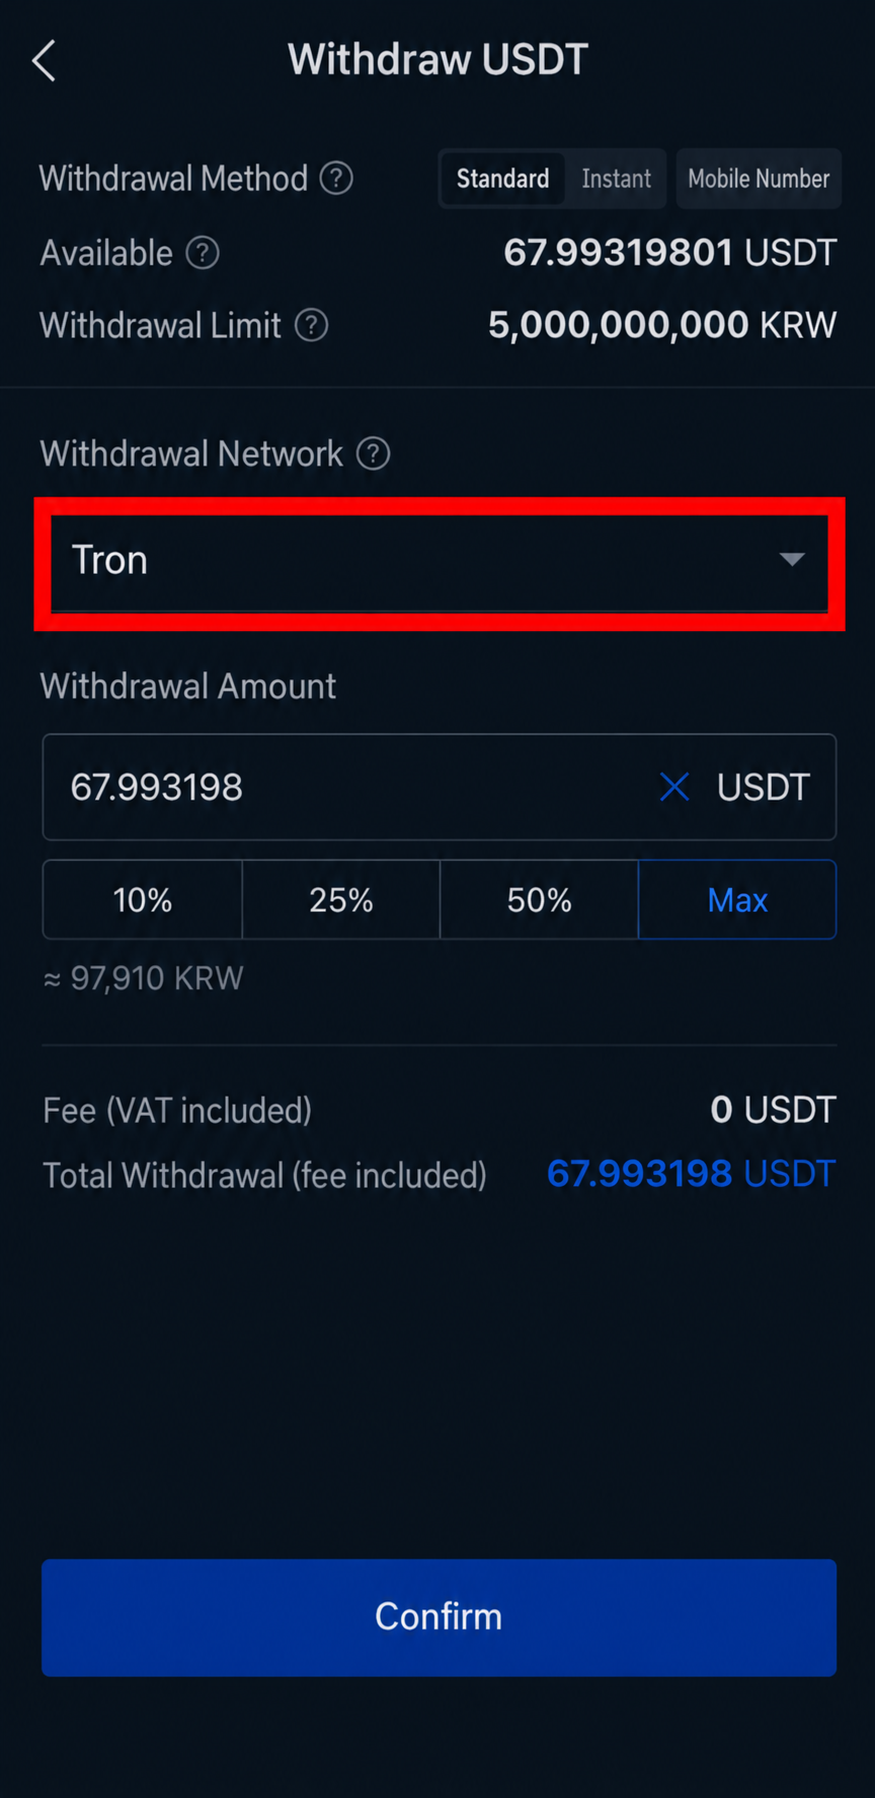
Check that the withdrawal network is Tron and verify it once more. A fee of 0 USDT indicates that Tron is selected.
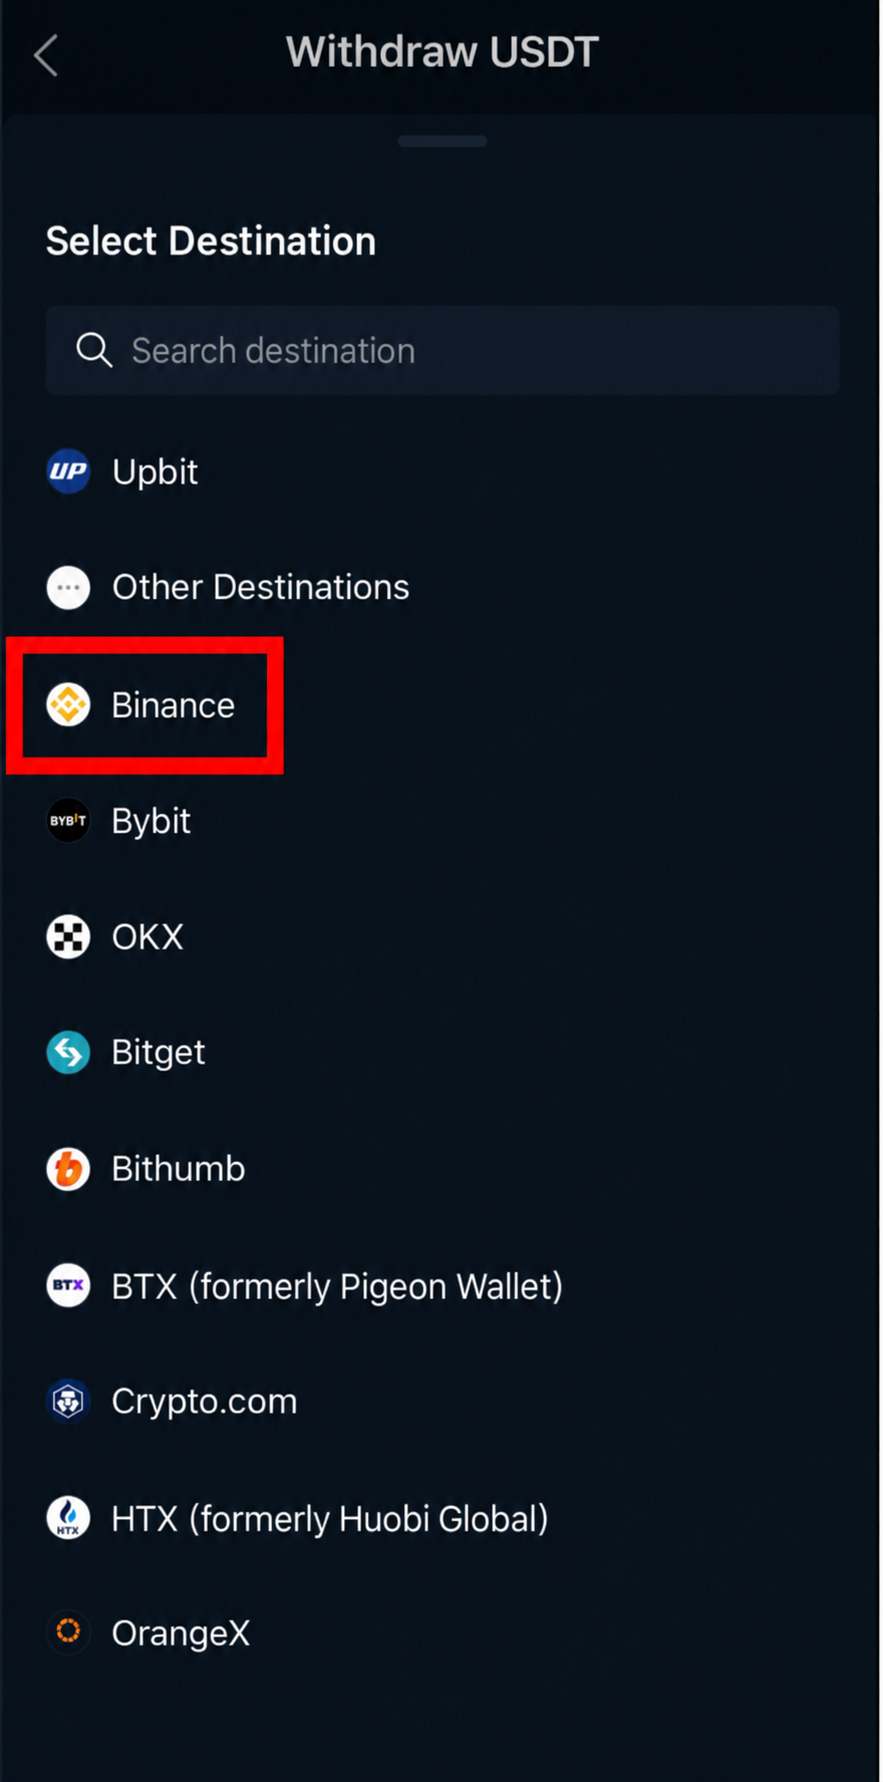
In the destination list, select Binance. Exchanges in this list have linked identity verification with Upbit, allowing transfers.
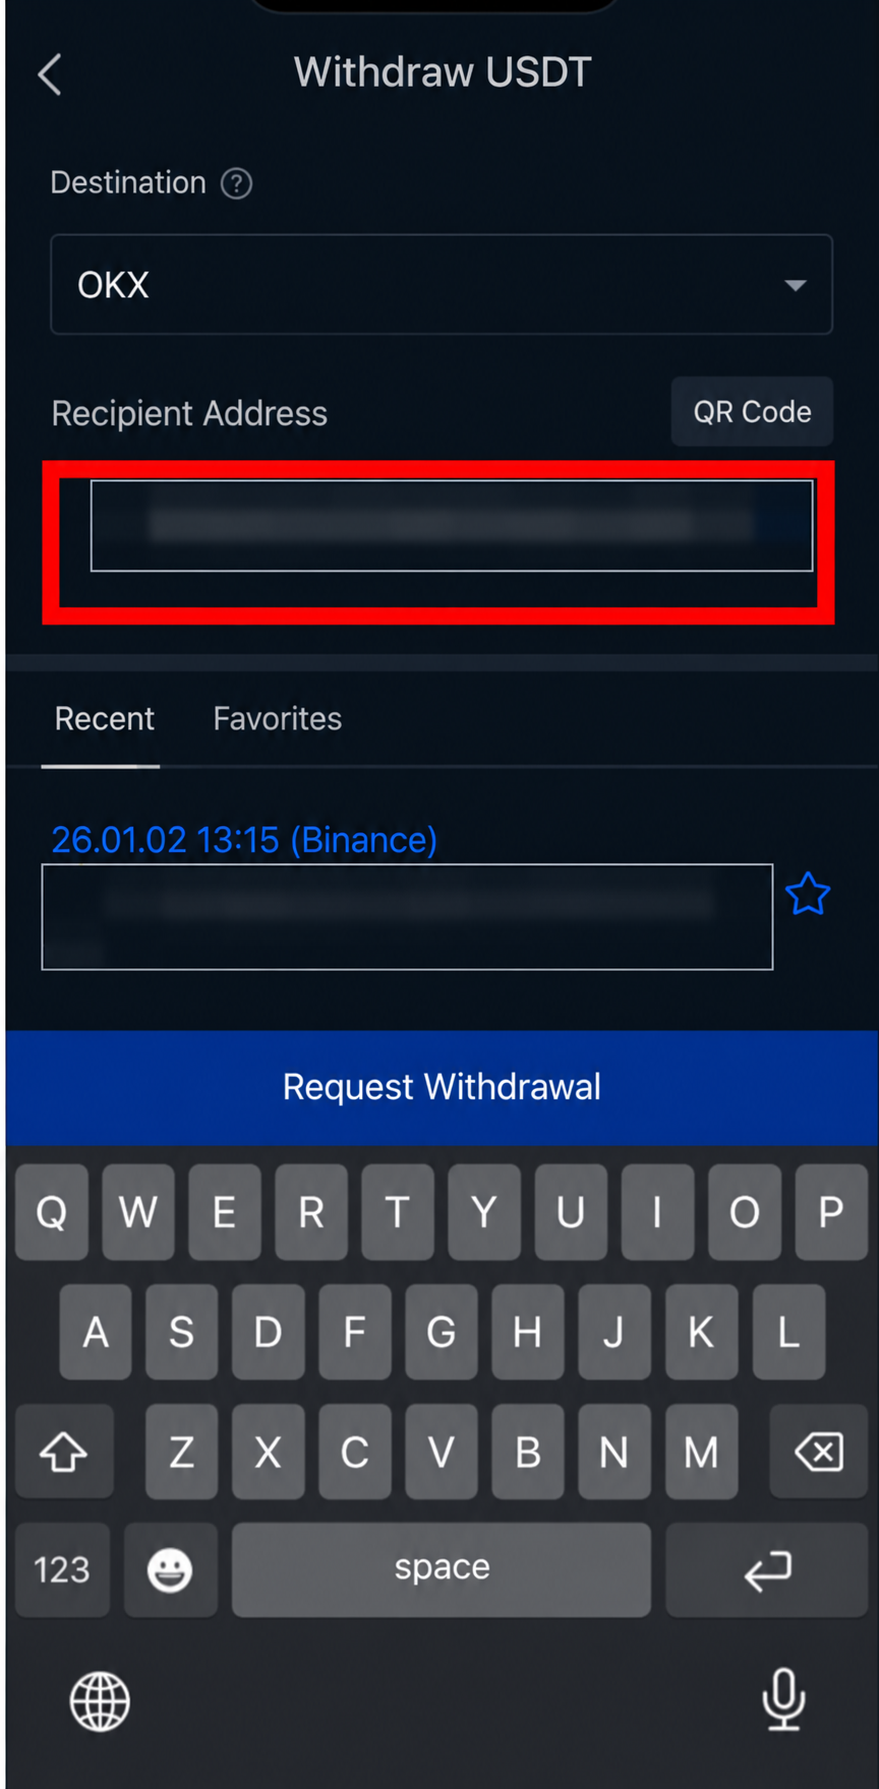
Use the address previously copied from Binance and paste it. After pasting, check the first 4 and last 4 characters against the Binance screen.
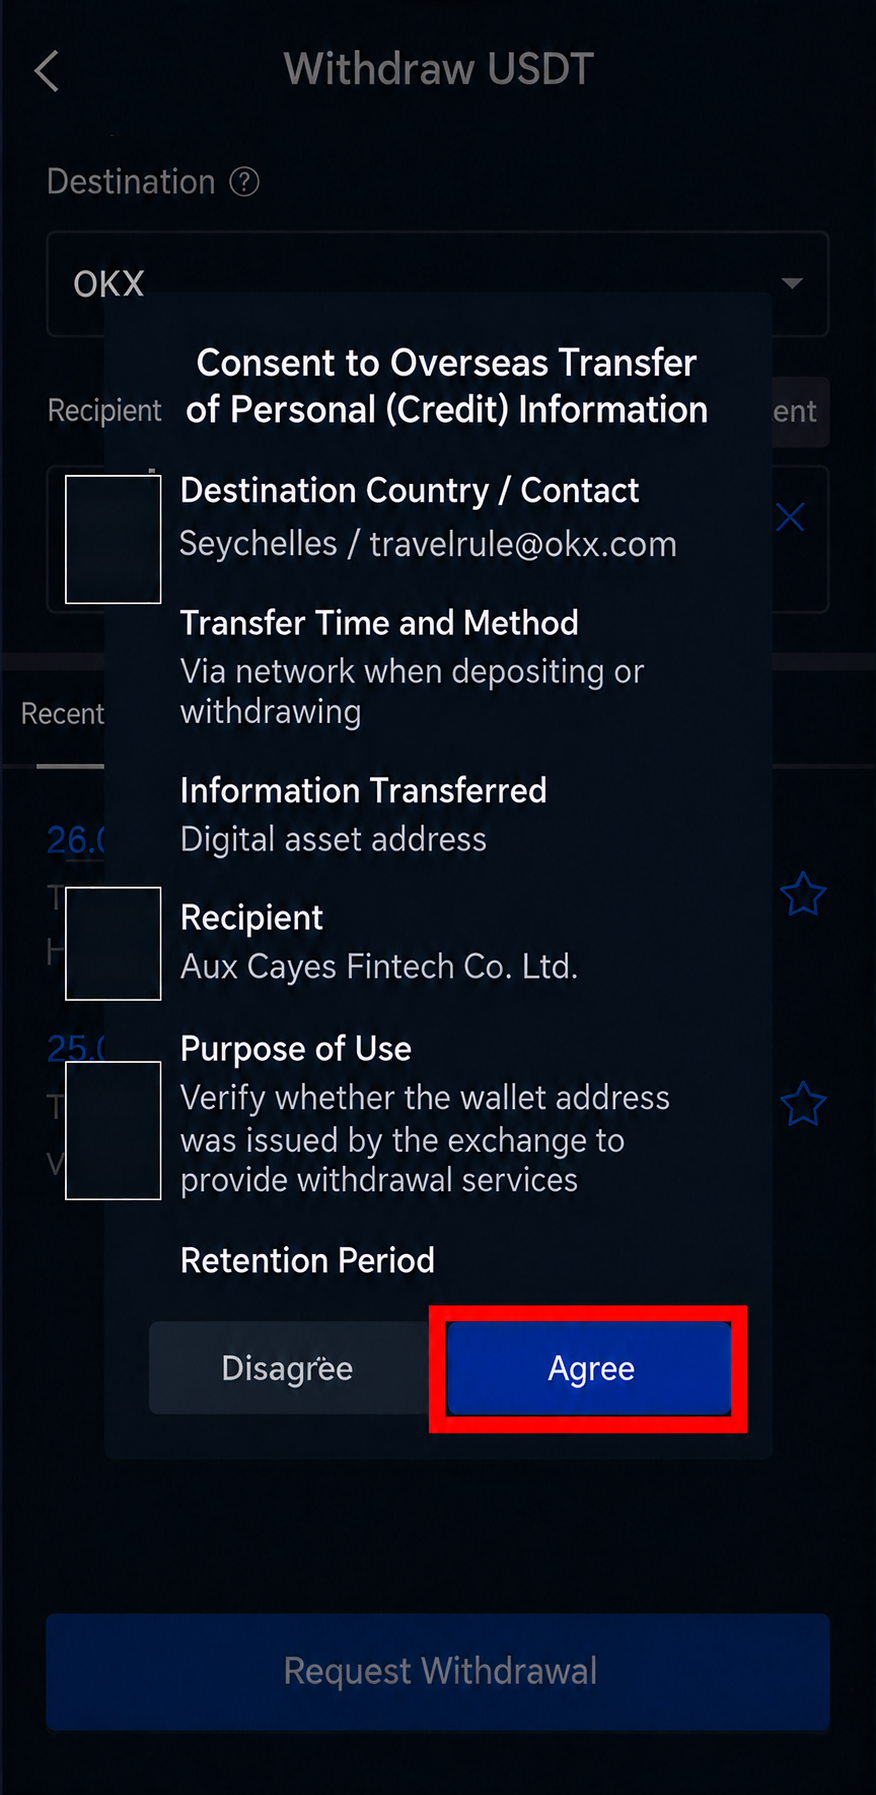
Because the transfer is to an overseas exchange, a Consent to overseas transfer of personal (credit) information dialog appears. [Agree] is required to continue.
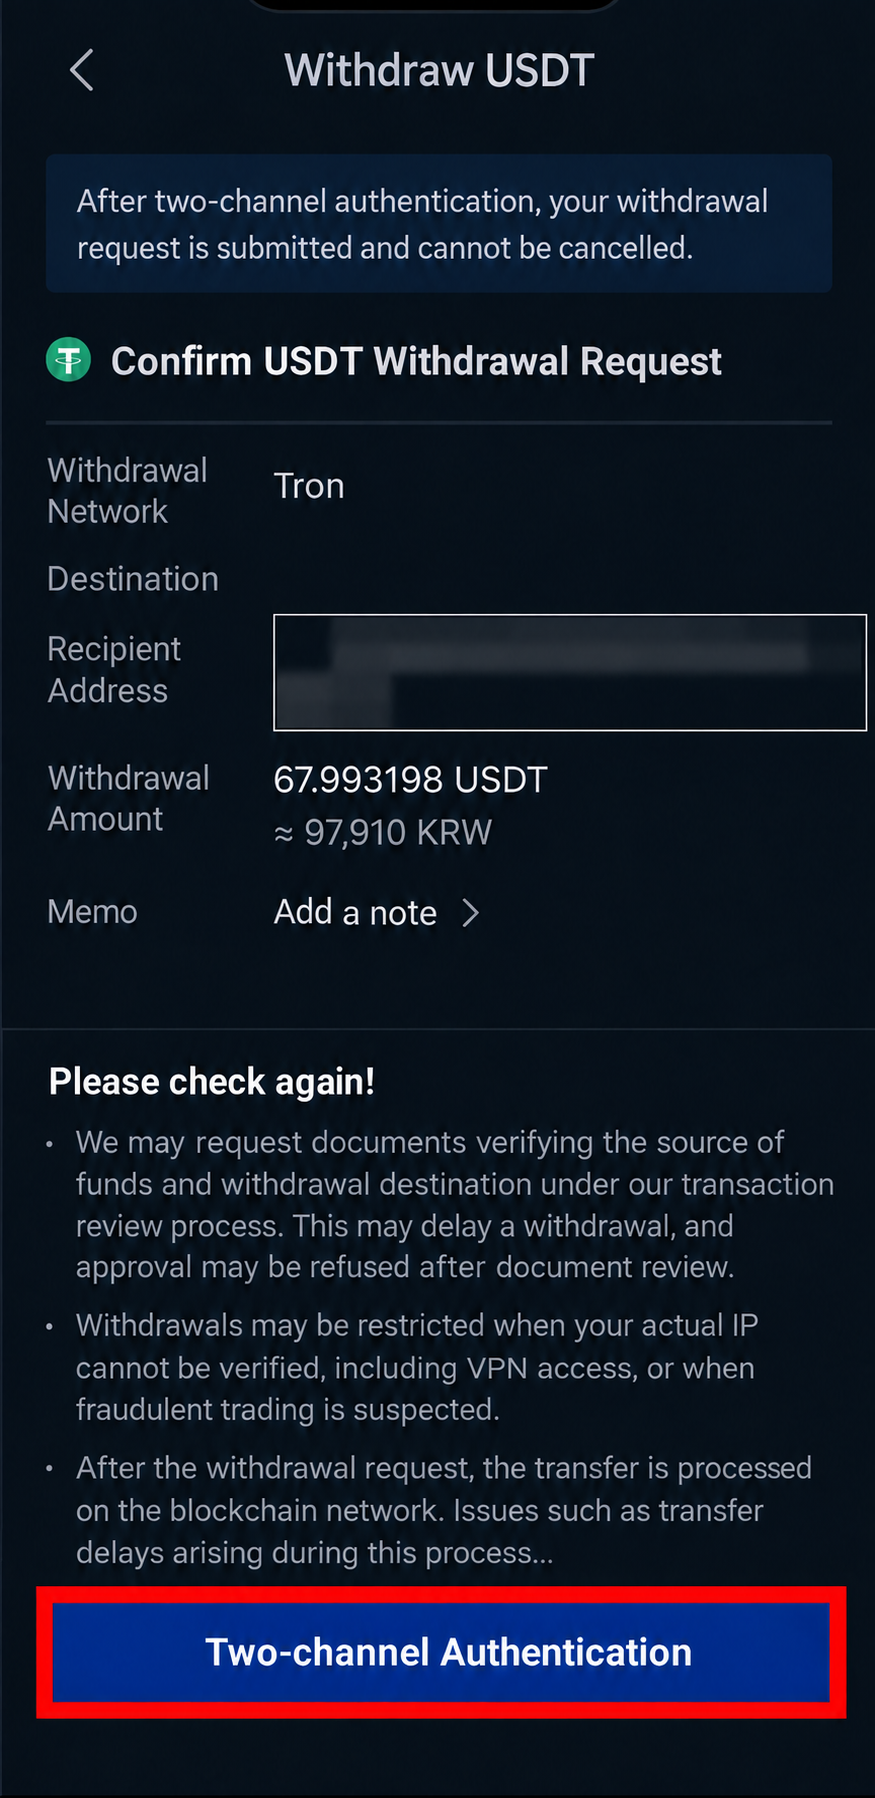
Check the network, recipient address, and amount one final time, then tap [Two-channel verification] and complete KakaoPay or PASS verification.
Tron (TRC20) normally takes 1–5 minutes to arrive at Binance. Open Assets → Spot → USDT in Binance and check that your holdings have increased.
The law requires verification that the sender and recipient are the same person. Your English name and date of birth registered with Upbit and Binance must match exactly, or the withdrawal will be rejected. Complete Binance identity verification (KYC) first.
B-1
Register with Bithumb and verify your identityInstall the app → Register → Verify your ID (KYC)
▾
At bithumb.com, select the upper-right [Download app] button. You may also search in the App Store or Google Play for Bithumb. Check that the publisher is Bithumb.
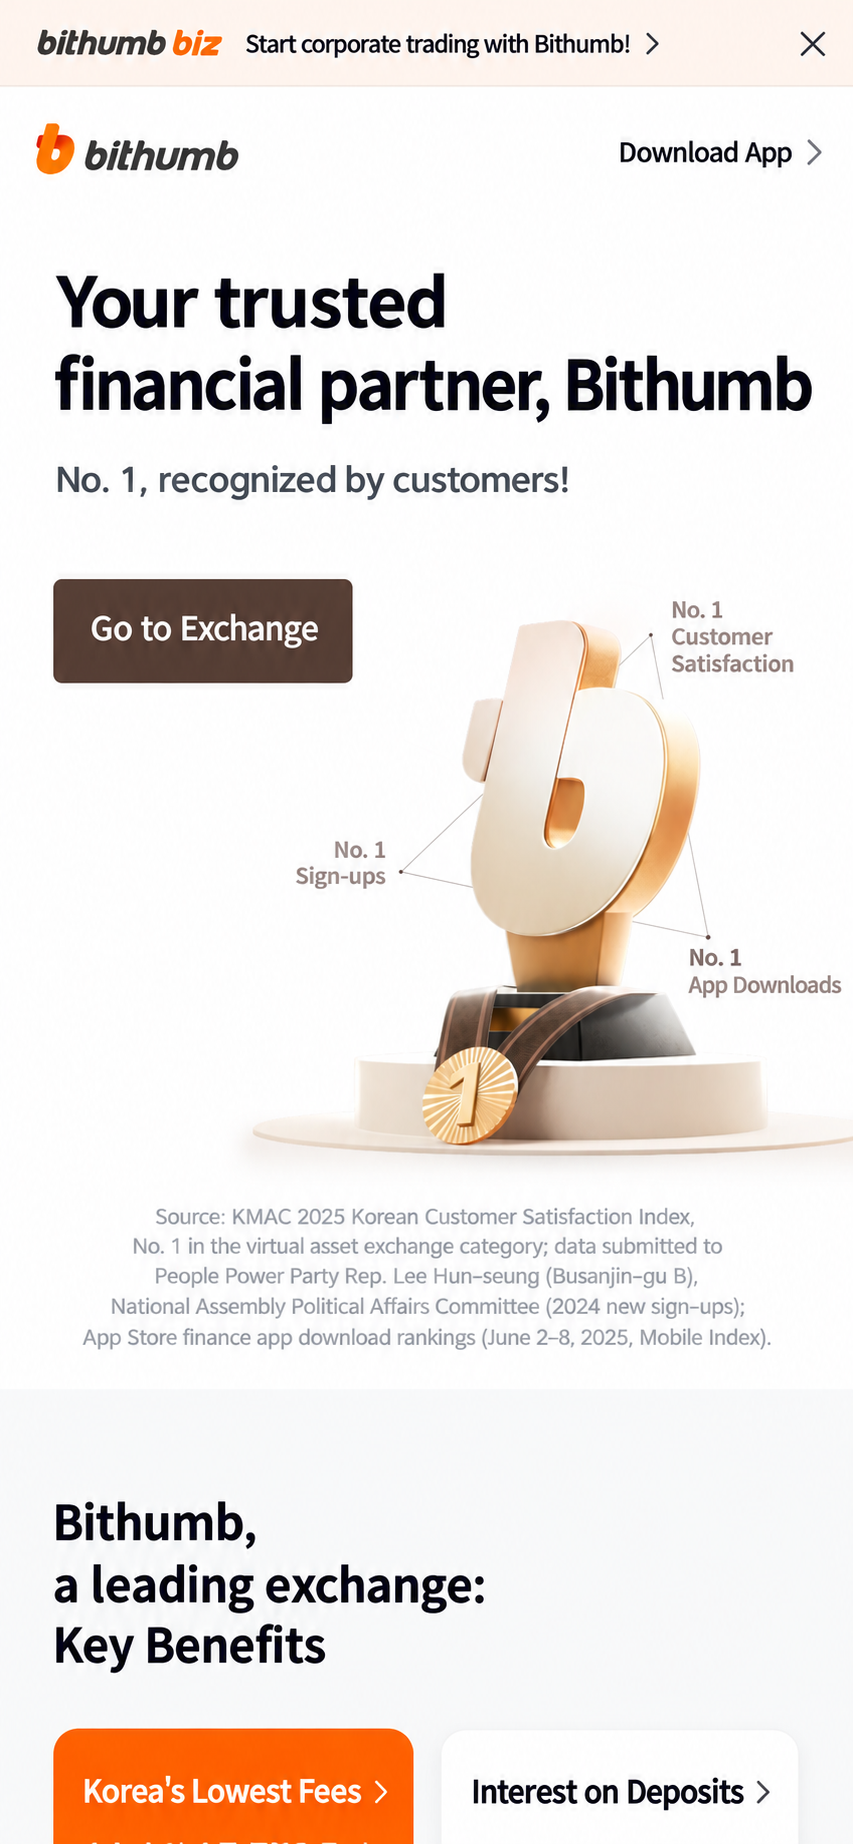
Below the login form, tap [Sign up], then set an email address and password and verify a phone registered in your own name. Enter your name, resident registration number, and carrier to receive an SMS code.
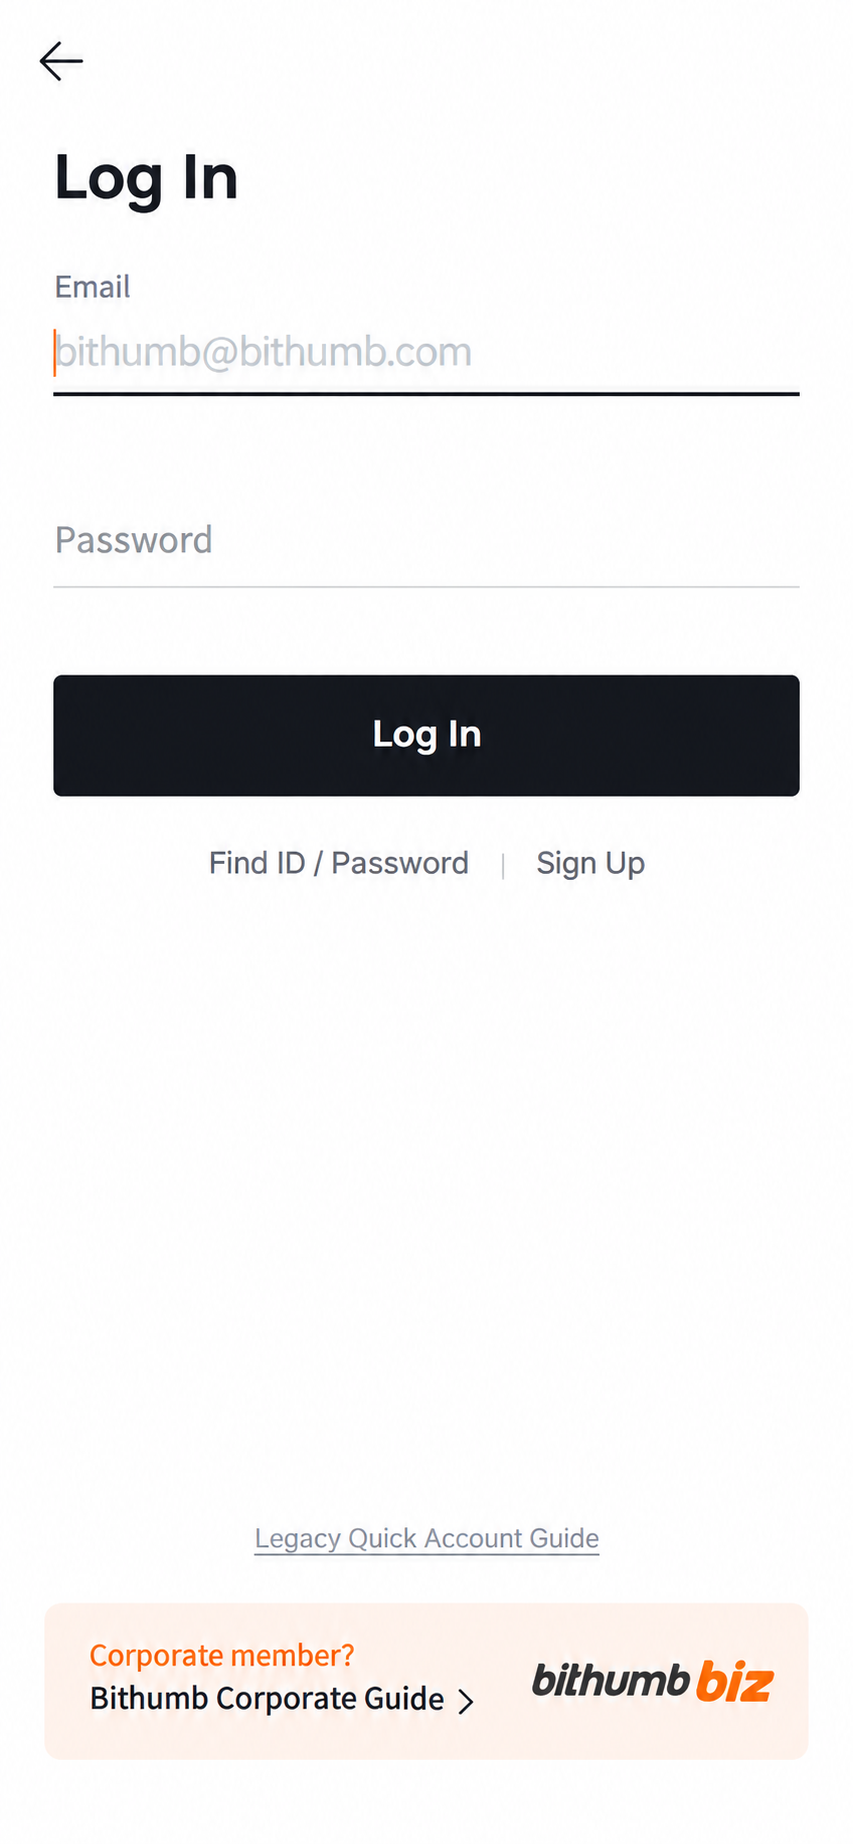
Follow the app's instructions to photograph a resident registration card or driver's license, then select your occupation, purpose of trading, and source of funds. Your English name will later be compared with Binance under the Travel Rule, so use the spelling on your passport.
B-2
Link a KB Kookmin Bank account → Deposit KRWBithumb supports KRW deposits and withdrawals only through KB Kookmin Bank
▾
- Link your account — At the bottom of the app, [Deposit/Withdrawal] → KRW → Follow the instructions to register a KB Kookmin Bank account. The names on the bank account, Bithumb account, and ID must match exactly. Complete bank verification, including the KRW 1 deposit check.
- Deposit KRW — [Deposit/Withdrawal] → KRW → [Deposit] → Enter an amount → Verify. Funds move from your linked KB Kookmin Bank account to Bithumb and are usually reflected immediately.
B-3
Buy Tether (USDT)Trade → Tether (KRW) → Buy · English-localized example
▾
At the bottom, select [Trade], search for Tether, then select Tether (KRW) USDT. In the [Buy] tab, change the order type to Market (the default is Limit, which may remain unfilled), enter the amount, then tap [Buy].
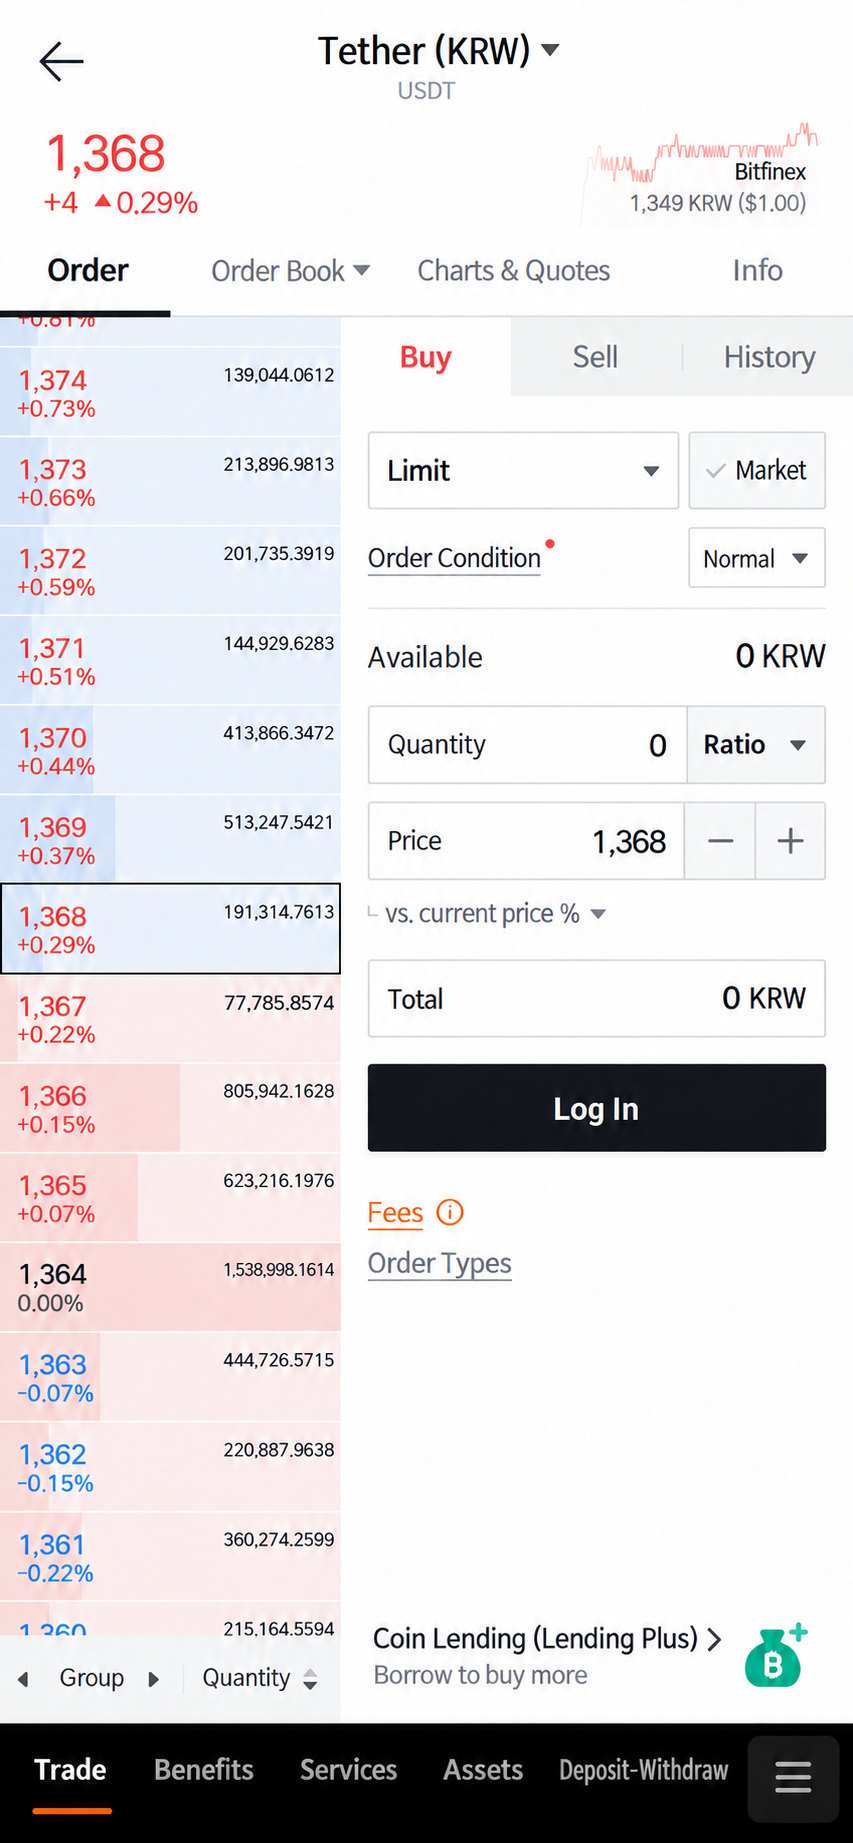
- Confirm execution — At the bottom, [Assets] shows whether your Tether holdings have been added.
B-4
Withdraw from Bithumb to BinanceRegister a withdrawal address → Tron (TRC20) network → Secondary verification
▾
- [Deposit/Withdrawal] → Tether (USDT) → [Withdraw] — Check the Available to withdraw amount first. It appears as 0 during the 72-hour hold.
- Register a withdrawal address — A new recipient address must first be registered. Select Exchange as the address type, then select Binance from the list. Paste the address copied in C-2. The next screen asks you to confirm that you are sending to your own account.
- Network — Tron (TRC20) — It must match TRC20 selected on Binance. The wrong network can result in lost assets.
- Enter the amount — For your first transfer, send only 10~20 USDT first and confirm arrival. The withdrawal fee is shown on the screen.
- Secondary verification — Complete OTP or Kakao verification to submit the withdrawal. The withdrawal cannot be cancelled after verification.
The details registered with Bithumb and Binance, specifically your English name and date of birth, must match exactly, or the transfer will be rejected. Complete Binance identity verification (KYC) first.
Binance — Receive funds and send to NOVA
The steps from here are the same whether you used Upbit or Bithumb in section ④. Create your Binance account in advance during the exchange's 72-hour waiting period.
C-1
Register with BinanceCreate the receiving account · 11 illustrated steps
▾
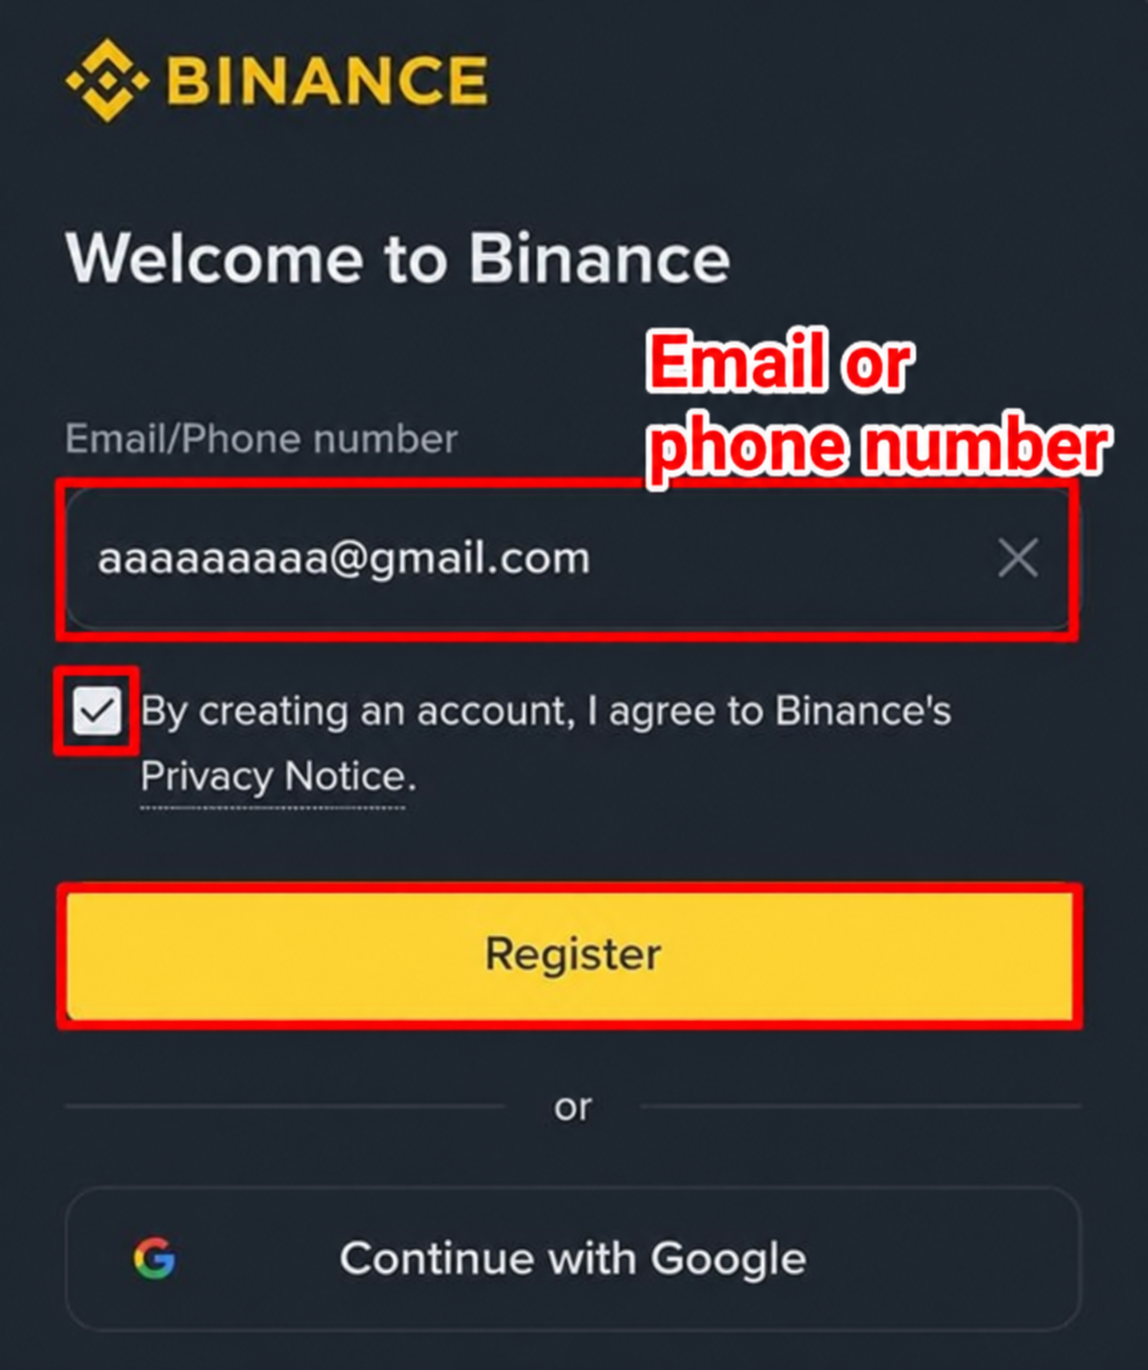
Enter an email address or phone number, select the agreement checkbox, then tap [Register]. You may also register using a Google account.
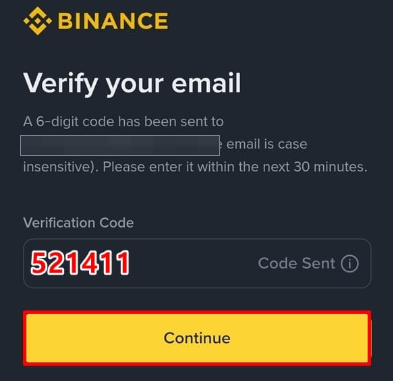
Enter the 6-digit code sent by email within 30 minutes. If the message has not arrived, check your spam folder.
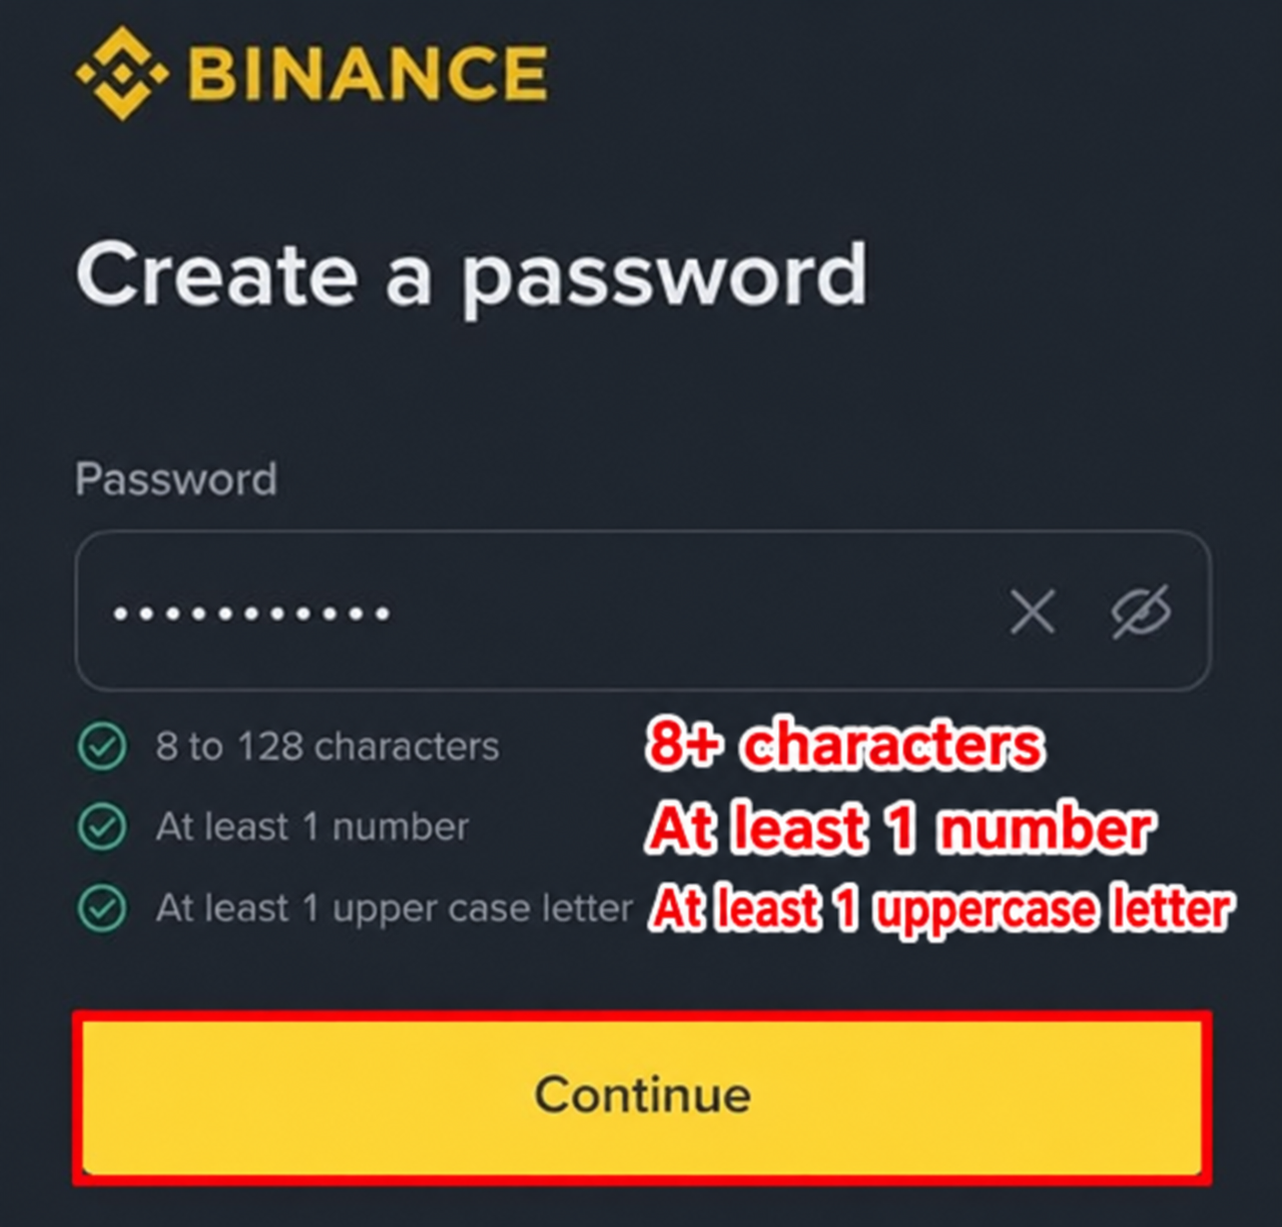
All conditions must be met — At least 8 characters, At least 1 number, At least 1 uppercase letter. All indicators on the left turn green when the requirements are met.
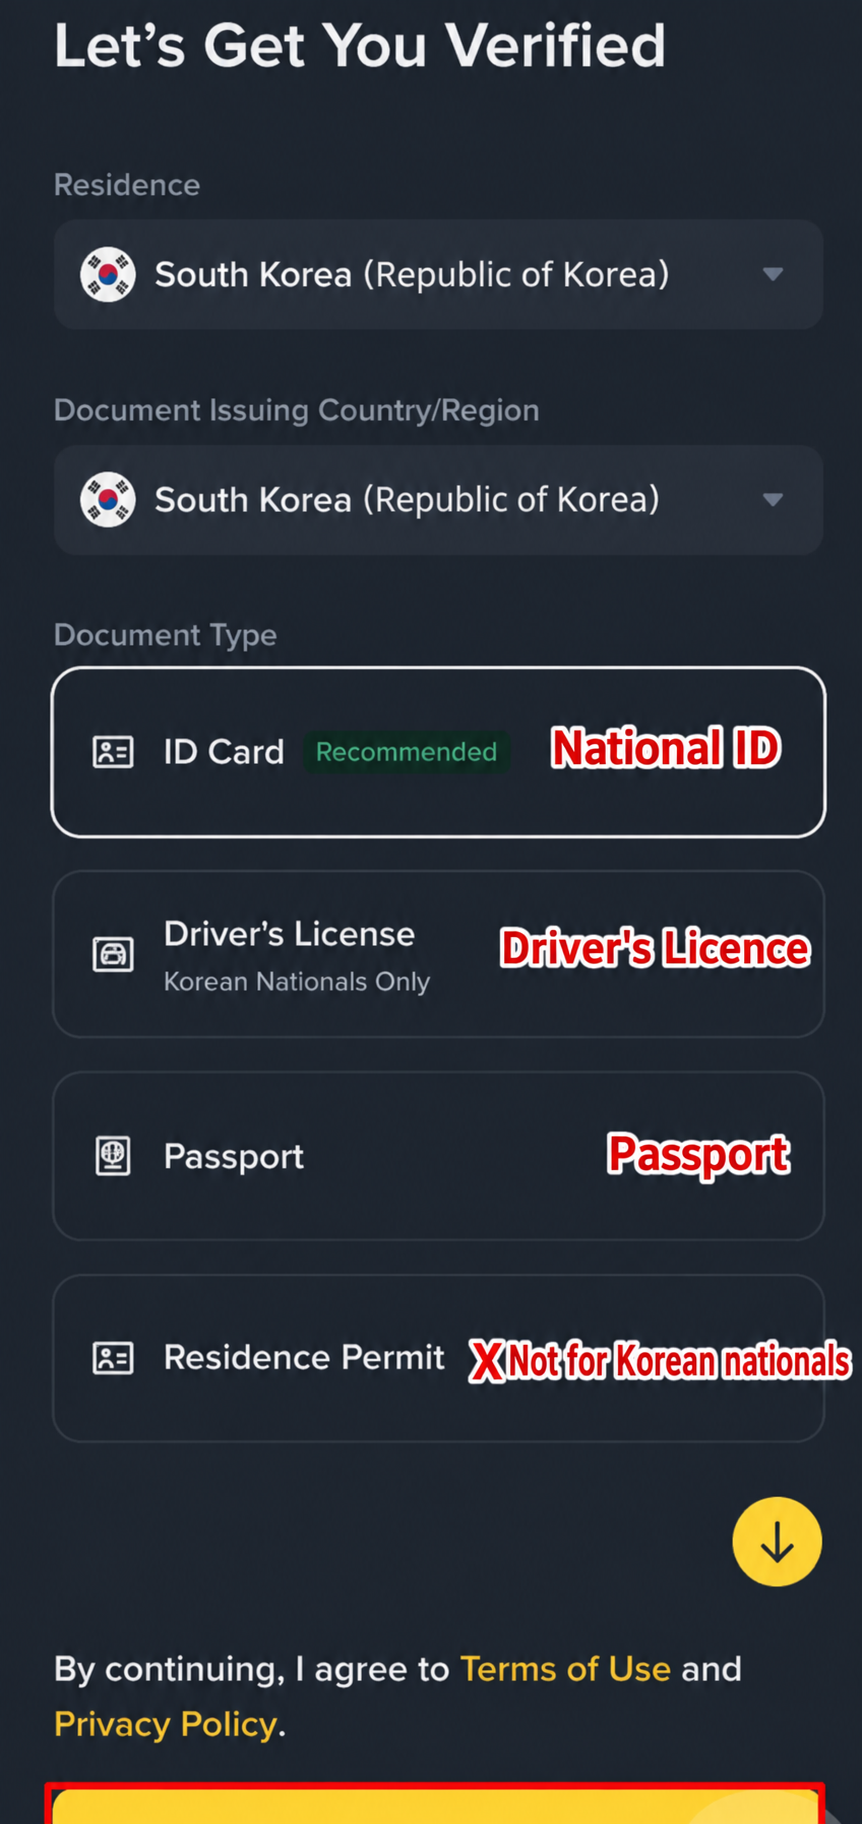
Set both country of residence and issuing country to South Korea, then select your ID type.
| On-screen label | Document |
|---|---|
| ID Card Recommended | A resident registration card — Recommended |
| Driver’s License | a driver's license |
| Passport | Passport |
| Residence Permit | Alien registration card — Not applicable to Korean citizens |
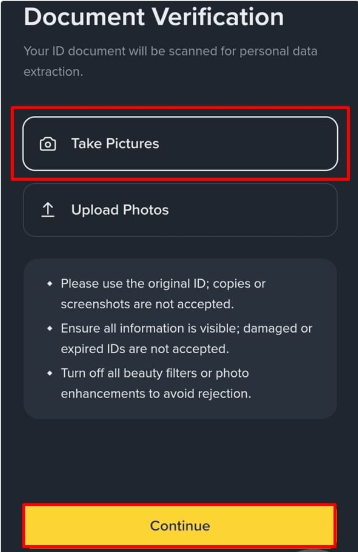
[Take Pictures] is recommended for taking a photo directly.
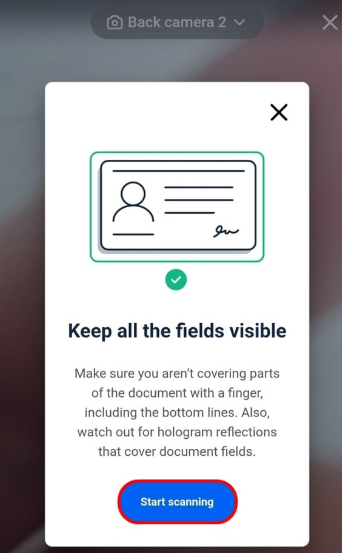
[Start scanning] opens the camera. Ensure all four corners are visible. Do not cover the document with your fingers, and adjust the angle so hologram glare does not obscure the text.
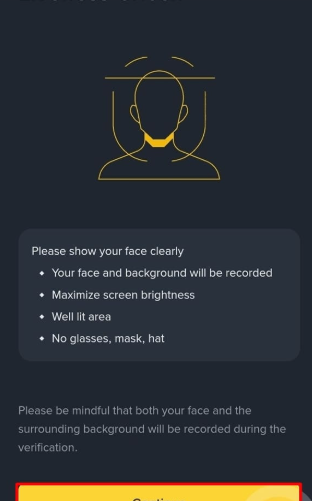
Position your face in the on-screen frame. Remove glasses, masks, and hats, in a well-lit place and set screen brightness to maximum.
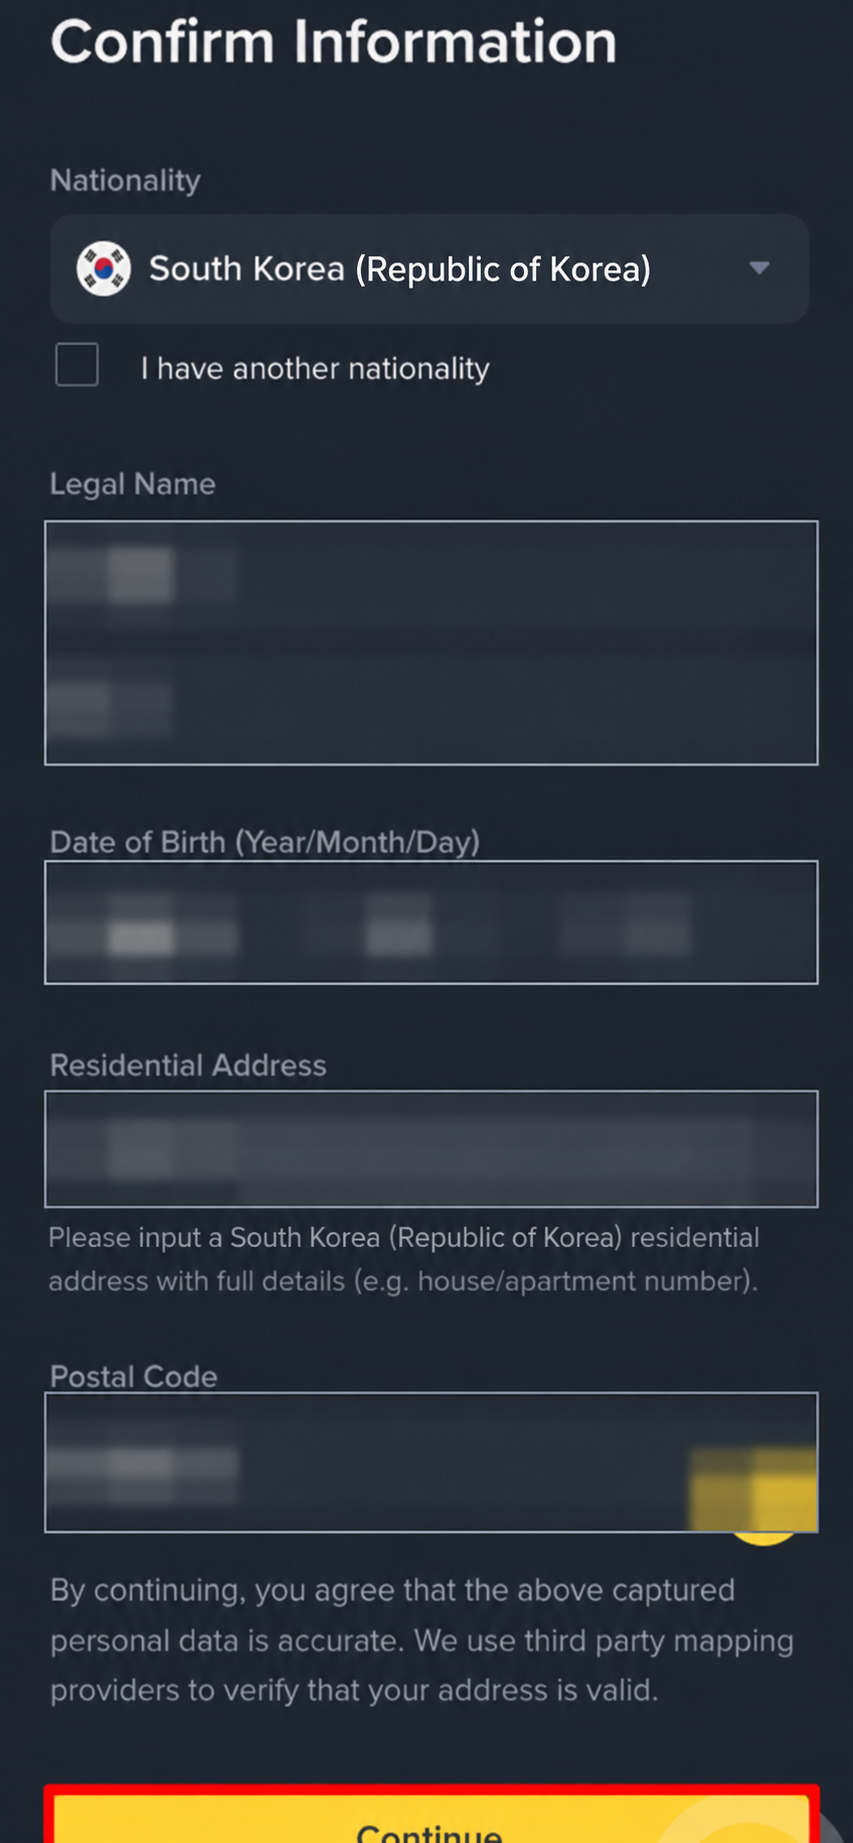
After reading your ID, the app automatically fills in your name and date of birth. Complete your address and postal code.
Check the displayed name and date of birth against your ID for an exact match. These details must be verified as belonging to the same person on Upbit before transfers of KRW 1 million or more can proceed. Korean script may be filled in automatically; do not change it arbitrarily.
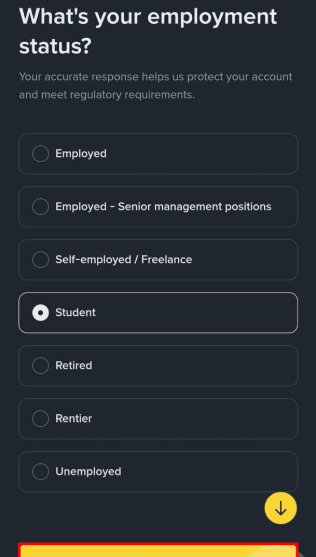
Choose the applicable option — Employed, Self-employed (including freelancers), Student, Retired, or Unemployed. This is a regulatory requirement, so answer truthfully.
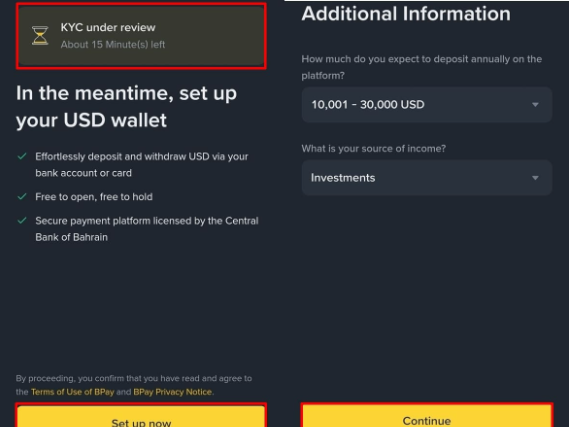
Select your expected annual deposit amount and source of income, then tap [Continue]. The status changes to KYC under review. Review usually takes around 15 minutes.
This asks about your investment experience. Your selection does not affect subsequent use.
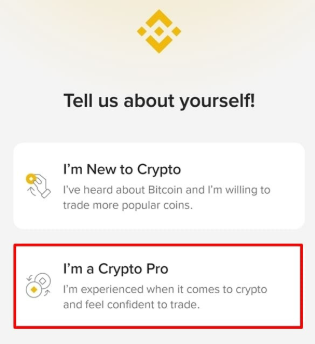
Binance is an overseas exchange, and recovering a compromised account can be difficult. In settings, enable Google Authenticator or mobile phone verification as well.
C-2
Obtain your Binance USDT deposit addressDo this before withdrawing from the Korean exchange · 6 illustrated steps
▾
First obtain the deposit address from Binance, then withdraw from Upbit or Bithumb. Both sides must use the same network (TRC20). Otherwise, assets may be lost and cannot be recovered.
Open the Binance app and tap the lower-right [Assets].
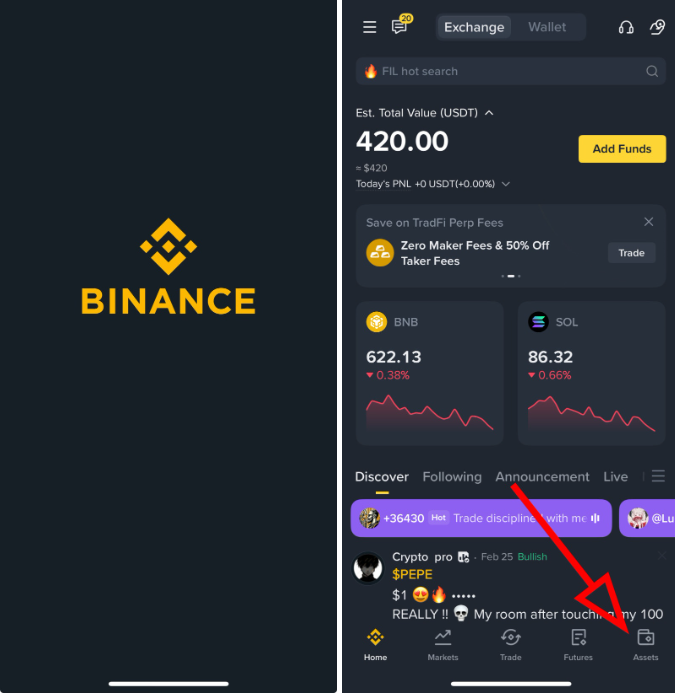
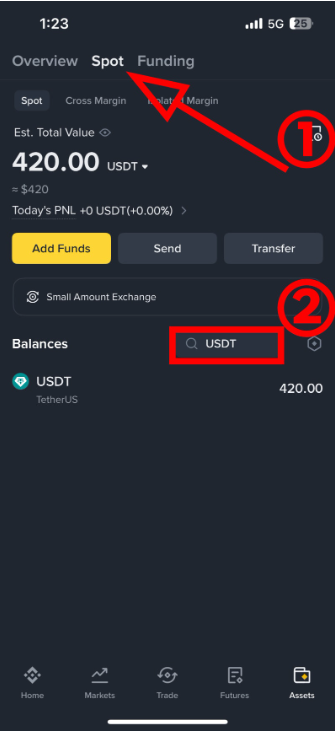
At the top, select the ① [Spot] tab, then select ② USDT from the list.
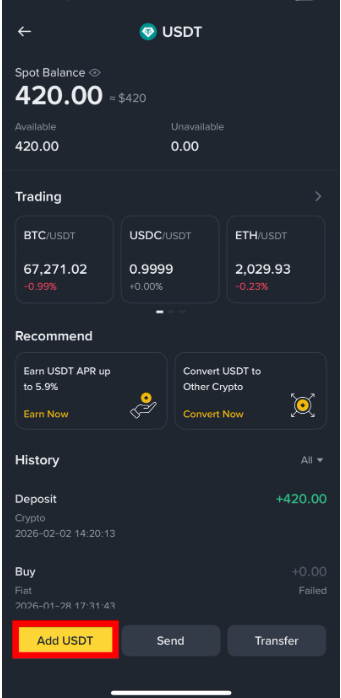
Tap the yellow button near the bottom, [Add USDT].
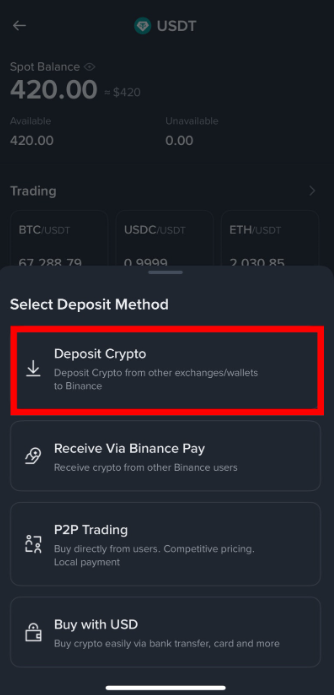
Select the first option, [Deposit Crypto], to continue. (to receive funds from another exchange or wallet)
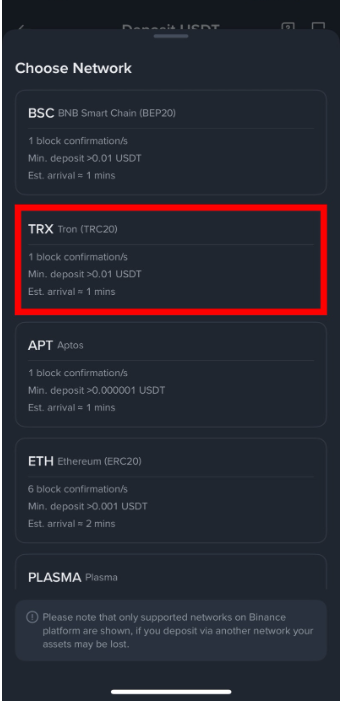
In the network list, select TRX · Tron (TRC20). This is the same network as Tron, which you will select on Upbit.
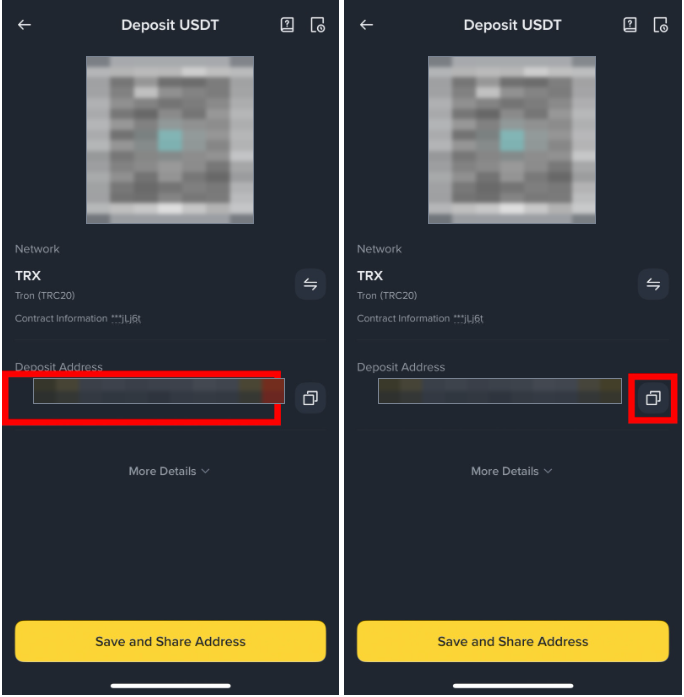
Copy the displayed Deposit Address using the copy icon on its right. Do not type the address manually — even a single incorrect character can result in lost assets.
C-3
Withdraw from Binance to your NOVA walletUse the address copied in section ② Deposit request · 9 illustrated steps
▾
① Always copy and paste the address. Do not type it manually.
② Check that the recipient uses TRC20. Sending through another network can make recovery impossible.
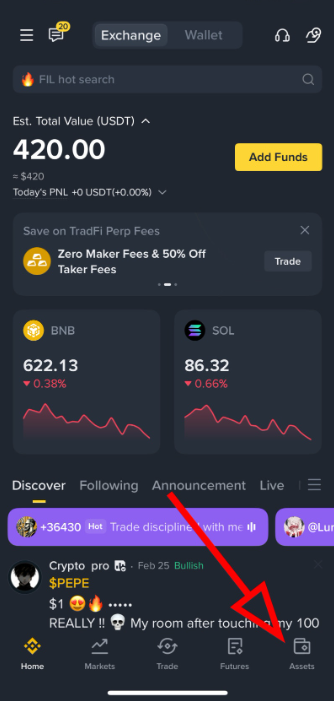
In the lower-right corner of the Binance app, tap [Assets].
Below your holdings, tap [Send]. (Transfer moves funds between Binance's internal wallets and is a different function)
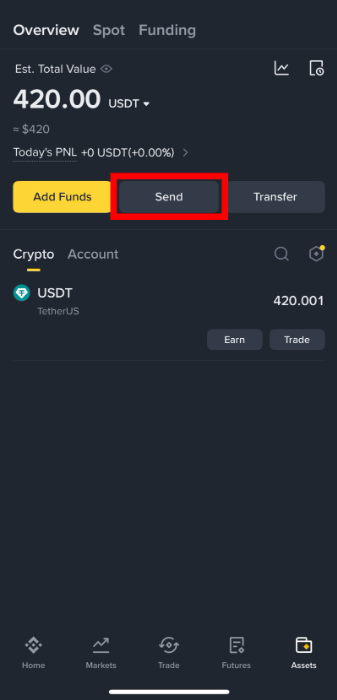
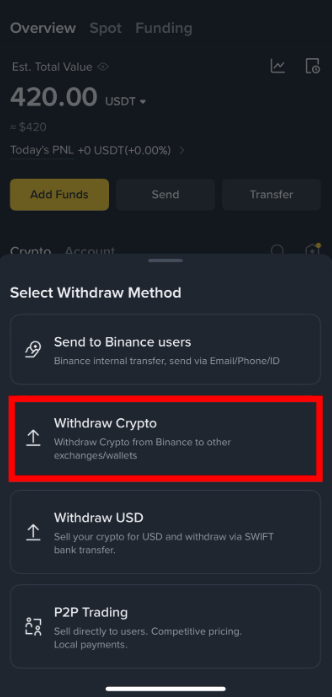
Select [Withdraw Crypto] to send to another exchange or wallet.
| On-screen label | When to use it |
|---|---|
| Send to Binance users | When the recipient is another Binance user (send by email or phone number) |
| Withdraw Crypto | To send to another exchange or wallet — Select this |
| Withdraw USD | To sell crypto and send USD to a bank |
| P2P Trading | To sell through peer-to-peer trading |
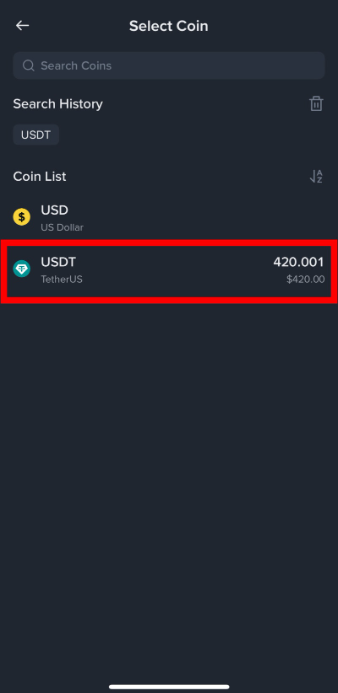
In the coin list, select USDT. Your holdings appear beside it.
Complete Address, Network, and Withdrawal Amount. The yellow notice at the top states the requirements for transfers to Korean exchanges.
In other words, only accounts in your own name can be used. If the details differ, the receiving exchange may not process the deposit.
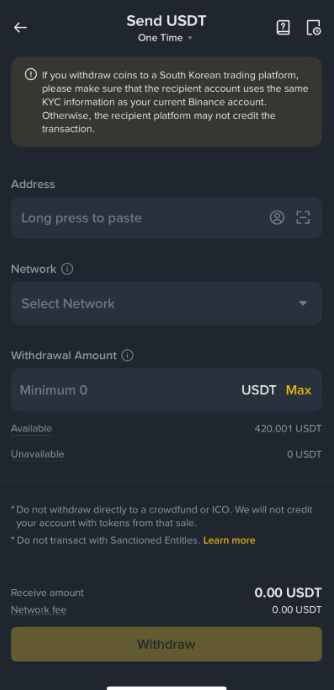
Press and hold the Address field to paste the address (Long press to paste). After pasting, compare the first 4 and last 4 characters with the recipient's address.
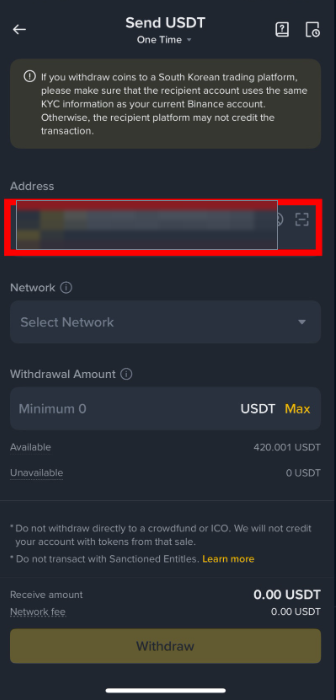
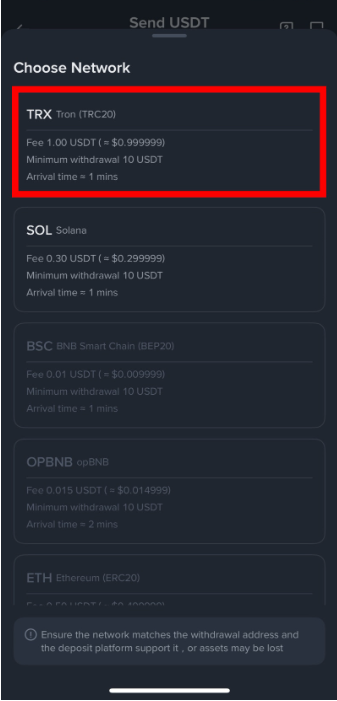
In the network list, select TRX · Tron (TRC20) to continue. It must match the network specified by the recipient.
| Network | Fee | Minimum withdrawal |
|---|---|---|
| TRX (TRC20) | 1.00 USDT | 10 USDT |
| SOL | 0.30 USDT | 10 USDT |
| BSC (BEP20) | 0.01 USDT | 10 USDT |
| ETH (ERC20) | High | 10 USDT |
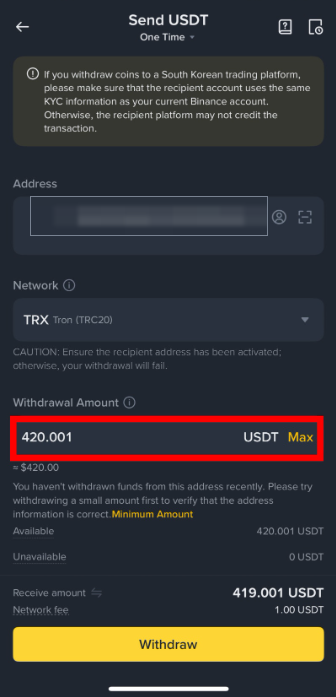
The Receive amount is the amount that actually arrives in the NOVA wallet after deducting a fee of 1 USDT. For automatic identification, Receive amount must match the amount to send from section ② exactly, including decimal places. Therefore, enter Amount to send + 1 USDT as the withdrawal amount. Do not tap [Max].
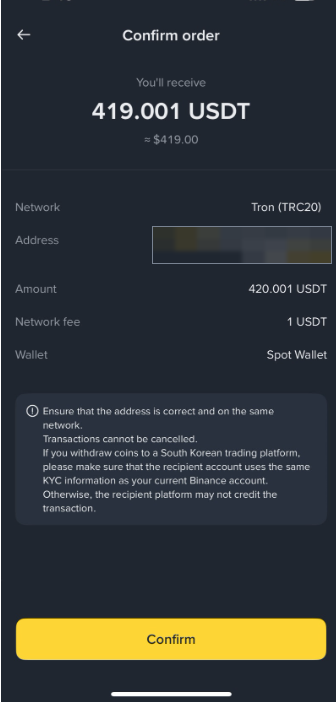
Received amount · Network · Address must be checked one last time before tapping [Confirm]. You may then be asked for email, SMS, or 2FA verification codes.
TRC20 usually takes 1–5 minutes to arrive. Return to NOVA and tap [Transfer complete] in section ⑥. If it is still unconfirmed after 10 minutes, open Binance's Withdrawal History, copy the TxID (transaction ID), and give it to customer support. The TxID allows the transfer to be traced.
Return to NOVA and select [Transfer complete]
4-1
Deposit confirmation → CreditBlockchain verification followed by final administrator confirmation
▾
- After sending the Tether, return to the NOVA deposit screen and tap [Transfer complete](or, depending on the screen, [Request complete — Confirm deposit]) and wait.
- When the blockchain confirms a deposit matching the amount to send, final administrator confirmation credits your E-Wallet or MT4 account. Check the Deposit history below the deposit screen for the processing status.
- If still unconfirmed after 10 minutes — From the sender's transfer history (Binance or the market), copy the TxID and send it to customer support on Telegram. With a TxID, a transfer with a different amount or a request cancelled after 2 hours can also be reviewed manually.
Frequently asked questions
Can I pay exactly KRW 3 million through BaroPay?
Must I select Transfer complete after a BaroPay payment?
Can I send Ethereum USDT directly from MetaMask?
My deposit request was cancelled (2 hours)
I sent a different amount from the amount shown
My Gift Flow Market registration has not been approved
Which bank account is required for Bithumb?
A P2P seller asks me to send to another account
The crypto withdrawal button is unavailable
(Upbit) I cannot register my Kbank account
My crypto has not arrived at Binance
My withdrawal was rejected
What is Binance's withdrawal fee?
Is there a faster way to send?
MetaMask - TRON Deposit Guide
How to send USDT on TRON (TRC20) to NOVA. The images below are purpose-made illustrations.
Do not send ERC20 USDT to NOVA's TRC20 address. Upbit's MetaMask personal-wallet registration applies to EVM networks; do not assume a MetaMask TRON address can be registered for Upbit withdrawals. To obtain USDT through an exchange, see the Upbit / Bithumb → Binance Guide and compare the withdrawal service's supported network with your own wallet address.
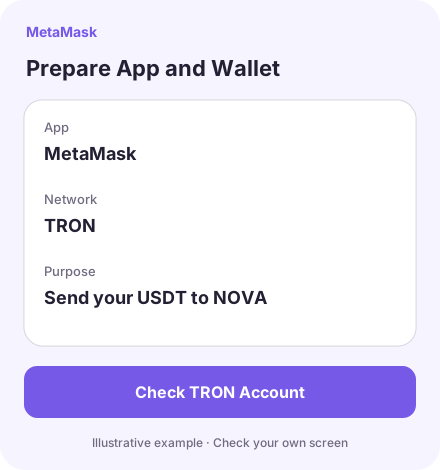
1Prepare the Official App and WalletSTEP 01▾
Open MetaMask installed from its official website and prepare your wallet. Keep your recovery phrase private; do not send it to NOVA or anyone else. Official MetaMask Website
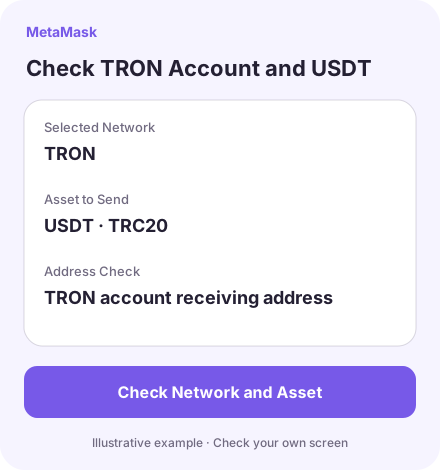
2Check Your TRON Account and USDTSTEP 02▾
On the assets screen, check USDT on the TRON network. USDT on Ethereum (ERC20) is a separate asset. Changing the displayed network does not move your coins.
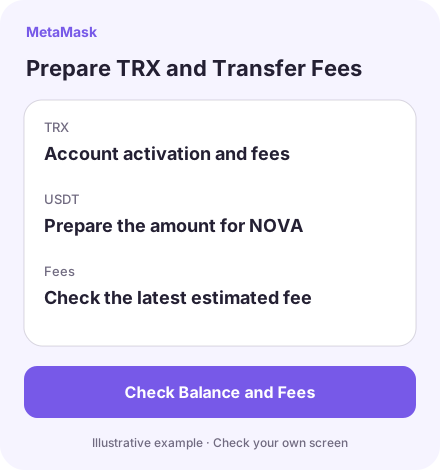
3Prepare TRX and Transfer FeesSTEP 03▾
A new TRON account must receive a small amount of TRX to activate. Receiving USDT alone does not activate it. Ensure you have the resources or TRX balance needed to send USDT, and check the fees on the actual transfer screen.
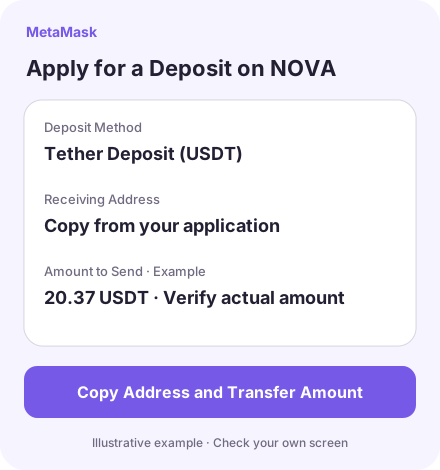
4Apply for a Deposit on NOVASTEP 04▾
On NOVA, open Finance → Deposit → Tether Deposit (USDT) to submit an application. Then copy the TRC20 address and Amount to Send from your own application screen. Check every decimal digit and the application's expiry time.
5Enter the Receiving Address and AmountSTEP 05▾
In MetaMask, select USDT on TRON and choose Send. Paste the NOVA address and enter exactly the specified amount. Before sending, recheck the full address, TRON network, USDT, quantity and fees.
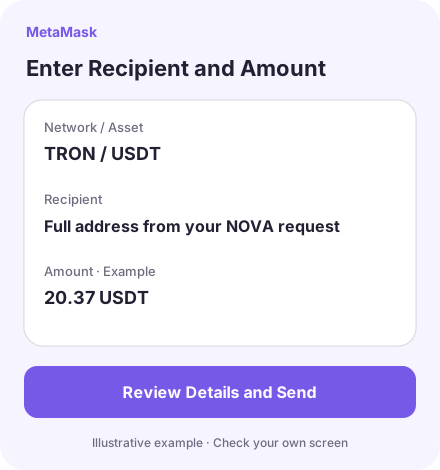
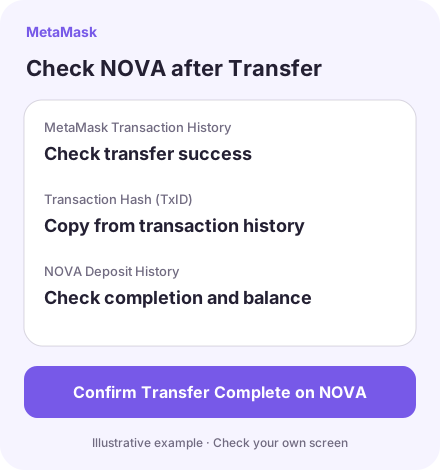
6Check NOVA after the TransferSTEP 06▾
In MetaMask's transaction history, check the transfer's success status and transaction hash (TxID). Return to NOVA and select Transfer Complete, then check that Deposit History shows completion and that your balance is credited. If it is not, contact customer support with the application details and TxID.
Official References: MetaMask TRON Guide · Personal Wallets Supported by Upbit
Checked: 2026.09.17
BaroPay Deposit Guide
Apply for a KRW deposit on NOVA, purchase and transfer through BaroPay, then check that NOVA has credited your account.
1Apply for a KRW Deposit on NOVASTEP 01▾
On NOVA, open Finance → Deposit → P2P Deposit (BaroPay) to select the KRW amount and deposit destination and submit your application. The maximum is KRW 3,000,000 per transaction; amounts above KRW 3,000,000 are not accepted. Check the payment amount on the application screen and select Proceed to BaroPay Payment.
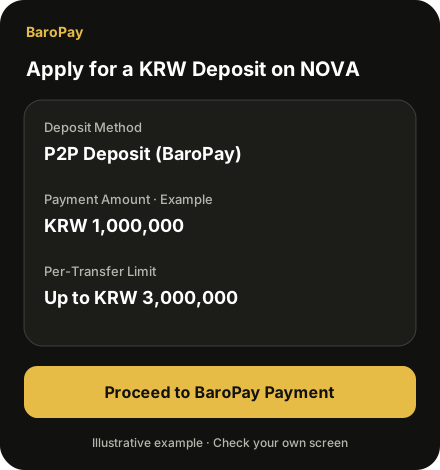
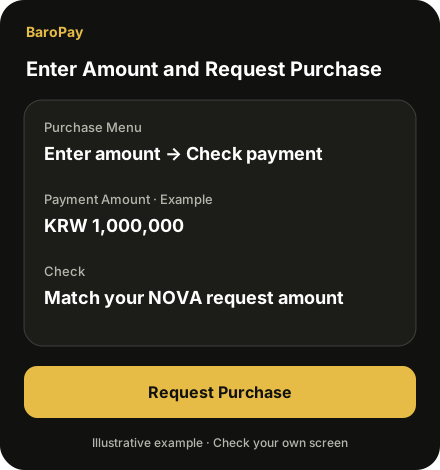
2Enter the Quantity and Apply to PurchaseSTEP 02▾
Register or log in to BaroPay, then open the purchase menu. Ensure the payment amount matches your NOVA application by checking the quantity before applying to purchase. Use the coin price and converted amount on the actual application screen. The amounts below are illustrative examples.
3Wait for Seller MatchingSTEP 03▾
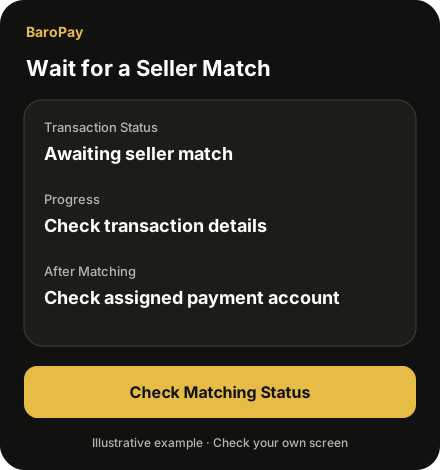
After submitting a purchase application, wait for a seller match. Once matched, check the payment instructions in the transaction details. Do not submit a duplicate application for the same transaction while waiting.
4Transfer the Exact Amount to the Displayed AccountSTEP 04▾
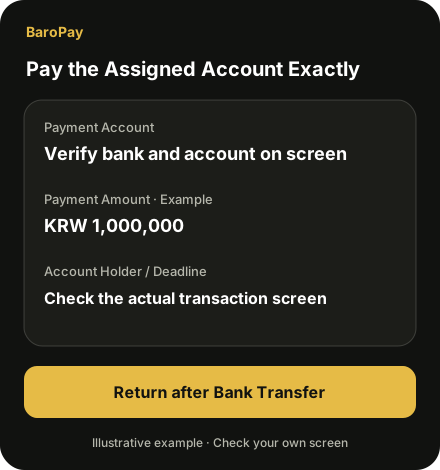
Check the bank, account number and account holder displayed for the matched transaction. Transfer from an account in your own name, for the exact specified amount, within the displayed deadline. Your registered name on BaroPay must also match your legal name registered with NOVA.
5Notify That Your Transfer Is CompleteSTEP 05▾
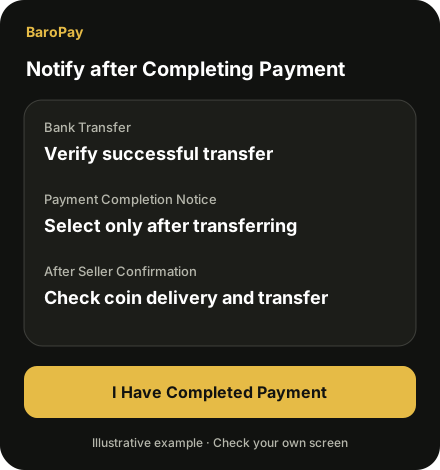
After completing the bank transfer, select BaroPay's I Have Completed the Transfer. The seller releases the coins after confirming payment. Check the release status and transfer details in the transaction record.
6Check NOVA's Automatic CreditingSTEP 06▾
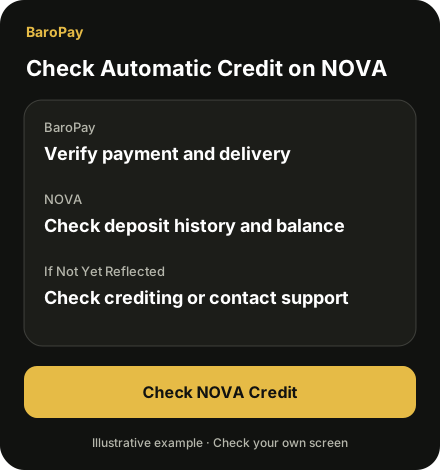
Return to NOVA and check Deposit History and your balance. The deposit is credited automatically after BaroPay's payment notification is confirmed. If it is not reflected after a few minutes, select Check Crediting or contact customer support. Verify both completion of the BaroPay transaction and crediting to NOVA.
Direct USDT Deposit - Ethereum
How to send USDT (ERC20) from MetaMask or your own wallet that supports Ethereum withdrawals.
Automatic deposit confirmation currently supports TRC20 only. Before sending ERC20 USDT, confirm acceptance and the crediting procedure with customer support.
ERC20 Direct Deposit Address
0x7DEe878e6497477afFF5aDAccD76013442eCb9D7Ethereum network only. Do not send through TRON, BNB Smart Chain, Base or any other network.1Prepare USDT on EthereumERC20 · STEP 01▾
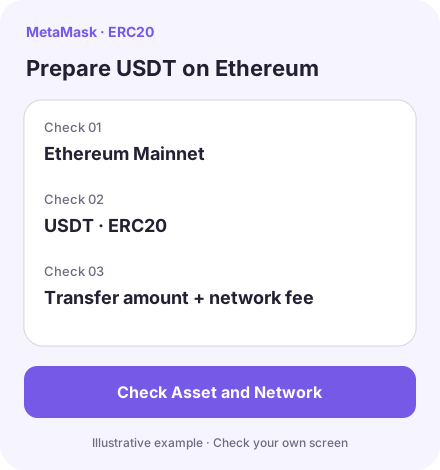
In MetaMask, select Ethereum Mainnet and USDT. In addition to the transfer amount, prepare the network fees and check the estimated fee and payment asset on the actual review screen. Do not use USDT on another network for this method.
2Confirm ERC20 Deposit AcceptanceERC20 · STEP 02▾
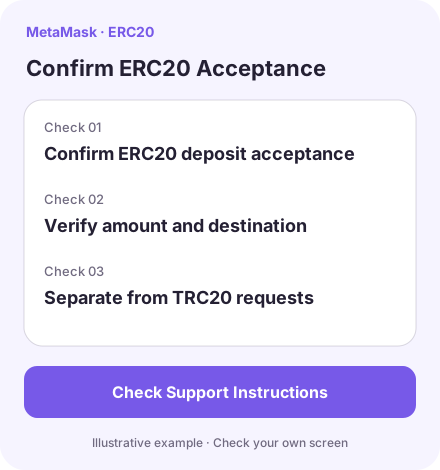
NOVA's current automatic deposit confirmation is for TRC20. Before sending, confirm ERC20 deposit acceptance and the crediting procedure with customer support, and record the confirmed amount and destination. Do not use the address or unique decimal amount from an existing TRC20 application for this method.
3Copy the Address and Review the TransferERC20 · STEP 03▾
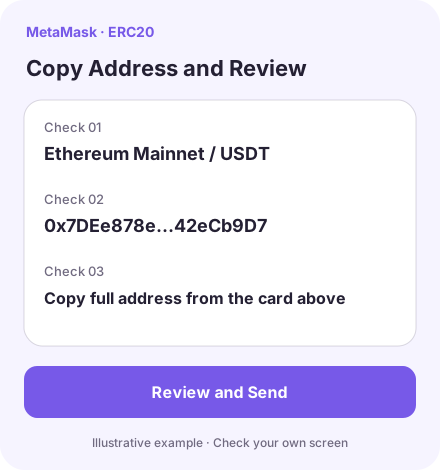
Copy the ERC20 address from the address card above. In MetaMask's USDT Send screen, paste the address and enter the quantity confirmed by customer support. Before sending, check Ethereum Mainnet, USDT, the full address, quantity and fees.
4Check the TxID and Crediting ResultERC20 · STEP 04▾
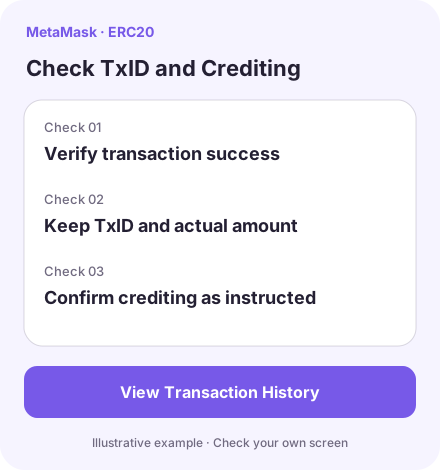
In MetaMask's transaction history, check the success status and TxID. Follow the acceptance instructions to send your NOVA username, quantity and TxID to customer support, then check the crediting result. ERC20 transfers are not confirmed automatically by the existing TRC20 Transfer Complete button.
Official References: Sending Tokens with MetaMask - Checked 2026.09.17
MetaMask TRON (TRC20) Guide →